background image


WIFI/MESH  


CONFIGURATION MOBILE MESH HOW-TO 
 

Configure Wireless Settings 


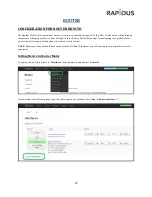
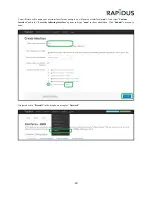
To getting started on configuring a Mobile Mesh network, begin by Clicking on Network > Wireless.  


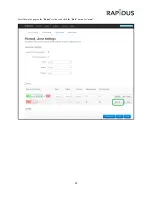
Click the “Edit” button for the radio that you choose to be used for the Mobile Mesh 


Summary of Contents for RL series

Page 1: ...1 Revision 3 Firmware RL k r3 Date April 12 2017 RAPIDUS WIRELESS NETWORKS RAPIDUS WIRELESS RL SERIES USER GUIDE COVERS INDOOR AND OUTDOOR SERIES MODELS Rafael Garrigo 5 8 2017 ...

Page 2: ... available on our web site www rapiduswireless com About Rapidus Wireless Networks The company s dedication to customer satisfaction provides comprehensive solutions with superior products Whether you are in the market for connectors or a complete network of high speed wireless access points or mesh products Rapidus is the answer With over 75 years of combined experience in the wireless field our ...

Page 3: ...3 Contents QUICK START 4 WIFI MESH 6 ACCESS POINT 12 CLIENT STATIONS 14 UPGRADE 16 ROUTER 19 ...

Page 4: ...ing to the device radio Before accessing the configuration interface you have to change the network connection setting in your computer to be on the same subnet as the device radio Alternatively you could use the RapiFind Utility program to assign the device radio a temporary IP alias that is on the same subnet as your computer Changing the IP address Windows 8 1 In your computer open Control Pane...

Page 5: ...54 6 Click OK and Close Step 5 Configuration of RL Series device features and option are accessible via the web page 1 Open your internet browser such as Internet Explorer Chrome or Firefox 2 In the address bar type your IP address default IP 192 168 1 99 3 In the login dialog enter your Username and Password default Username Root no Password is required 4 Click OK you will then access the configu...

Page 6: ...N MOBILE MESH HOW TO Configure Wireless Settings To getting started on configuring a Mobile Mesh network begin by Clicking on Network Wireless Click the Edit button for the radio that you choose to be used for the Mobile Mesh ...

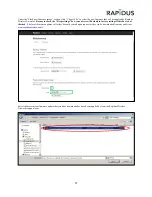
Page 7: ...tup Tab Select the channel that you will be operating on and choose between 20MHz 40MHz or 80Mhz In the Interface Configuration General Setup Tab Change your ESSID name to your preference and select Mobile Mesh from the Mode dropdown options ...

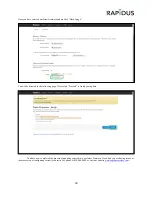
Page 8: ...8 In the Network section you must unselect Lan Select mesh then click Save Apply to save these changes ...

Page 9: ...9 Click Network Interface When directed to the Interfaces page click Edit ...

Page 10: ...10 Please click on the Physical Setting Tab Then Select Ethernet Adapter bat0 Then save and apply by clicking Save Apply ...

Page 11: ...e devices need to be configured to MESH mode setting for you to be able to see them under Associated Stations You have now completed the process of creating your Mobile Mesh Network setup and can continue to configure more units to your network If you find you are having issues you can contact us by phone at 855 864 9488 or visit our website www rapiduswireless com ...

Page 12: ... show you how to set up and configure an AP on your desired radio unit To begin configuring your AP please go to the Network Tab and select Wireless from the pull down tab You will be directed to the following page once here click Edit on the radio you are configuring to be your AP ...

Page 13: ... down Best practice select a higher channel to avoid interfering with other networks Create your own ESSID name that you will use for your AP Be sure that the Mode is set to Access Point Click Save Apply to save your settings You have now completed the process of creating your AP If you find you are having issues or the process is not configuring correctly please contact us by phone at 855 864 948...

Page 14: ... get started login to your device and select Wireless from the drop down Network tab From here you will select the radio for which you will be using for your Client station The radio you choose here will depend on which radio you have chosen to make as your AP Be sure when choosing which radio to use for your Client station that it is on the same frequency as the radio you configured for your AP d...

Page 15: ... in the same ESSID name as you used for the AP that you want to connect to ei if your AP ESSID is Sample1 then your Client station ESSID must be Sample1 You must also change the Mode to Client WDS in the drop down menu Be sure to click Save Apply before you leave this page Note ESSID is case sensitive You have now completed the step for setting up a Client station If you find you are having issues...

Page 16: ...dating upgrading your current firmware to the latest released firmware supported by Rapidus Wireless Networks This manual shows the process on how to update the firmware on your device To begin your firmware update please go System Maintenance You will be directed to the following page ...

Page 17: ...eep settings box your device will default to factory settings if this box is not checked The latest firmware updates will either be sent by email upon request or they can be downloaded from our website at www rapiduswireless com Select the most current firmware update that you have downloaded or have been supplied by from the Rapidus Wireless Networks support team ...

Page 18: ...e following page Please click Proceed to finish your update You have now completed the process of updating your radio to our latest firmware If you find you are having issues or the process is not configuring correctly contact us by phone at 855 864 9488 or visit our website www rapiduswireless com ...

Page 19: ...configuring your product are for devices that are already in default mode or have been reset to default NOTE Before you start you should have a plan outlined of which IP addresses you will be using in your network to be set for your router Setting Device to Router Mode To begin you must first navigate to Interfaces in the drop down menu under Network Once directed to the following page you will ne...

Page 20: ...e for our example we will name our interface wan And select Custom Interface under the Cover the following interface options and type none in the available box Click Submit once you re done Navigate back to Firewall in the drop down menu for Network ...

Page 21: ...21 Scroll down the page to the Zones sections and click the Edit button for wan ...

Page 22: ...nge the settings for Forward to accept as well Scroll down the page under Inter Zone Forwarding select Lan for both Allow forward to destination zones and Allow forward from destination source zones Click Save Apply once you have made these changes and before you move away from this page ...

Page 23: ...ate back to the Interface page by clicking Interfaces in the drop down menu of Network When you arrive at the Interfaces page under Interfaces Overview click Edit for the WAN interface to edit the network zone ...

Page 24: ...24 Under the General Setup tab for Common Configuration change the Protocol option to Static Address and click Switch protocol ...

Page 25: ...sk gateway and DNS server addresses that you will be using to for your network Click Save once done Refer to your IP address outlined plan for your required needs as to which IP addresses to use to connect back to your network ...

Page 26: ...sical Settings tab under Common Configuration In the Physical Settings tab select Bridge Interfaces and for the Interface options select both Ethernet Adapter eth0 and eth1 Then unselect Ethernet Adapter none and click Save ...

Page 27: ...page click the LAN tab to edit the network zone for LAN Edit the addresses under the General Setup tab Refer to your IP address outline plan for your required needs as to which IP addresses you will use for your networking ...

Page 28: ...28 Unselect Ignore interface to enable DHCP And click Save Scroll back up the page and click the Physical Settings tab ...

Page 29: ...29 In the Physical Settings tab under the Interface options unselect both Ethernet Adapter eth0 and eth1 Once you have done so click Save Apply ...

Page 30: ... Reboot from the drop down menu of the System tab at the top of the page Your device is now configured to operate in router mode If you find you are having issues or the process is not configuring correctly contact us by phone at 855 864 9488 or visit our website www rapiduswireless com ...

Reviews: