background image

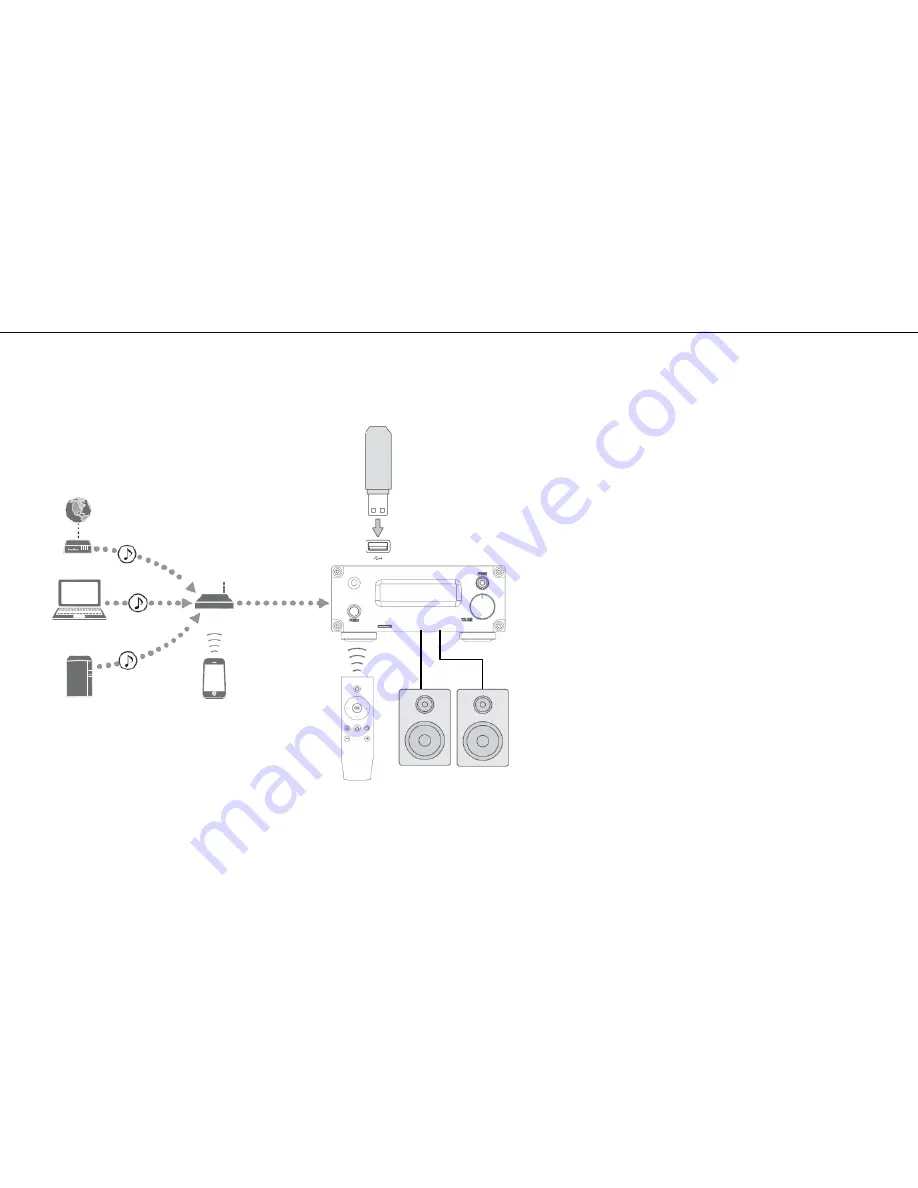
What you can do with this unit (Network Audio)


• This unit  as a player with built-in amplifier, can be used not only for USB storage playback but also as a network player. 
   You can play from a media server (PC,NAS,etc.) on the same network or connect to an AirPlay / DLNA device. 
   In addition, Internet radio and streaming service can be received in an environment connected to the Internet. 

Playback the Internet radio and Spotify etc. streaming 

Play back music files stored on your PC (support Roon bridge) 

Play back music files stored on your NAS 

Play back your mobile with AirPlay or dlna connect 

Play back music in an USB device 

You can operate this unit on the PC 

You can operate this unit on the Mobile phone 

If it is easy operation you can do it from the remote control 


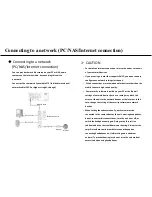
①Internet 

②⑥PC 

③NAS 

Broadband router 

④⑦Mobile phone 

(AirPlay or DLNA) 

Modem 

⑧Remote control 

⑤ 

USB flash drive 

USB hard disk drive 

Speakers 

Note 

If you use streaming services such as Spotify, you will need to subscribe to the service (charged) by yourself. 

Summary of Contents for MF-1

Page 1: ...Network audio system built in amplifier OWNER S MANUAL ...

Page 2: ...triangle is intended to alert you to the presence of uninsulated dangerous voltage within the product s enclosure that may be of sufficient magnitude to constitute a risk of electric shock to persons The exclamation point within an equilateral triangle is intended to alert you to the presence of important operating and maintenance servicing instructions in the literature accompanying the appliance...

Page 3: ...minimum distance 20cm between the radiator and your body Declaration Of Conformity Hereby Machine Technology SZ Co Ltd Declares that this RAPNAS MF 1 is in compliance with the essential requirements and other relevant provisions of Directive 2014 53 EU IC warning statements This device complies with Industry Canada s license exempt RSSs Operation is subject to the following two conditions 1 This d...

Page 4: ...17 Before moving this unit press A to set it to standby mode and disconnect the AC power plug from the wall outlet 18 Condensation will form when the surrounding temperature changes suddenly Disconnect the power cable from the outlet then leave this unit alone 19 When using this unit for a long time this unit may become warm Turn the power off then leave this unit alone for cooling 20 Install this...

Page 5: ...net connection 17 Basic connection of this unit 18 Stand by before use 19 Power ON 20 Mode and initial display of DAC 21 Front panel OLED display page1 22 Front panel OLED display page2 23 Front panel OLED display page3 24 Front panel OLED display exception 25 Launch Web UI 26 Volumio Web UI 27 Queue screen function 28 Select storage 29 Playback LR Stereo Test 30 Playback from USB storage 31 DSD N...

Page 6: ...adio and Spotify etc streaming Play back music files stored on your PC support Roon bridge Play back music files stored on your NAS Play back your mobile with AirPlay or dlna connect Play back music in an USB device You can operate this unit on the PC You can operate this unit on the Mobile phone If it is easy operation you can do it from the remote control Internet PC NAS Broadband router Mobile ...

Page 7: ... an external digital SPDIF device Playback music in an external analog device With this use method only the reboot of this unit and the power off and digital volume up down can be operated with the remote control Remote control AUX IN Speakers SPDIF IN Note In case of digital SPDIF input you can use digital volume of DAC digital volume can not be used with analog input ...

Page 8: ...s unit USB DAC This unit can be used as a USB DAC by connecting PC with a USB conversion cable B and C Support foobar2000 Support JRiver Media Center Support Audirvana Plus USB conversion cable B Speaker USB conversion cable C ...

Page 9: ...unit is described mainly using the WindowsPC and remote control iOS and Android mobile devices are collectively referred to as mobile devices Supplied accessories About this manual CD ROM MicroSD card Backup image file Owner s manual PDF file Micro SD card volumio2 based rapnas distribution USB conversion cable A USB conversion cable B Power cable Remote control USB conversion cable C AAA battery ...

Page 10: ...r If the distance required between the remote and the main unit decreases or if the unit stops responding to the remote buttons replace both batteries with new ones Dispose of the used batteries according to the instructions on them or requirements set by your local municipality 30 30 About 6 meters Operation range Aim the remote control directly at the remote control sensor on the main unit durin...

Page 11: ... I Reboot selection button J Volume down button 2 K Volume up button 2 1 Pressing the I button first pressing this button shifts the system to power off Pressing the J button first pressing this button shifts the system to reboot 2 With these buttons you can raise or lower the DAC s digital volume display volume value It has nothing to do with amp volume at the latter stage A F C D B G H E I K J F...

Page 12: ...ont Power Switch microSD card slot Pre Amplifier Volume knob Headphones jack 3 5mm stereo mini plug Front panel OLED display Remote control sensor Familiarize yourself with all parts and these functions Front panel ...

Page 13: ...A 4 DC5V OUT micro USB B Power supply AC 100 120V or AC200 240V Exhaust port 1 Speaker terminal SPDIF Digital IN RCA coaxial plug AUX Analog IN 3 5mm stereo mini plug Exhaust port 2 DAC Analog OUT 3 5mm stereo mini plug Rear panel Familiarize yourself with all parts and these functions ...

Page 14: ...oSD card read or write indicator DC5V IN For special use microUSB B HDMI TYPE A Video and audio output 3 5mm 4section mini plug Video and audio output Exhaust port 3 Side panel Familiarize yourself with all parts and these functions ...

Page 15: ...e speaker cable is marked to distinguish it from the wire of the cable Connect the marked wire to the red terminal and the unmarked wire to the black terminal If the exposed core wires at the tips of the speaker cables should touch other cables or terminals an electrical short might occur Never allow speaker cables to cause a short To prevent hum and noise avoid bundling the cables together with t...

Page 16: ...g Always set the amplifier volume to minimum before connecting and unconnecting headphones on Left rotating end is minimum volume To prevent hearing loss do not raise the volume level excessively when using headphones PHONES jack This headphone amp circuit uses a three pole connector with Common left and right for grounding Ordinary 3 5mm stereo mini plugs with 3 poles can be used Left rotating en...

Page 17: ... the subnet manually each server must be connected to the same subnet as the unit wearing headphones do not connect or disconnect them turn the unit on or off or switch the headphone amp gain Doing so could result in a sudden loud noise that could harm your hearing Always set the amplifier volume to minimum before connecting and un connecting headphones on Left rotating end is minimum volume To pr...

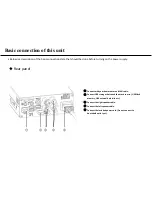
Page 18: ... music source USB flash memory USB external hard disk etc Connect the right speaker cable Connect the left speaker cable Connect the Included power cord Do not connect to household outlet yet Below is a description of the basic connection state that should be done before turning on the power supply Rear panel ...

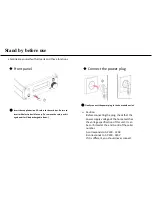
Page 19: ...rt with electrode slit face up To remove the card push it again and it will be discharged in front Connect the power plug Caution Before connecting the plug check that the power supply voltage of the home matches the voltage specification of this unit It can be confirmed at the end A or B of the serial number A corresponds to AC 100 120V B corresponds to AC 200 240V If it is different you should n...

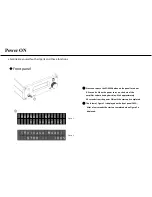
Page 20: ...glows blue Wait approximately 40 seconds from the power ON until the startup is completed The letter of Figure 1 is displayed on the front panel OLED After a few seconds the start up completed when Figure 2 is displayed Familiarize yourself with all parts and these functions Front panel R A P N A S M F 1 b y V o l u m i o 2 Figure 1 Figure 2 ...

Page 21: ...are connected by conversion cable B And the output device setting of the volumio playback option described later is RAPNAS USB audio 2 0 OLED display status is Figure2 It is a mode that USB DAC is preferentially used in volumio Playback of PCM and DSD Native sound source Is possible I2S DAC Mode As shown in Figure5 DAC IN and USB port are connected by conversion cable B And the output device setti...

Page 22: ...DSD512 DoP 2 Support DSD64 DSD256 DSD 3 Support DSD64 DSD256 SPDIF Support 44 1KHz 192KHz X XX X XX or X XX X XX When volumio playing music from the queue that time is displayed When the middle mark is During playback When the middle mark is Paused Left term is playing time right term is ending time LINK When playing from other than the queue will be displayed Current value of DAC digital volume 0...

Page 23: ...t world standard time will be displayed Since the date and time information is acquired from the Internet correct date and time will not be displayed if you are not connected to the Internet While playing from volumio s queue artist and title information will be displayed If there is more than 16 letters of information it will be scrolled When playing from other than the queue the date and time wi...

Page 24: ...uality by stopping the display program Wireless LAN connection IP address However if the IP address is 192 168 211 1 it means that it is functioning as an access point If there is no connection no connection is displayed T u r n o f f d i s p l a y a f t e r 3 s e c o n d s N o w R e b o o t S e t e t h 0 t o D H C P Page3 option2 Option2 When rebooting from the remote control or volumio Web UI wh...

Page 25: ...not return to normal display even after 1 minute or more you need to restart or turn off the power once C o n n e c t i o n f a i l s w a i t i n g r e t r y S h u t d o w n d u e t o h i g h t e m p e r a t u r e Exception 2 Exception 2 When the CPU temperature reaches 75 it is a display that the system automatically shifts to shut down When turning on the power supply again must be wait until th...

Page 26: ... also on low power PCs notebooks or thin clients By flashing installing Volumio on any of this platforms it will then become an headless Audiophile Music Player Headless means that the only way to control it will be with another Mobile phone computer or tablet This is made possible by Volumio s UI a web applications that runs on any device with a browser and that allows an easy and intuitive contr...

Page 27: ...c waiting for playback Click to From left to right Decrease the volume Mute Increase volume Click to display setting menu Click to display Add conditions to the source being played Displays source information during playback or standby Click to play start stop previous and next Displays source output type and playback time Display DAC digital volume rate ...

Page 28: ...before the next section Note Emptying the queue makes it impossible to demonstrate playback by the method in the Quick Guide in another booklet Click on to delete the song from the queue Click the icon to function From left icon to Random play Repeat playback Save to Playlist Empty the queue It plays downward from the clicked song Click the trash can icon ...

Page 29: ...Select storage Click Music Library Click browse at the bottom left of the screen Click INTERNAL INTERNAL is a storage location in micro SD card Two demo songs will be displayed ...

Page 30: ...yback is started Add to Playlist Save the title to an arbitrary Playlist name 1 Add to Favorite Save the title to an favorites 1 1 The saved title can be selected from the Browse screen on the previous page When you click the at the right end of the title LR Channel And Phase the menu is displayed Here we select Add to queue When you return to the queue screen a title has been added Click the titl...

Page 31: ...form the same operation as page20 Select storage Click USB The distinguished name of the connected USB storage is displayed Click the USB name you want to play The folder name or file name are displayed according to the directory structure in the USB storage You can directly click on the desired folder or file or add it to the queue and play it File name song title Folder name or Album name ...

Page 32: ...layback of DSD in Volumio two preparations are required beforehand Work should be done with playback stopped USB conversion cable B Connect the rear panel DAC IN and USB expansion port with the included USB conversion cable B U S B D A C M o d e S T O P 1 0 0 Afterwards it is only selecting and playing the sound source of DSD format with volumio During DSD playback the OLDE will display as shown b...

Page 33: ...er right corner of the UI screen By default Output Device is RAPNAS I 2 S DAC Click USB RAPNAS USB DAC and select it Click to open the menu for the device Click Save to save your settings When the Configuration update message is displayed at the upper right of the screen saving is completed ...

Page 34: ...grated Amplifier Or you can connect with stereo mini plug cable Sold separately with headphone jack of mobile phone or portable player When the stereo mini plug is inserted in the AUX IN of this unit the internal DAC and the amplifier are disconnected in this case it becomes independent of the operation of volumio CD player etc mobile phone portable player etc ...

Page 35: ...rately you can connect the DAC analog output of this unit with an external amplifier or active speaker When the stereo mini plug is inserted in the DAC OUT of this unit the DAC and the internal amplifier are disconnected Amplifier and speaker Active speaker ...

Page 36: ...e iPod touch iPad or iTunes can be played on this unit via the network Playing songs from iPhone iPod touch or iPad Select volumio for the speaker device to use Install iTunes 10 or later on a Mac or Windows PC that is connected to the same network as this unit Start iTunes and click the AirPlay icon to select the volumio Playing iTunes music with this unit Choose a song and click play in iTunes T...

Page 37: ...D player with a coaxial digital output terminal by coaxial cable Sold separately and this unit can be used as an Integrated Amplifier In this case you need to select RAPNAS I2S DAC in advance as the Output Device of the volumio playback option setting CD player etc ...

Page 38: ... by default As shown in the figure on the left when connected to a personal computer and this unit is used as an external USB DAC the OLED being played back will be displayed as shown below D S D 3 5 6 4 M H z L I N K 1 0 0 P C M 3 9 6 0 K H z L I N K 1 0 0 During PCM playback During DSD playback In reproduction of the DSD of this connection the output from the personal computer is the DoP format ...

Page 39: ...m using this unit PCs and NAS are regarded as Digital Media Server DMS Digital Media Controller DMC is a device to control digital contents The dedicated mobile device application corresponds to Digital Media Controller DMC for the system using this unit Digital Media Renderer DMR is a device to receive instructions from Digital Media Controller DMC and play back digital contents such as this unit...

Page 40: ... UI Click the gear icon at the top right of the screen Click Shutdown from the side menu Click Restart to system reboot A I Press the button I on the remote control then press A to reboot the system Reboot display N o w R e b o o t p l e a s e w a i t When rebooting is started Figure1 is displayed on the display It disappears After about 1 minute the restartup is completed ...

Page 41: ...power off Power off display When rebooting is started Figure1 is displayed on the display It disappears After about 10 seconds the backlight of the volume knob goes off and the power off is completed A H N o w S h u t d o w n s e e y o u n e x t Method 2 power button Press and hold the power button for about 3 seconds and release the button immediately when figure figure1 is displayed on the displ...

Page 42: ...he button is released the backlight of the volume knob goes out and the power turns off When normal power off can not be done for some reason forcibly Means for shutting down the system Caution The forced power off function has the risk of damaging the system file depending on its execution timing ACTION LED MicroSD card read or write indicator ...

Page 43: ...Appearance dimension Unit mm ...

Page 44: ...m throughput 300Mbps Wireless network 2 4GHz and 5GHz IEEE 802 11 b g n ac wireless LAN Bluetooth Bluetooth 4 2 BLE Main Amplifier Maximum output 47W 47W 1 THD N 4Ω 23W 23W 1 THD N 8Ω Allowable speaker impedance 4Ω 8Ω Frequency response 20Hz 20kHz 0 5dB 10Hz 80kHz 3dB Dynamic range 110dB S N ratio 115dB THD N 0 003 1kHz 8Ω 1W Pre Headphone Amplifier AUX IN Input level 2 1Vrms 3 5mm 3 pole stereo m...

Page 45: ...M 44 1KHz 768KHz DSD DoP is up to DSD256 Native is up to DSD512 SPDIF PCM 44 1KHz 192KHz volumio2 Distribution Supported audio format WMA MP3 MP2 WAV AAC FLAC ALAC AIFF DFF DSF Media service Support Airplay Support DLNA Ver 1 5 Power supply Input power supply Serial partition A AC100 120V 50 60Hz Serial partition B AC220 240V 50 60Hz Power consumption 130W DC output USB Micro B 5V 5 Maximum allowa...

Page 46: ...o Ltd Post code 518101 Address West side 2F Block 1 Yin jin industry building Liu xian 3rdroad Bao an xin an 71 district Shen zhen city Guang dong province China Phone 86 755 2784 7182 Model name RAPNAS MF 1 Printed in China ...

Reviews: