Chapter 12: Remote Authentication
195
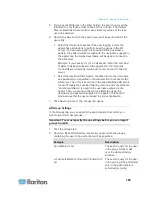
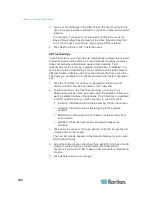
Editing an AD Module
Once you have configured AD modules, you can edit them at any time.
To edit an AD module:
1. Choose Administration > Security.
2. Click the Authentication tab. All configured external Authorization
and Authentication Servers appear in a table.
3. Select the AD module you want edit, and then click Edit.
4. Click each tab in the Edit Module window to view the configured
settings. Make changes as needed. See
AD General Settings
(on
page 191),
AD Advanced Settings
(on page 192),
AD Group
Settings
(on page 193), and
AD Trust Settings
(on page 194).
5. If you change the connection information, click Test Connection to
test the connection to the AD server using the given parameters. You
should receive a confirmation of a successful connection. If you do
not see a confirmation, review the settings carefully for errors and try
again.
6. Click OK to save your changes.
7. You must synchronize the AD user groups you changed, or you can
synchronize all AD modules to synchronize all groups and users in
all modules. See
Synchronize All User Groups with AD
(on page
198) and
Synchronize All AD Modules
(on page 199).
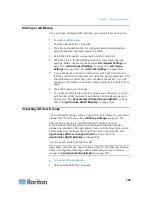
Importing AD User Groups
You must specify Group settings in the AD module before you can import
groups from the AD server. See
AD Group Settings
(on page 193).
After making a change to imported groups or users, you must
synchronize the AD user groups you changed so that the imported
groups are mapped to the appropriate groups on AD and synchronize all
AD modules to synchronize all groups and users in all modules. See
Synchronize All User Groups with AD
(on page 198) and
Synchronize All AD Modules
(on page 199).
You can import nested groups from AD.
Note: Make sure that you have configured the CC-SG DNS and Domain
Suffix in Configuration Manager before attempting to import AD user
groups. See
Advanced Administration
(on page 237).
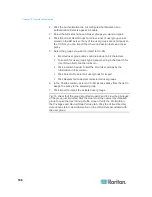
To import AD user groups:
1. Choose Administration > Security.

