Chapter 10: Maintenance
197
As noted, you may delete a custom profile from the system while it is still
designated as an active profile. Doing so will terminate any virtual
media sessions that were in place.
Handling Conflicts in Profile Names
A naming conflict between custom and standard USB profiles may occur
when a firmware upgrade is performed. This may occur if a custom
profile that has been created and incorporated into the list of standard
profiles has the same name as a new USB profile that is downloaded as
part of the firmware upgrade.
Should this occur, the preexisting custom profile will be tagged as 'old_'.
For example, if a custom profile called GenericUSBProfile5 has been
created and a profile with the same name is downloaded during a
firmware upgrade, the existing file will then be called
'old_GenericUSBProfile5'.
You can delete the existing profile if needed. See
USB Profile
Management
(on page 196) for more information.
Upgrading CIMs
Use this procedure to upgrade CIMs using the firmware versions stored
in the memory of your Dominion KX II device. In general, all CIMs are
upgraded when you upgrade the device firmware using the Firmware
Upgrade page.
In order to make use of USB profiles, you must use a D2CIM-VUSB or
D2CIM-DVUSB with updated firmware. A VM-CIM that has not had its
firmware upgraded will support a broad range of configurations
(Windows, Keyboard, Mouse, CD-ROM, and Removable Device) but will
not be able to make use of profiles optimized for particular target
configurations. Given this, existing VM-CIMs should be upgraded with the
latest firmware in order to access USB profiles. Until existing VM-CIMs
are upgraded, they will be able to provide functionality equivalent to the
‘Generic’ profile.
Note: Only D2CIM-VUSB can be upgraded from this page.
To upgrade CIMs using the Dominion KX II memory:
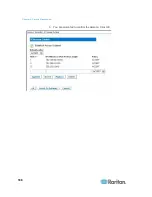
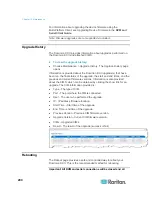
1. Choose Maintenance > CIM Firmware Upgrade. The CIM Upgrade
from page opens.
The Port (number), Name, Type, Current CIM Version, and Upgrade
CIM Version are displayed for easy identification of the CIMs.
2. Check the Selected checkbox for each CIM you want to upgrade.
Tip: Use the Select All and Deselect All buttons to quickly select all
(or deselect all) of the CIMs.
Summary of Contents for Dominion KX II
Page 10: ......
Page 14: ...Chapter 1 Introduction 4...
Page 16: ...Chapter 1 Introduction 6 Product Photos Dominion KX II KX2 832...
Page 17: ...Chapter 1 Introduction 7 KX2 864...
Page 89: ...Chapter 4 Virtual Media 79...
Page 111: ...Chapter 6 User Management 101...
Page 144: ...Chapter 7 Device Management 134 3 Click OK...
Page 154: ...Chapter 7 Device Management 144 3 Click OK...
Page 198: ...Chapter 9 Security Management 188 3 You are prompted to confirm the deletion Click OK...
Page 277: ...Appendix B Updating the LDAP Schema 267...
Page 324: ......

