Chapter 13: Dominion KX II Local Console
232
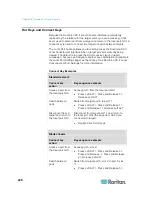
3. Choose the local port hotkey. The local port hotkey is used to return
to the Dominion KX II Local Console interface when a target server
interface is being viewed. The default is to Double Click Scroll Lock,
but you can select any key combination from the drop-down list:
Hot key:
Take this action:
Double Click Scroll Lock
Press Scroll Lock key twice quickly
Double Click Num Lock
Press Num Lock key twice quickly
Double Click Caps Lock
Press Caps Lock key twice quickly
Double Click Left Alt key
Press the left Alt key twice quickly
Double Click Left Shift key
Press the left Shift key twice quickly
Double Click Left Ctrl key
Press the left Ctrl key twice quickly
4. Select the Local Port Connectkey. Use a connect key sequence to
connect to a target and switch to another target. You can then use
the hot key to disconnect from the target and return to the local port
GUI. The connect key works for both standard servers and blade
chassis. Once the local port connect key is created, it will appear in
the Navigation panel of the GUI so you can use it as a reference.
See
Connect Key Examples
(on page 228) for examples of connect
key sequences.
5. Set the Video Switching Delay from between 0 - 5 seconds, if
necessary. Generally 0 is used unless more time is needed (certain
monitors require more time to switch the video).
6. If you would like to use the power save feature.
a. Select the Power Save Mode checkbox.
b. Set the amount of time (in minutes) in which Power Save Mode
will be initiated.
7. Choose the resolution for the Dominion KX II Local Console from the
drop-down list. The browser will be restarted when this change is
made.
800x600
1024x768
1280x1024
8. Choose the refresh rate from the drop-down list. The browser will be
restarted when this change is made.
60
Hz
75
Hz
9. Choose the type of local user authentication.
Summary of Contents for Dominion KX II
Page 10: ......
Page 14: ...Chapter 1 Introduction 4...
Page 16: ...Chapter 1 Introduction 6 Product Photos Dominion KX II KX2 832...
Page 17: ...Chapter 1 Introduction 7 KX2 864...
Page 89: ...Chapter 4 Virtual Media 79...
Page 111: ...Chapter 6 User Management 101...
Page 144: ...Chapter 7 Device Management 134 3 Click OK...
Page 154: ...Chapter 7 Device Management 144 3 Click OK...
Page 198: ...Chapter 9 Security Management 188 3 You are prompted to confirm the deletion Click OK...
Page 277: ...Appendix B Updating the LDAP Schema 267...
Page 324: ......


