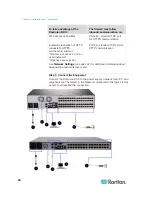
Chapter 2: Installation and Configuration
25
A. AC Power
To connect the power supply:
1. Attach the included AC power cord to the Dominion KX II and plug
into an AC power outlet.
2. For dual power failover protection, attach the second included AC
power cord and plug it into a different power source than the first
power cord.
Note: If you only attach one power cord, the power LED on the Dominion
KX II front panel will be red because the system is set to automatically
detect both sources. See
Power Supply Setup
(on page 137) for
information about turning off automatic detection for the power source
that is not in use.
B. Modem Port (Optional)
The Dominion KX II features a dedicated modem port for remote access
even when the LAN/WAN is unavailable. Using a straight-through serial
(RS-232) cable, connect an external serial modem to the port labeled
MODEM on the back of the Dominion KX II (see
Specifications
(on
page 236) for a list of certified modems and
Modem Settings
(on page
127) for information on configuring the modem).
Note: Raritan recommends configuring the modem by enabling the CD
(carrier detect) setting.
C. Network Port
The Dominion KX II provides two Ethernet ports for failover purposes (not
for load-balancing). By default, only LAN1 is active and the automatic
failover is disabled. When enabled, if the Dominion KX II internal network
interface or the network switch to which it is connected becomes
unavailable, LAN2 will be enabled using the same IP address.
Note: Because a failover port is not activated until after a failover has
actually occurred, Raritan recommends that you either not monitor the
failover port or monitor it only after a failover occurs.
To connect the network:
1. Connect a standard Ethernet cable (included) from the network port
labeled LAN1 to an Ethernet switch, hub, or router.
2. To make use of the optional Dominion KX II Ethernet failover
capabilities:
Connect a standard Ethernet cable from the network port labeled
LAN2 to an Ethernet switch, hub, or router.
Summary of Contents for Dominion KX II
Page 10: ......
Page 14: ...Chapter 1 Introduction 4...
Page 16: ...Chapter 1 Introduction 6 Product Photos Dominion KX II KX2 832...
Page 17: ...Chapter 1 Introduction 7 KX2 864...
Page 89: ...Chapter 4 Virtual Media 79...
Page 111: ...Chapter 6 User Management 101...
Page 144: ...Chapter 7 Device Management 134 3 Click OK...
Page 154: ...Chapter 7 Device Management 144 3 Click OK...
Page 198: ...Chapter 9 Security Management 188 3 You are prompted to confirm the deletion Click OK...
Page 277: ...Appendix B Updating the LDAP Schema 267...
Page 324: ......

