Dominion PX Quick Setup Guide
3
QSG-DPX-0M-v1.5.1-E
255-80-6081-00 RoHS
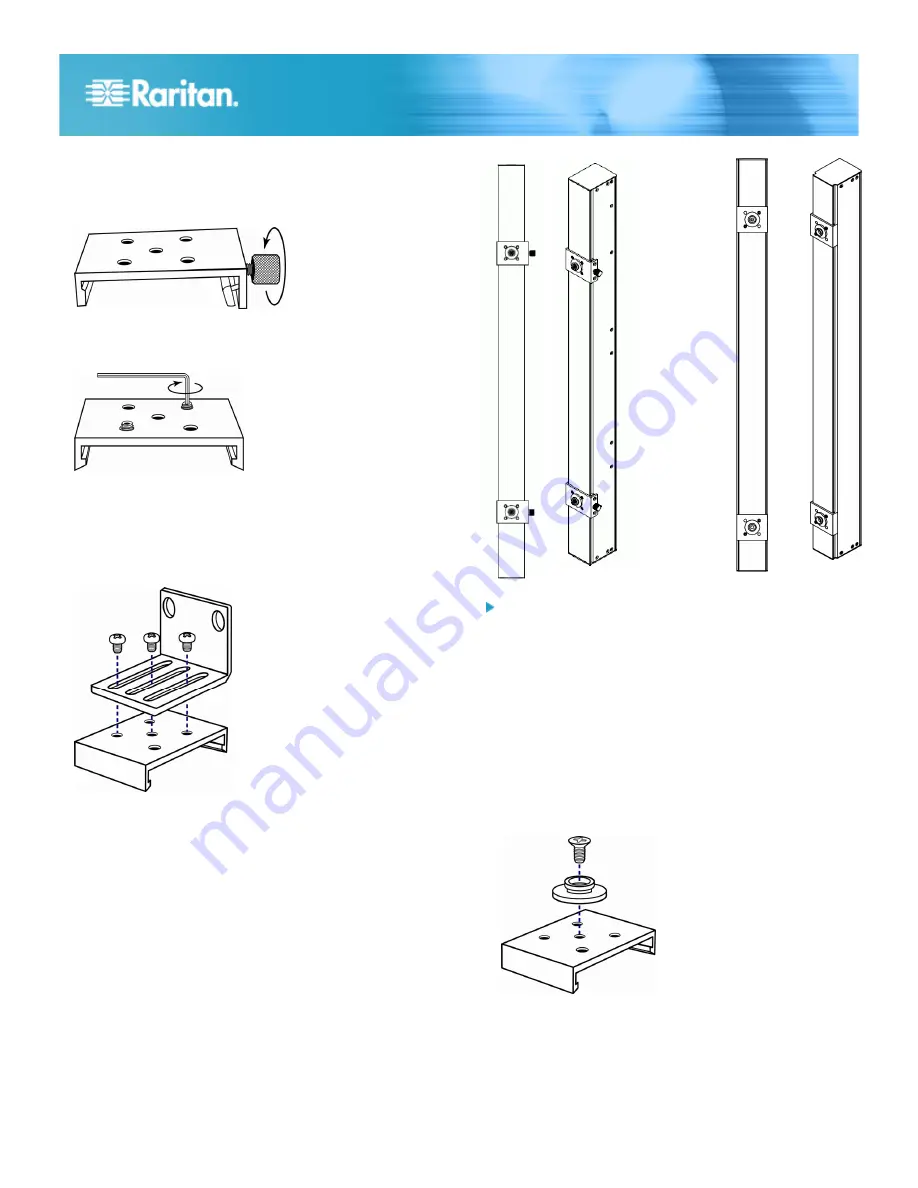
2. Secure the baseplates in place. Different models ship with
different types of baseplates.
To secure a baseplate with the thumbscrew, turn the
thumbscrew until it is tightened.
To secure a baseplate without the thumbscrew, use the
included L-shaped hex key to loosen the hex socket
screws until the baseplate is fastened.
3. Align the L-brackets with the baseplates so that the five
screw-holes on the baseplates line up through the
L-bracket's slots. The rackmount side of brackets should
face either the left or right side of the Dominion PX device.
4. Fasten the brackets in place with at least three screws (one
through each slot). Use additional screws as desired.
5. Using rack screws, fasten the Dominion PX device to the
rack through the L-brackets.
Mounting Zero U Models Using Button Mount
If your PDU has circuit breakers implemented, read
Circuit
Breaker Orientation Limitation
(on page 1) before mounting
it.
To mount Zero-U models using button mount:
1. Align the baseplates on the rear of the Dominion PX device.
Leave at least 24 inches between the baseplates for
stability.
2. Make the baseplates grasp the Dominion PX device lightly.
For a baseplate with the thumbscrew, turn the
thumbscrew until it is "slightly" tightened.
For a baseplate without the thumbscrew, use the
included L-shaped hex key to loosen the hex socket
screws until the baseplate is "slightly" fastened.
3. Screw each mounting button in the center of each
baseplate. The recommended torque for the button is 1.96
N·m (20 kgf·cm).
4. Align the large mounting buttons with the mounting holes in
the cabinet, fixing one in place and adjusting the other.
5. Depending on the type of your baseplates, either further
tighten the thumbscrews or loosen the hex socket screws
until the mounting buttons are secured in their position.


