


Chapter 6: Using the Web Interface
127
In this example, NIC-2 (fd07:2fa:6cff:2405::80) is the next hop router for
your PX to communicate with any device in the other subnet
fd07:2fa:6cff:1111::0. In the IPv6 'Append new Route' dialog, you should
specify:
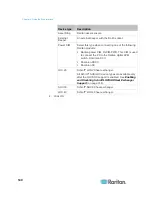
Destination:
fd07:2fa:6cff:2405::0/64
Next Hop:
fd07:2fa:6cff:2405::80
Role of a DNS Server
As Internet communications are carried out on the basis of IP addresses,
appropriate DNS server settings are required for mapping domain names
(host names) to corresponding IP addresses, or the PX may fail to
connect to the given host.
Therefore, DNS server settings are important for external authentication.
With appropriate DNS settings, the PX can resolve the external
authentication server's name to an IP address for establishing a
connection. If the
SSL/TLS encryption
is enabled, the DNS server
settings become critical since only fully qualified domain name can be
used for specifying the LDAP server.
For information on external authentication, see
Setting Up External
Authentication
(on page 184).
Modifying Network Service Settings
The PX supports these network communication services: HTTPS, HTTP,
Telnet and SSH.
HTTPS and HTTP enable the access to the web interface, and Telnet
and SSH enable the access to the command line interface. See
Using
the Command Line Interface
(on page 341).
By default, SSH is enabled, Telnet is disabled, and all TCP ports for
supported services are set to standard ports. You can change default
settings if necessary.
Note: Telnet access is disabled by default because it communicates
openly and is thus insecure.
In addition, the PX also supports the SNMP and Modbus/TCP protocols.
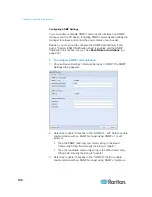
Changing HTTP(S) Settings
Important: Raritan disables SSL 3.0 and uses TLS for releases 3.0.4,
3.0.20 and later releases due to published security vulnerabilities in SSL
3.0. Make sure your network infrastructure, such as LDAP and mail
services, uses TLS rather than SSL 3.0.
Summary of Contents for PX3-4000 series
Page 5: ......
Page 627: ...Appendix I RADIUS Configuration Illustration 606 Note If your PX uses PAP then select PAP...
Page 632: ...Appendix I RADIUS Configuration Illustration 611 14 The new attribute is added Click OK...
Page 633: ...Appendix I RADIUS Configuration Illustration 612 15 Click Next to continue...
Page 648: ...Appendix J Integration 627 3 Click OK...
Page 661: ...Appendix J Integration 640 2 Launch dcTrack to import the spreadsheet file...


