Chapter 6: Using the Web Interface
142
3. Select 'Use custom SMS center number' if a custom SMS will be
used.
4. Enter the SMS center number in the SMS Center field.
5. Click Advanced Information to show information.
6. Enter the number of the recipient's phone in the Recipients Phone
field, then click Send SMS Test to send a test SMS message.
Setting the Cascading Mode
A maximum of eight PX devices can be cascaded using USB cables and
therefore share only one Ethernet connection. See
Cascading the PX
via USB
(on page 28).
The Ethernet sharing mode applied to the USB-cascading configuration
is either network bridging or port forwarding. This mode is determined by
the master device.
Only the Admin user or a user who has the Administrator Privileges
permission can configure the cascading mode.
To apply the "Port Forwarding" cascading mode, all cascaded PX
devices must be upgraded to version 2.5.20 or later, or those devices not
supporting the "Port Forwarding" mode cannot be accessed over the
network. See
Updating the PX Firmware
(on page 324).
To configure the cascading mode:
1. Log in to the master device's web interface.
2. Choose Device Settings > USB Cascading. The USB Cascading
Configuration dialog appears.
3. Verify that the "Position in cascaded chain" field shows 0 (Master),
indicating that this PX is the master device.
4. Select the preferred cascading mode in the "Cascading mode" field.
Bridging: Each device in the USB-cascading configuration is
accessed with a different IP address. This is the default.
Port Forwarding: Each device in the USB-cascading
configuration is accessed with the same IP address with a
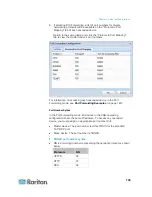
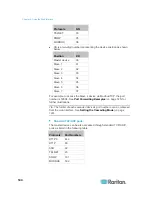
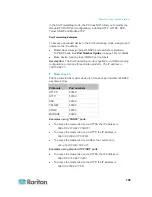
different port number assigned. The port numbers vary based on
the networking protocol and device position in the chain. See
Port Number Syntax
(on page 143).
Note: If reversing or disconnecting the USB cable from a slave
device, causing the slave device to become a master or standalone
device, you must plug an Ethernet cable to it to update its
USB-cascading status.
5. Click OK.
Summary of Contents for PX3-4000 series
Page 5: ......
Page 627: ...Appendix I RADIUS Configuration Illustration 606 Note If your PX uses PAP then select PAP...
Page 632: ...Appendix I RADIUS Configuration Illustration 611 14 The new attribute is added Click OK...
Page 633: ...Appendix I RADIUS Configuration Illustration 612 15 Click Next to continue...
Page 648: ...Appendix J Integration 627 3 Click OK...
Page 661: ...Appendix J Integration 640 2 Launch dcTrack to import the spreadsheet file...


