


8
This chapter explains how to install a PXE device and configure it for
network connectivity.
In This Chapter
Before You Begin ......................................................................................8
Connecting the PDU to a Power Source ...................................................9
Configuring the PXE ..................................................................................9
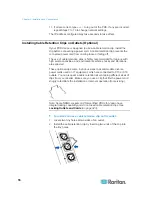
Installing Cable Retention Clips on Outlets (Optional) ............................16
Before You Begin
Before beginning the installation, perform the following activities:
Unpack the product and components
Prepare the installation site
Fill out the equipment setup worksheet
Check the branch circuit rating
Unpacking the Product and Components
1. Remove the PXE device and other equipment from the box in which
they were shipped. See
Package Contents
(on page 1) for a
complete list of the contents of the box.
2. Compare the serial number of the equipment with the number on the
packing slip located on the outside of the box and make sure they
match.
3. Inspect the equipment carefully. If any of the equipment is damaged
or missing, contact Raritan's Technical Support Department for
assistance.
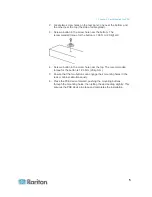
4. Verify that all circuit breakers on the PXE device are set to ON. If not,
turn them ON.
Or make sure that all fuses are inserted and seated properly. If there
are any fuse covers, ensure that they are closed.
Note: Not all PXE devices have overcurrent protection mechanisms.
Preparing the Installation Site
1. Make sure the installation area is clean and free of extreme
temperatures and humidity.
Chapter 3
Installation and Configuration
Summary of Contents for PXE
Page 16: ......
Page 339: ...Appendix A Specifications 323 RS 485 Pin signal definition al 4 5 6 D bi direction al Data 7 8...
Page 380: ...Index 364 Z Zero U Products 1...
Page 381: ......