ALL APPLICATIONS (VENTED and VENT FREE OPERATION)
Millivolt Pilot Lighting (continued):
6.
Press Piezo Ignitor Button to
light pilot. Continue to hold in the
Gas Cock Dial until the Pilot flame
remains lit when knob is released
(approximately 60 to 90 seconds). If
Pilot does not remain lit, repeat steps
1 through 5 and allow more time after
Pilot Lighting before releasing knob.
7.
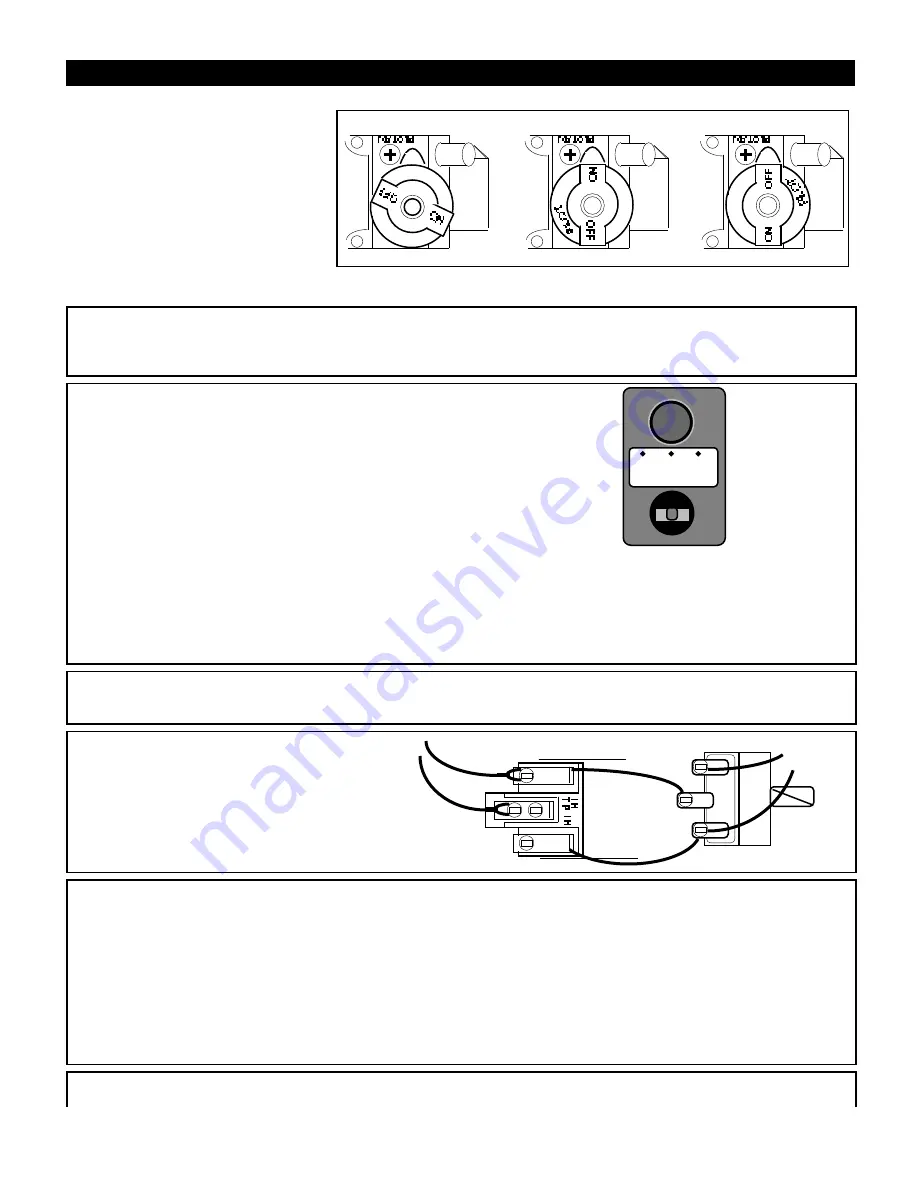
Turn Gas Cock Dial to "ON".
"PILOT" POSITION
"ON" POSITION
"OFF" POSITION
PILOT
+
v
+
+
+
+
v
+
+
+
v
+
PILOT ADJUST
COVER CAP
Figure 12
N O T E : The Gas Cock Dial has complete control of gas to pilot and burner. The Gas Cock Dial cannot be
turned to "OFF" without first depressing dial in "PILOT" position and then rotating clockwise to "OFF".
Switch Control (Manual ON-OFF):
After successful pilot lighting, allow 60-90 seconds for the
Thermogenerator to heat up. To turn burner(s) on, place Control Selector Switch in the "ON" position (see
Figure 11). To turn burner off (pilot remains lit) place Control Selector Switch in the "OFF" position.
NOTE: Flame size at the burner is adjustable at the Gas Cock Dial (see Figure 12).
Ultrasonic Remote Control (Manual or Remote ON-OFF)
Before you start: Both the transmitter and receiver require 9 volt batteries
to operate in remote control.
The blue and black receiver wire leads are for the optional sound producing
device (CRACKLER Model CF5).
The receiver must be protected from overheating. Locate receiver well away
from heat. Accessory REMOTE LOG HOUSE (Model "RH") is
available for use as a heat resistant "log" in which the receiver portion of a
Wireless remote option may be located.
Operation Tips: This is a sound operated remote (unlike TV remotes which
SWITCH OFF REMOTE
ON ACCESS
ON
When switching
from REMOTE to
OFF, first turn set
off using the
transmitter.
Remote: Switch to
REMOTE ACCESS
ON. Aim, press button
and hold transmitter at
receiver.
Manual: Switch from
OFF to SWITCH ON;
SWITCH ON to OFF
Figure 13
are Infrared and operate instantly) and requires you to aim and hold the transmitter for 1 to 3 seconds to
operate. Manual Operation: (Receiver switch position ON or OFF) does not require batteries.
Remote Operation: Requires good batteries. If you turn the gas log on using the remote control and then turn
the set off by sliding the receiver switch from REMOTE to OFF, when you replace the switch to REMOTE it will
remain in the last selected remote position (in this case ON) and turn the gas log on. (see Figure 13)
To shutdown overnight or for any prolonged period, slide receiver switch to "OFF".
Remote Accessory Control (Remote ON-OFF):
Place manual switch in the "R E M O T E A C C E S S
O N " position. Burner "O N " or "O F F " is now controlled by the position of the accessory control being used with the
burner. Individual operating instructions for each Accessory Option are included with the individual accessory.
Remote Accessory Wiring:
Wiring from the Accessory Control (Remote,
Thermostat or Switch) is connected to the two
outside terminals of the Control Selector
Switch as shown in Figure 14.
NOTE: Wire length for Thermostat or Remote
controls should not exceed 20 feet.
Thermostat wiring should be 20 AWG Type CL2.
From THERMOPILE
To
ACCESSORY
CONTROL
Valve
Terminals
Control
Selector
Switch
Figure 14
Outside Terminal
Outside Terminal
Remote Accessory Options:
ULTRA-SONIC WIRELESS REMOTE
(Model "F10-AB)
INFRARED WIRELESS REMOTE WITH THERMOSTAT
(Model "IRRC")
WALL SWITCH
(Model "WS-1")
WALL THERMOSTAT
(Model "TS-1")
WALL TIMER (60 MINUTE TIMER)
(Model "WT-1")
CRACKLER Sound Generator option for F10 AB or IRRC
(Model "CF5")
•
Accessory REMOTE LOG HOUSE (Model "RH") is available for use as a heat resistant "log" in which the
receiver portion of Wireless remote option F10 AB or IRRC may be located.
•
Accessory CRACKLER LOG HOUSE (Model "CH") is available for use as a heat resistant "log" in which the
CRACKLER Sound Generator option for both the F10 AB and IRRC wireless remotes may be located.
Complete Shutdown (Including Pilot):
Place Control Selector Switch in "OFF". Turn "OFF" all
Accessory Switches. Slightly push and turn Gas Cock Dial to "OFF".
9


