


REV. 1/25/08
Page 2 of 7
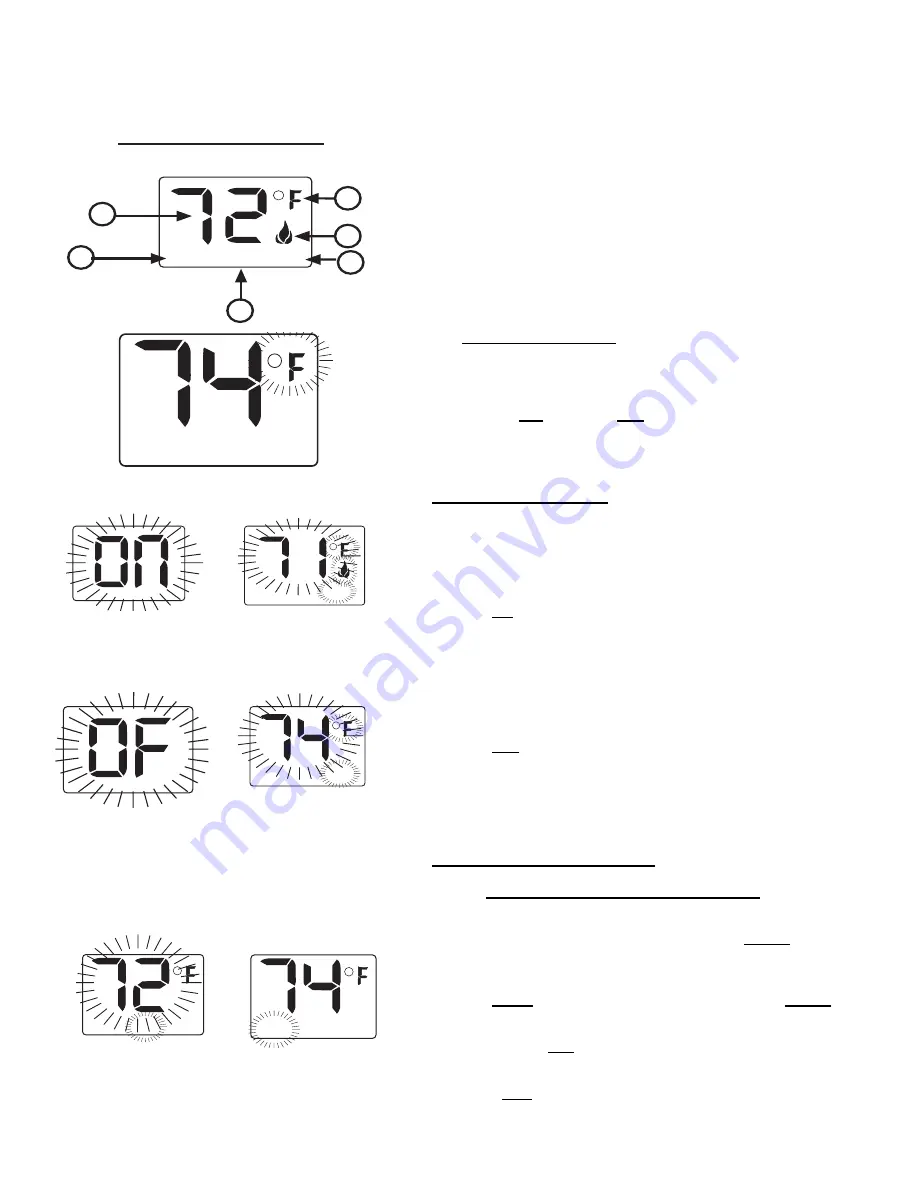
1. DISPLAY
Indicates CURRENT room temperature
.
2.
0
F
OR
0
C
Indicates degrees Fahrenheit or Celsius.
3. FLAME
Indicates burner/valve in operation.
4. ROOM
Indicates remote is in THERMOSTAT operation.
5. TEMP
Appears during manual operation.
6. SET
Appears when setting the desired temperature
for thermostat operation.
SETTING
0
F /
0
C SCALE
The factory setting for temperature is
0
F
. To change this setting to
0
C:
•
Press the ON key and the OFF key on the transmitter at the same
time. This will change from
0 F
to
0 C
. Follow this same procedure to
change from
0
C back to
0
F
.
MANUAL FUNCTION
To operate the system in the manual “MODE” do the following.
ON OPERATION
Press the ON key - the appliance flame will come on. During this time
the LCD screen will show ON. After 3 seconds the LCD screen will
default to display room temperature and the word TEMP will show
.
(Flame icon will appear on LCD screen in manual on mode)
OFF OPERATION
Press the OFF key - the appliance flame will shut off. During this time
the LCD screen will show OFF. After 3 seconds the LCD screen will
default to display room temperature and the word TEMP will show.
THERMOSTAT FUNCTION
SETTING DESIRED ROOM TEMPERATURE
This remote control system can be thermostatically controlled when the
transmitter is in the THERMOSTAT mode (The word
ROOM must be
displayed on the screen).
To set the THERMOSTAT MODE and
DESIRED room temperature:
Press the MODE key until the LCD screen shows the word ROOM, then
the remote is in the thermostat mode.
Press and hold the SET key until the desired set temperature is
reached. (By pressing and holding the set key the LCD screen set
numbers will increase from 45
0
to 99
0
then restart over at 45
0
) Next
release the SET key. The LCD screen will display the set temperature
TEMP
TEMP
SET
THERMO SET
SCREEN WHILE
DEPRESSING OFF
KEY
TEMP
SCREEN AFTER 3
SECOND DEFAULT
ROOM
TEMP
THERMO MODE
TEMP
SCREEN AFTER 3
SECOND DEFAULT
ROOM
LCD - Liquid Crystal Display
TEMP
1
2
3
SET
4
5
6
SCREEN WHILE
DEPRESSING ON
KEY
f i r e - p a r t s . c o m


