background image

16

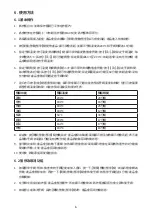
5. Before First Use

1.  Remove all the packaging materials and stickers from the appliance. 

2.  Thoroughly clean all the accessories, rinse them and wipe them dry. 

3.  Clean the surface and cavity of the appliance with a wrung soft cloth, then wipe it dry.

4.  Put the fryer basket rack into the fryer basket, push the fryer basket back to the appliance.

6. Operation Instructions

6.1 Basic Operation

1.  Pull out the fryer basket and make sure the fryer basket rack installed well in the fryer 

basket.

2.  Put food onto the fryer basket rack and must not exceed the MAX level. Push the fryer 

basket back to the original position.

3.  Plug in the appliance, the appliance will have a sound, 

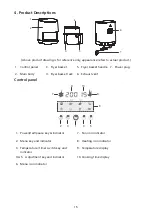
 Power / start / pause 

】 

indicator will 

be on. The appliance is in the standby status.

4.  Press 

 Power / start / pause 

】 

key to turn on the appliance, the display will be on. It will 

show the cooking temperature is 200

°

C and the cooking time is 15 minutes.

5.  To set the cooking temperature, press 

 Temperature / timer switch 

】 

key, the temperature 

on the display will flash. Press 

+

 and 

-

 keys to set the cooking temperature, each 

adjustment is 5

°

C. Press and hold 

+

 and 

-

 keys to adjust quickly. The setting range is 

from 50

°

C to 200

°

C. If over 5 seconds without setting, the appliance will confirm the just set 

cooking temperature.

6.  To set the cooking timer, press

 Temperature / timer switch 

 key twice, the timer on 

the display will flash. Press 

+

 and 

-

 keys to set the cooking timer, each adjustment is 

1 minute. Press and hold 

+

 and 

-

 keys to adjust quickly. The setting range is from 1 

minute to 60 minutes. If over 5 seconds without setting, the appliance will confirm the just 
set cooking timer.

Summary of Contents for RAF-B271W

Page 1: ...se read the operation manual carefully before using Keep it in a safe place for future reference The images in this operation manual are for reference only and may not match with the actual product Fo...

Page 2: ...1 1 2 3 4 5 6 7 8 9...

Page 3: ...2 1 220 240V...

Page 4: ...3 8 8 8 10...

Page 5: ...4 2 1 2 3 10 4 5 6 7 8 3 RAF B271W 220 240 50 60 1400 2 7 3 4 x x 230 x 281 x 297...

Page 6: ...5 4 1 2 6 7 4 3 5 1 2 3 4 5 6 7 215 0 4mm 2 7 8 6 3 9 10 1 4 5 1 7 2 8 3 9 4 5 10 6 5 1 2 3 4...

Page 7: ...6 6 6 1 1 2 MAX 3 4 200 15 5 5 50 200 5 6 1 1 60 5 7 200 20 180 16 180 25 180 12 50 30 200 17 160 17 180 18 8 1 9 1 10 6 2 1 1 2 3 2...

Page 8: ...7 6 3 1 3 2 3 4 5 6 7 8 9 6 4 7 1 2 3 4 5 MAX MAX 6 7 E1 E2 2...

Page 9: ...8 8 1 2 3 4 2861 2767 9 1 2 2406 5666...

Page 10: ...fully before use and keep it for your future reference Table of Contents 1 Important Safeguards 2 Maintenance Cleaning and Storage 3 Product Specifications 4 Product Descriptions 5 Before First Use 6...

Page 11: ...tial injury and malfunction Do not use the same socket with other high power consumption appliance or use the extension cord beyond its capacity or use the power supply other than 220 240V to avoid da...

Page 12: ...ch Make sure the power cord is not in contact with the appliance enclosure Otherwise insulating material of the power cord may melt resulting in a risk of short circuit Do not operate the appliance in...

Page 13: ...n cooking food which are greasy or marinated with sauce must wrap the food with aluminum foil It is to avoid the food grease or sauces from spilling onto the heating elements and cause fire Do not fry...

Page 14: ...op or let it touch any hot surface it may damage the power cord During or immediately after use the appliance will emit hot steam at the exhaust vent must keep a safe distance When pulling out the fry...

Page 15: ...ach use must clean the cavity and accessories to avoid smoke fire or metal erosion caused by the accumulated grease or food residue And the surface and cavity of the appliance and fryer basket can be...

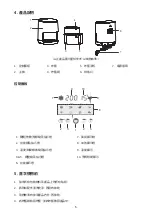
Page 16: ...t handle 7 Power plug 2 Main body 4 Fryer basket rack 6 Exhaust vent Control panel 215 0 4mm 2 7 8 6 3 9 10 1 4 5 1 Power start pause key indicator 7 Fan icon indicator 2 Menu key and indicator 8 Heat...

Page 17: ...The appliance is in the standby status 4 Press Power start pause key to turn on the appliance the display will be on It will show the cooking temperature is 200 C and the cooking time is 15 minutes 5...

Page 18: ...status automatically 9 When the cooking is finished the appliance will have several sounds the heating icon indicator will be off The fan icon indicator will keep flashing during the fan cooling opera...

Page 19: ...emperature according to the actual cooking condition 7 When cooking water vapor may condense around the appliance This is because water evaporates from the food which is normal 8 To adjust the applian...

Page 20: ...cook The cooking time is too short Put the food into the appliance and cook again 5 The fryer basket cannot push back to the appliance Too much food filled in the fryer basket which is beyond the MAX...

Page 21: ...r enquiries please call Shun Hing Electric Works Engineering Co Ltd hotline at 2861 2767 9 After Sales Service 1 For any defect in the judgement of technician from Shun Hing Electric Service Center Li...

Page 22: ...om zh For the latest information of Hong Kong and Macau service center please visit SHUN HING ELECTRIC WORKS AND ENGINEERING CO LTD 67 9 2861 2767 2865 6706 http www rasonic com shew shunhinggroup com...

Reviews: