background image

WARRANTY

Rasor

®

 Elettromeccanica S.r.l.


pneumatic scissors have a 12 month warranty from the date

indicated on the last page of this manual, except in case of different written agreements.
The warranty covers all manufacturing and material defects. Replacement and repair operations
are covered only if carried out by our company and at our workshop. If in-warranty goods
need to be repaired, 

the customer must always send the complete scissors to Rasor

®

.

Single units will not be repaired under warranty.

The material to be repaired must be sent CARRIAGE FREE.
Once the machine has been repaired, it will be sent CARRIAGE FORWARD to the customer.
The  warranty  covers  neither  technicians'  intervention  on  site  nor  the  machine  disassembly
from the installation place.
If for practical reasons, one of our technicians is sent to the premises, the customer will be
charged the costs plus the travelling expenses.

The warranty does not include:

+

failure caused by wrong use or assembly,

+

failure caused by external agents,

+

failure caused by lack of maintenance or negligence,

+

blades and parts subject to wear.

+

failure caused by dirty compressed and/or not lubricated air.

WARRANTY FORFEITURE:

+

In case of arrearage or other breaches of contract,

+

Whenever changes or repairs are carried out  on our pneumatic scissors without our

prior authorization,

+

Whenever the serial number is tampered with or cancelled,

+

Whenever  the  damage  is  caused  by  improper  use,  bad  treatment,  bumps,  falls  and

other causes not due to normal working conditions,

+

Whenever  the  unit  seems  tampered  with,  dismantled  or  previously  repaired  by

unauthorized staff,

+

In case the pneumatic scissors are used for purposes that are different from the ones

described in this manual.

+

In case non-original spare parts are used.

All repair operations carried out under warranty do not interrupt its duration.

All disputes will be settled in the court of justice of Milan (Italy).

We thank you in advance for the attention you will pay to this manual and we invite you to
inform us of any change you deem necessary to improve it and make it more complete.

Summary of Contents for FP503

Page 1: ...PNEUMATIC SCISSORS use manual FP503...

Page 2: ...gi Spinelli For more than sixty years it has been producing automatic cutting systems cutting units for textile applications and electric and pneumatic cutters Initially considered as a point of refer...

Page 3: ...S IN ORDER The workplace must always be kept in order and well lightened ALWAYS USE PNEUMATIC SCISSORS FP503 PROPERLY Use the scissors only to carry out the works they have been designed for do not us...

Page 4: ...ion pneumatic scissors FP503 must not be used until the Customer Care Technical Service has repaired them The original configuration of the pneumatic scissors must not be changed at all On receiving t...

Page 5: ...ed on the front part of the pneumatic scissors The plate must not be removed at all even if the machine is resold Always refer to the serial number written on the plate itself when contacting the manu...

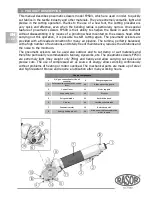
Page 6: ...nce reduces the vibrations and the noise to the minimum The pneumatic scissors can be used also outdoor and to cut damp or wet materials and therefore particularly recommended in tannery dyeworks etc...

Page 7: ...d by means of rotary circular decagonal or hexagonal blades This equipment must not work in areas prone to explosions in presence of fine dust or corrosive gases to cut plastic metal and wooden materi...

Page 8: ...ce must NEVER be removed Always check the resistance of the material to be cut and the kind of blade which is being used The Customer shall equip his own personnel with all the individual safety prote...

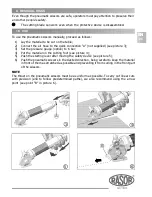
Page 9: ...3 Set the pressure gauge option to 6 bar 4 Put the material on the cutting foot see picture 4 5 Push the starting lever after moving the safety device see picture 5 6 Push the pneumatic scissors in t...

Page 10: ...the quick connection to the scissors For the use and maintenance read the instruction sheet supplied with the filter 5 1 2 3 4 6 7 8 12 BLADE SHARPENING After many hours of a continuative use of the...

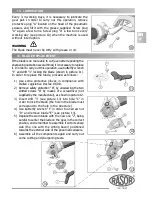
Page 11: ...order to replace the blade proceed as follows 1 Use some protective gloves in compliance with Italian Legislative Decree 81 08 2 Remove safety protection B by unscrewing the two slotted screws A by m...

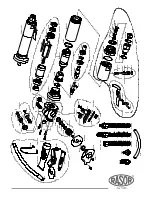
Page 12: ...HOOK FP86146 COMPLETE CONTROL LEVER F 5059 BLADE DISASSEMBLY KEY FP074 REAR FLANGE FP096 COMPENSATION RING NUT FRNF503 SET OF ACCESSORIES FP503 F 5065 SCREW FIXING THE FOOT FP075 REAR FLANGE PLUG FP86...

Page 13: ...74 FP076 FP075 T102909 T102910 T102906 FP86013CPL FP86012 FP86013 FP86146 FP86014 FP86021 FP86022 FP8612301 FP86028 FP86130 FP8612301CPL FP86025 FP86017 FP86019 FP86020 FP86018 FP86010 FP86011 FP09401...

Page 14: ...sed by wrong use or assembly failure caused by external agents failure caused by lack of maintenance or negligence blades and parts subject to wear failure caused by dirty compressed and or not lubric...

Page 15: ...RASOR ELETTROMECCANICA SRL ViaVincenzo Caldesi 6 20161 Milan Italy ph 39 02 66 22 12 31 fax 39 02 66 22 12 93 info rasor cutters com www rasor cutters com FOLLOW US...

Reviews: