background image

7

https://www.rasor-cutters.com/it/

MAINTENANCE

3  Maintenance

3.1 

Replacing the cutting head

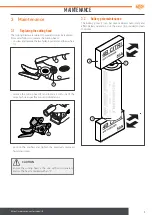
The cutting blades are subject to wear and must be replaced.
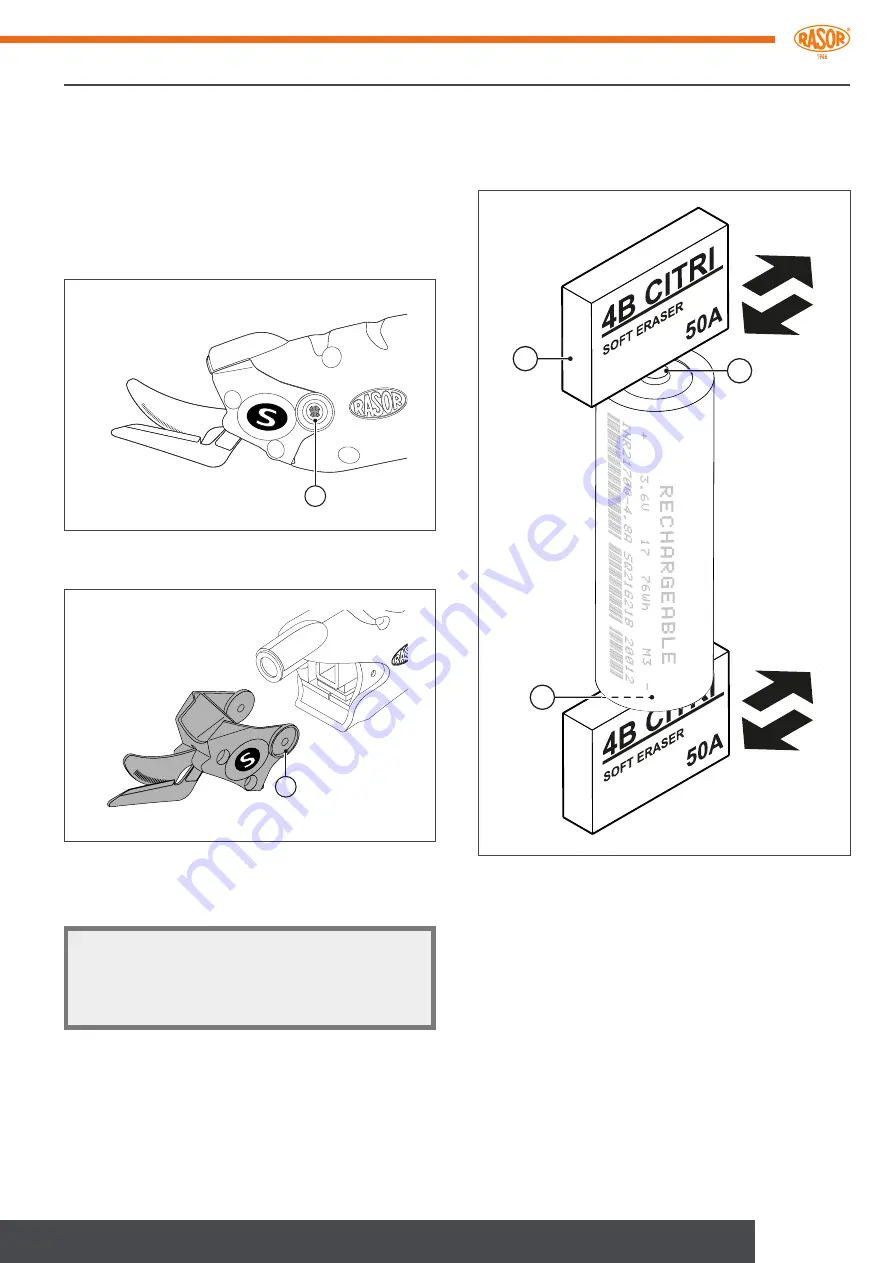
Proceed as follows to replace the cutting head:


unscrew and remove the two fastening screws and the washers 
(1)

1


remove the cutting head (2) and replace it with one of the 
same technical specifications and dimensions

2


position the washers and tighten the previously removed 
fastening screws.

CAUTION

Ensure the cutting head is the one with micro-serrated 
blades. The head is marked with an “S”.

3.2 

Battery pole maintenance

The battery poles (1) can become oxidised and/or dirty and 
affect battery operation. Use the eraser (2) provided to clean 
the poles

1

1

2

Summary of Contents for RS1S

Page 1: ...DLESS ELECTRIC SCISSORS RS1S USE AND MAINTENANCE INSTRUCTIONS Please read this manual carefully before using the device and keep it safe with the product TRANSLATION OF ORIGINAL AND COMPLETE INSTRUCTI...

Page 2: ...l declares under its own respon sibility that the aforementioned products to which this decla ration refers comply with the Directives on the approximation of the laws of EEC member states relating t...

Page 3: ...product itself a CAUTION HAZARD Check that electrical and mechanical parts are in excellent working order before starting the device Children must not play with the product Cleaning and maintenance in...

Page 4: ...ating temperature 0 to 55 C Battery charge time 150 minutes Buttons For product use 1 6 Noise The maximum sound pressure level emitted is approximately 60 dB A Airborne noise was detected in complianc...

Page 5: ...to enable disable the LED Press and hold to disable machine operation 1 9 Package contents 1 4 7 5 2 6 3 1 RS1S 2 Two rechargeable 5Ah lithium ion batteries 3 Docking station 4 Wall charger 5 Battery...

Page 6: ...g down keys and A red light appears on the keypad activate the laser by pressing if desired tap quickly twice to activate automatic cutting start cutting the textile keeping it as taut as possible to...

Page 7: ...ashers 1 1 remove the cutting head 2 and replace it with one of the same technical specifications and dimensions 2 position the washers and tighten the previously removed fastening screws a CAUTION En...

Page 8: ...ades are in contact with one another Check the device is designed to cut this type of textile Check the textile thickness Check the blades are intact The device does not start Check the charge status...

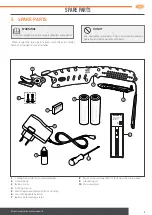
Page 9: ...pare parts They can cause anomalous operation and harm people or property FUL WJ2020 For 21700 3 7 4 2V Li ion battery 2A Charge CHG 8 7 6 1 2 5 3 4 10 9 1 Cutting head with micro serrated blades 2 Ce...

Page 10: ...defective parts solely by us at our workshop If returning the product to us for repair the customer must al ways send the complete scissors to Rasor Individual defective parts will not be accepted fo...

Page 11: ...11 https www rasor cutters com it DISPOSAL...

Page 12: ...RS1S_EN_01_06 22 FOLLOW US FOLLOW US RASOR ELETTROMECCANICA SRL Via Giannetto Mattei 41 43 20044 Arese MI Italy ph 39 02 66 22 12 31 info rasor cutters com www rasor cutters com...

Reviews: