
Page 4
1.
Connect the Ethernet port of the VoIP Interface to the PC using an ethernet cable
2.
Change computer IP address
a. Navigate to Control Panel
b. Navigate to Network Settings
c. Change the IP address of the PC to
192.168.1.150
3.
Turn off wireless card on computer (if applicable)
4
. Log into the VoIP Interface
a. Enter the VoIP Interface IP address
192.168.1.160
into the web browser (Google Chrome
preferred)
b. Log into the VoIP Interface using
PASSWORD:
admin
5.
Change the IP address settings of the VoIP Interface
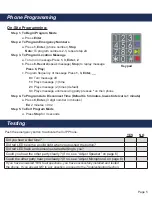
a. Click Basic Settings under the menu options on the top of the screen
b. Under IP Address click on the circle next to Statically Configure As
c. Enter a new static IP address, subnet mask, and default router for the VoIP Interface
d. Select the appropriate time zone from the drop down menu next to Time Zone
6.
Click Apply at the bottom of the page
7.
Enter the SIP Server information into the VoIP Interface
a. Click the FXS Port under the menu options on the top of the screen
b. Enter the IP address of the SIP Server in the Primary SIP Server box
c. Enter the SIP Extension ID in the SIP User ID box
d. Enter the Authentication ID in the Authenticate ID box (can be the same as the SIP Extension ID)
e. Enter the Authentication Password in the Authenticate Password box
f. Fill in the Name location as it will appear on the phone
8.
Click Apply at the bottom of the page
9.
Click Reboot to restart the VoIP Interface
Note:
the reboot may take up to 5 minutes
10.
The VoIP Phone is ready when Registered shows next to the status on the home page of the VoIP
Interface
VoIP Phone Set-Up
Connecting Device to Network
1.
Connect the WAN port of the Wireless Module to the ethernet port of the IP Interface
2
. Turn he wireless card on the PC back on (if applicable)
3
. Connect the PC to the same wireless network being used for the WiFi VoIP Phone
4
. Open the Command Prompt
5
. Ping the IP address of the Wireless Module on the phone
6
. If the ping is successful, plug the analog phone into the FXS port and place a test call
7
. After successfully placing the test call, the SmartPhone board can be plugged back in and is ready
to be programmed