background image

45

HSS drill bits in good condition. Always use 

a magnetic bit holder (not included) when 

using short screwdriver bits. When screw-

driving, apply a small quantity of liquid 

soap or similar to the screw threads to ease 

insertion.

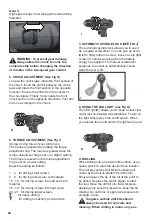
10. LED LIGHT INDICATOR

Before operation, the LED light will be activated 

when the On/Off switch is slightly depressed, and 

will turn off after the On/Off switch is released.

The tool and battery are equipped with a 

protection system. When the LED Light is 

quickly flashing and turn off, the system will 

automatically cut off power to the tool to extend 

battery life.

The tool will automatically stop during operation 

if the tool and/or battery are placed under one of 

the following conditions:

 Overloaded: The tool is operated in a manner 

that causes it to draw an abnormally high current. 

In this situation, release the Trigger Switch on 

the tool and stop the application that caused the 

tool to become overloaded. Then pull the Trigger 

Switch again to restart.

 Overheated: Under the condition above, if 

the tool does not start, the Tool and Battery are 

overheated. In this situation, let the Tool and 

Battery cool before pulling the Trigger Switch 

again.

 Low battery voltage: The remaining Battery 

capacity is too low and the tool will not operate. 

In this situation, remove and recharge the 

Battery.

WARNING: To turn on the light, press the 

On/Off switch and make sure the Forward/

Reverse Rotation Control is on right/left 

position.

11. DISPOSAL OF AN EXHAUSTED BATTERY 

PACK

To preserve natural resources, please 

recycle or dispose of the battery pack 

properly. This battery pack contains 

Lithium batteries. Consult your local 

waste authority for information regarding 

available recycling and/or disposal options. 

Discharge your battery pack by operating your 

drill, then remove the battery pack from the drill 

housing and cover the battery pack connections 

with heavy-duty adhesive tape to prevent short 

circuit and energy discharge. Do not attempt to 

open or remove any of the components.

12. TEMPERATURE DEPENDENT OVERLOAD 

PROTECTION

When using as intended for the power tool 

cannot be subject to overload. When the load 

is too high or the allowable battery temperature 

of 75 °C is exceeded, the electronic control 

switches off the power tool until the temperature 

is in the optimum temperature range again.

13. PROTECTION AGAINST DEEP 

DISCHARGING

The Li-ion battery is protected against deep 

discharging by the “Discharging Protection 

System”. When the battery is empty, the machine 

is switched off by means of a protective circuit: 

The inserted tool no longer rotates.

PROBLEM SOLUTION

1. WHY DOES THE DRILL NOT TURN ON 

WHEN YOU PRESS THE SWITCH?

The forward/reverse rotation control, which is 

on top of the trigger, is positioned in the lock 

function. Unlock the forward/reverse rotation 

control by putting it into the required rotation 

position. Push the trigger and the drill will start 

to rotate.

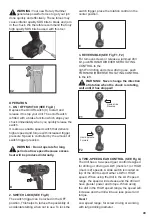
2. THE DRILL STOPS BEFORE THE SCREW 

IS COMPLETELY TIGHTENED. WHY?

Verify the torque position of the variable clutch, 

you can find the variable clutch between the 

chuck and the drill body. Position 1 is the lowest 

torque (screw driving force) and position 21 is the 

highest torque (screw driving force). Position       

is for drill operation. Position    is for hammer 

drill operation. Regulate the torque adjusting ring 

to a higher position to reach the best result.

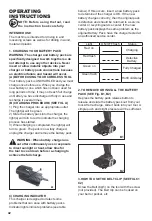
3. I CANNOT FIT THE BATTERY INTO THE 

BATTERY CHARGER. WHY?

a) Check if the charger and the battery pack are 

specifically designed for working together. 

b) The battery can be inserted into the charger 

only in one direction. Turn the battery around 

until it can be inserted into the slot, the indicator 

light should be red when the battery is charging.

4. REASONS FOR DIFFERENT BATTERY 

PACK WORKING TIMES

Charging time issues, as above, and having 

not used a battery pack for a prolonged time 

will reduce the working life of the battery pack. 

Summary of Contents for PRO XF20-2

Page 1: ......

Page 2: ...2 Instrucciones en Espa ol Instru es em Portugu s Instructions in English...

Page 3: ...e par 3 Selector de dos velocidades 4 Control de rotaci n hacia delante y hacia atr s 5 Gancho para cintur n 6 Bater a 7 Bot n para liberar la bater a 8 Luz de iluminaci n 9 Interruptor de encendido a...

Page 4: ...r sobre cemento Valor de emisi n de vibraci n ah ID 9397 m s Incertidumbre K 1 5 m s Taladrado sobre metal Valor de emisi n de vibraci n ah D 2270 m s Incertidumbre K 1 5 m s El valor total de vibraci...

Page 5: ...nes o las advertencias puede tener como resultado una descarga el ctrica un incendio y o lesiones graves Conserve todas las advertencias y las instrucciones para consultarlas en el futuro Con el t rmi...

Page 6: ...a una parte en rotaci n de la herramienta podr a causar una lesi n e No trabaje en sitios a los que no alcance bien Trabaje con los dos pies en el suelo y con un buen equilibrio en todo momento Esto...

Page 7: ...on una persona cualificada y utilice nicamente recambios id nticos Esto garantiza que la seguridad de la herramienta no se ve alterada ADVERTENCIAS DE SEGURIDAD PARA TALADRAR 1 Use protectores ac stic...

Page 8: ...ARGADORES ADVERTENCIA Lea todas las advertencias de seguridad y todas las instrucciones El incumplimiento de cualquiera de las instrucciones o las advertencias puede tener como resultado una descarga...

Page 9: ...l cargador de bater a est en una zona bien ventilada y lejos de materiales inflamables Las bater as se pueden calentar durante la carga No sobrecaliente las bater as Aseg rese de que las bater as y lo...

Page 10: ...producto se ha marcado con un s mbolo de recogida selectiva para todo tipo de bater as Al hacerlo ser reciclado o desmantelado para reducir el impacto medioambiental Las bater as pueden ser da inas p...

Page 11: ...estar cargada desenchufe el cargador y retire la bater a ADVERTENCIA Cuando la bater a se descargue despu s de un uso continuado o por exposici n a la luz directa del sol o al calor deje que se enfr e...

Page 12: ...a reducir la posibilidad de un accionamiento accidental Para bloquear el gatillo coloque el control de rotaci n en la posici n central E 3 REVERSIBLE CONSULTE LAS Fig F1 F2 Para retirar tornillos y li...

Page 13: ...que os 5 9 para atornillar tornillos en materiales blandos 10 14 para atornillar tornillos en materiales blandos y duros 15 19 para atornillar tornillos en madera dura 20 21 para atornillar tornillos...

Page 14: ...ire y recargue la bater a ADVERTENCIA Para encender la luz pulse el interruptor de encendido apagado y aseg rese de que el selector de rotaci n hacia delante y hacia atr s est en posici n derecha izqu...

Page 15: ...o Las condiciones de trabajo intensivas como introducir tornillos de gran tama o en madera dura agotar n la energ a de la bater a m s r pido que las condiciones de trabajo m s ligeras No recargue la b...

Page 16: ...nuevo de igual o mayor valor seg n nuestro criterio Esta garant a no es v lida por defectos causados como resultado de 1 Mal uso abuso o negligencia 2 La herramienta no se ha utilizado para fines de a...

Page 17: ...17...

Page 18: ...34 1 35 CDI218LB1 2 35 1 36 CDI218LB1 2 36 1 37 CDI218LB1 2 37 1 38 CDI218LB1 2 38 1 39 CDI218LB1 2 39 5 40 CDI218LB1 2 40 1 41 CDI218LB1 2 41 5 42 CDI218LB1 2 42 1 43 CDI218LB1 2 43 2 44 CDI218LB1 2...

Page 19: ...do bin rio 3 Controlo de engrenagem de duas velocidades 4 Controlo da rota o revers vel 5 Clipe de cinto 6 Bateria 7 Bot o de liberta o do conjunto de bateria 8 Luz de vis o 9 Bot o Ligar Desligar 10...

Page 20: ...e emiss o de vibra es ah ID 9 397m s Incerteza K 1 5 m s Perfurar em metal Valor de emiss o de vibra es ah D 2 270 m s Incerteza K 1 5 m s O valor total apresentado pode ser utilizado para comparar as...

Page 21: ...e as instru es na ntegra A inobserv ncia dos avisos ou das instru es pode resultar em choque el trico inc ndio e ou les es graves Guarde todos os avisos e instru es para futuras consultas O termo fer...

Page 22: ...o bot o ligado potencia a ocorr ncia de acidentes d Antes de ligar a ferramenta el trica retire as chaves de ajuste ou a chave inglesa Uma chave inglesa ou outra chave ligada a uma pe a girat ria da f...

Page 23: ...abusivas o l quido pode ser expelido da bateria evite o contacto Caso o contacto ocorra acidentalmente lave bem com gua Se o l quido entrar em contacto com os olhos procure tamb m assist ncia m dica O...

Page 24: ...ecarregue apenas com o carregador especificado pelo fabricante N o use qualquer carregador diferente daquele fornecido especificamente para uso com o equipamento Um carregador que adequado para um tip...

Page 25: ...ada e n o est obstru da por corpos estranhos 13 Mantenha as ranhuras da bateria do carregador livres de objetos estranhos e proteja contra a sujidade e humidade Guarde num local seco e sem gelo 14 Ao...

Page 26: ...rcado com um s mbolo relativo recolha seletiva para todas as baterias e o pr prio conjunto de bateria Ser ent o reciclado ou desmontado para reduzir o impacto sobre o ambiente As baterias podem ser pe...

Page 27: ...regado desconecte o carregador e retire o conjunto de bateria AVISO Quando a carga da bateria acabar ap s uma utiliza o cont nua ou exposi o luz direta do sol ou calor aguarde que a ferramenta arrefe...

Page 28: ...stiver a ser usado Para travar o gatilho do bot o coloque o controlo de rota o na posi o central E 3 REVERS VEL VER FIG F1 F2 Para remover os parafusos ou soltar uma broca encravada empurre o CONTROLO...

Page 29: ...r quando o anel de ajuste do bin rio definido para um valor mais baixo Configure do seguinte modo 1 4 para aparafusar pequenos parafusos 5 9 para aparafusar parafusos em material suave 10 14 para apar...

Page 30: ...ito baixa e a ferramenta n o ir funcionar Nesta situa o remova e recarregue a bateria AVISO Para acender a luz prima o bot o ligar desligar e certifique se de que o Controlo de Rota o Revers vel est n...

Page 31: ...descarga carregando e operando com o seu berbequim Condi es de trabalho pesadas tais como parafusos grandes em madeira dura gastar o a energia do conjunto de bateria mais rapidamente do que condi es d...

Page 32: ...o crit rio Esta garantia nula se os defeitos forem causados por 1 M utiliza o abuso ou neglig ncia 2 A ferramenta n o foi utilizada para fins de aluguel 3 Repara es anteriores realizadas em centros de...

Page 33: ...33...

Page 34: ...2 34 1 35 CDI218LB1 2 35 1 36 CDI218LB1 2 36 1 37 CDI218LB1 2 37 1 38 CDI218LB1 2 38 1 39 CDI218LB1 2 39 5 40 CDI218LB1 2 40 1 41 CDI218LB1 2 41 5 42 CDI218LB1 2 42 1 43 CDI218LB1 2 43 2 44 CDI218LB1...

Page 35: ...uck 2 Torque adjustment ring 3 Two speed gear control 4 Forward Reverse rotation control 5 Belt Clip 6 Battery pack 7 Battery pack release button 8 Sight light 9 On off switch 10 LED battery capacity...

Page 36: ...total value may be used for comparing one tool with another and may also be used in a preliminary assessment of exposure WARNING The vibration emission value during actual use of the power tool can d...

Page 37: ...areas invite accidents b Do not operate power tools in explosive atmospheres such as in the presence of flammable liquids gases or dust Power tools create sparks which may ignite the dust or fumes c K...

Page 38: ...repaired c Disconnect the plug from the power source and or the battery pack from the power tool before making any adjustments changing accessories or storing power tools Such preventive safety measu...

Page 39: ...In the event of battery leaking do not allow the liquid to come into contact with the skin or eyes If contact has been made wash the affected area with copious amounts of water and seek medical advic...

Page 40: ...vice must be protected from moisture 7 Do not use the charging device in the open 8 Do not short out the contacts of battery or charger 9 Respect the polarity when charging 10 Do not open the unit and...

Page 41: ...symbol relating to separate collection for all battery packs and battery pack It will then be recycled or dismantled in order to reduce the impact on the environment Battery packs can be hazardous for...

Page 42: ...ow fully charged unplug the charger and remove the battery pack WARNING When battery charge runs out after continuously use or exposure to direct sunlight or heat allow time for the tool to cool down...

Page 43: ...lps to reduce the possibility of accidental starting when not in use To lock the switch trigger place the rotation control in the center position E 3 REVERSIBLE SEE Fig F1 F2 For remove screws or rele...

Page 44: ...iving screws into hard wood 20 21 for driving larger screws for heavy drilling for drilling in masonry and concrete I 7 AUTOMATIC SPINDLE LOCK SEE FIG J The automatic spindle lock allows you to use it...

Page 45: ...e battery pack connections with heavy duty adhesive tape to prevent short circuit and energy discharge Do not attempt to open or remove any of the components 12 TEMPERATURE DEPENDENT OVERLOAD PROTECTI...

Page 46: ...AL PROTECTION Waste electrical products must not be disposed of with household waste Please recycle where facilities exist Check with your local authorities or retailer for recycling advice GUARANTEE...

Page 47: ...ttery powered Drill Type PRO XF20 2 CDI designation of machinery representative of Cordless Drill Function Drilling Complies with the following Directives 2006 42 EC 2011 65 EU 2014 30 EU 2014 35 EU S...

Page 48: ...48...

Page 49: ...B1 2 34 1 35 CDI218LB1 2 35 1 36 CDI218LB1 2 36 1 37 CDI218LB1 2 37 1 38 CDI218LB1 2 38 1 39 CDI218LB1 2 39 5 40 CDI218LB1 2 40 1 41 CDI218LB1 2 41 5 42 CDI218LB1 2 42 1 43 CDI218LB1 2 43 2 44 CDI218L...

Page 50: ......

Page 51: ......

Page 52: ......

Reviews: