INSTRUCTION, USE AND
MAINTENANCE MANUAL
GB
Page 39 of 64
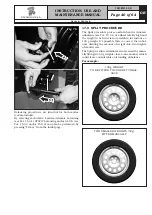
Remove the automatic gauge and fit the adhesive weight
in the pliers as shown in
Fig. 71
, using a weight of pre-
determined value (the example in
Fig. 70
shows 15 g).
Fig. 71
Fit the adhesive weight in the
pliers of the automatic rod
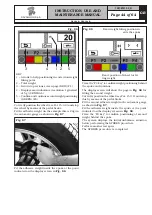
An arrow that appears on the display shows the weight
is coming close to correction position. When two fixed
arrows are reached (on the display on the top left) fit
the adhesive weight on the inner side in the position
in which the weight pliers touch the wheel.
Fig. 72
Fit weight on the position where
pliers touches the wheel
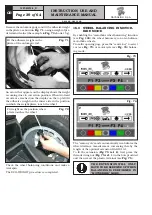
Check the wheel balancing conditions and make a
trial spin.
The ECO-WEIGHT procedure is completed.
16.0 WHEEL BALANCING IN MOTOR-
BIKE MODE
By enabling the “motorbike wheel balancing” function
(see
Fig. 100
) the wheel balancers can also balance
motorbike wheels.
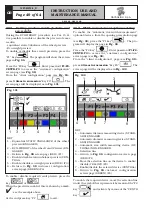
From the opening page, press the "centre key" to select
car (see
Fig. 73
) or motorcycle (see
Fig. 74
) balanc-
ing mode.
Fig. 73
Fig. 74
The "motorcycle" mode automatically recalculates the
wheel distance measurement, increasing this by the
length of the optional extension GAR181 A1.
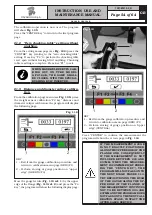
To fit the extension (
Fig. 75 ref. 2
), first press the
threaded ring nut (
Fig. 75 ref. 1
) in the hole provided
and then screw the plastic terminal (see
Fig. 75
).
THE EXTENSION WILL ONLY
HAVE TO BE SCREWED UP WHEN
BALANCING IS PERFORMED IN
"MOTORBIKE" MODE.
1297-M010-0_R
G2.124R - GP2.124R
RAVAGLIOLI S.p.A.


