background image

-Shut off the valve at the gas cylinder or the regulator before moving the appliance; 
-The tubing or the flexible hose must be changed within the prescribed intervals; 
-Use only the type of gas and the type of cylinder specified by the manufacturer; 
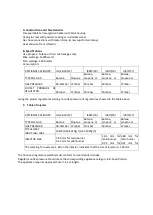
The LP tank used with your patio heater must meet the following requirements: 
Purchase  LP  tanks  only  with  these  required  measurements:  (31.8cm)  (diameter)  x  58cm)  (tall)  
with 15kg capacity maximum. 
-In  case  of  violent  wind  particular  attention  must  be  taken  against  tilting  of  the  appliance;  Keep  
the appliance at least 1m from the gas cylinder. 
-The injector is installed by the manufacturer only. 
Do not connect the gas cylinder directly to the appliance without regulator. Use only the type of gas 
and the type of cylinder specified in the instructions. 
A regulator(compliees with EN16129:2013 and the national regulation) 
of the correct pressure corresponding to the appliance category. 
Use 30mbar regulator for butane/propane under the category I3B/P(30). 
Use 30mbar regulator for butane under the category I3+(28-30/37). 
Use 37mbar regulator for propane under the category I3+(28-30/37). 
Use 50mbar regulator for butane/propane under the category I3B/P(50). 
It's recommended to use flexible hose that approved by EN16436: 2014. 
 

CAUTION 

PLEASE READ CAREFULLY THE FOLLOWING SAFETY GUIDELINES BEFORE OPERATION. 


1.


Do not use the patio heater for indoors, as it may cause personal injury or property damage. 

2.


This outdoor heater is not intended to be installed on recreational vehicles and/or boats. 

3.


Installation and repair should be done by a qualified service person. 

4.


Improper installation, adjustment, alteration can cause personal injury or property damage. 

5.


Do not attempt to alter the unit in any manner. 

6.


Never replace or substitute the regulator with any regulator other than the factory-suggested 
replacement. 

7.


Do not store or use gasoline or other flammable vapors or liquids in the heater unit. 

8.


The whole gas system, hose, regulator, pilot or burner should be inspected for leaks or damage 
before use, and at least annually by a qualified service person. 

9.


All leak tests should be done with a soap solution. Never use an open flame to check for leaks. 

10.


Do not use the heater until all connections have been leak tested. 

11.


Turn off the gas valve immediately if smell of gas is detected. Turn Cylinder Valve OFF. If leak 
is at Hose/ 
Regulator connection: tighten connection and perform another leak test. If bubbles continue 

appearing should be returned to hose’s place of purchase. If leak is at Regulator/Cylinder Valve 

connection: disconnect, reconnect, and perform another leak  check. If you continue  to see 

bubbles after several attempts, cylinder valve is defective and should be returned to cylinder’s 

place of purchase. 

12.


Do not transport heater while it’s operating.


13.


Do not move the heater after it has been turned off until the temperature has cooled down. 

14.


Keep the ventilation opening of the cylinder enclosure free and clear of debris. 

15.


Do not paint the radiant screen, control panel or top canopy reflector. 

16.


Control  compartment,  burner  and  circulation  air  passageways  of  the  heater  must  be  kept 
clean. 
Frequent cleaning may be required as necessary. 

17.


The LP tank should be turned off when the heater is not in use. 

18.


Check the heater immediately if any of the following occurs: 

-


The heater does not reach temperature. 

Summary of Contents for OG-500

Page 1: ...niony przedstawiciel Ravanson Ltd Sp z o o ul Mazowiecka 6 09 100 P o sk Polska tel 0048 23 662 68 01 fax 0048 23 662 68 02 www ravanson pl PL T umaczenie Instrukcji oryginalnej Ogrzewacz ogrodowy ENG...

Page 2: ...warty p omie 3 Je li zapach nadal wyst puje natychmiast skontaktuj si ze swoim dostawc gazu lub ze stra po arn DLA W ASNEGO BEZPIECZE STWA 1 Nie przechowuj ani nie u ywaj benzyny ani innych atwopalnyc...

Page 3: ...zamkni tych poniewa mo e to spowodowa obra enia cia a lub uszkodzenie mienia 2 Ten ogrzewacz nie jest przeznaczona do instalacji na pojazdach rekreacyjnych i lub odziach 3 Instalacj i napraw powinien...

Page 4: ...adnie nadzorowane gdy znajduj si w obszarze ogrzewacza 23 Odzie ani inne materia y atwopalne nie powinny by zawieszane na ogrzewaczu ani umieszczane na lub w pobli u ogrzewacza 24 Butl z gazem nale y...

Page 5: ...aku przepis w lokalnych ze standardem dla przechowywania i obs ugi p ynnych gaz w naftowych 4 Zagnieciony zardzewia y lub uszkodzony zbiornik mo e by niebezpieczny i powinien zosta sprawdzony przez Tw...

Page 6: ...enia pilotuj cego UWAGA Je eli pod czana jest nowa butla z gazem prosz wcisn pokr t o regulacji na co najmniej minut pozwoli to na wydmuchanie powietrza znajduj cego si w w u przez otw r pilotowy odpo...

Page 7: ...zkodzenie wymie zaw r i w 4 Nigdy nie wolno przechowywa butli z gazem ciek ym poni ej poziomu gruntu lub w miejscach bez odpowiedniej wentylacji CZYSZCZENIE I KONSERWACJA 1 Wytrzyj powierzchnie malowa...

Page 8: ...CZ CI I SPECYFIKACJE...

Page 9: ...ar 37 mbar U ycie odpowiedniego regulatora zgodnie z ci nieniem wylotowym regulatora jak pokazano w powy szej tabeli Kategoria urz dzenia I3 28 30 37 I3B P 30 I3B P 50 I3B P 37 Rodzaj gazu Butan Propa...

Page 10: ...wielko ci Butelka roztworu mydlanego z rozpylaczem do pr by szczelno ci Uwaga podk adki dystansowe odb y nika s zawarte w zestawie monta owym CZ OPIS ILO A Panel odb y nika 3 B P yta odb y nika 1 FF...

Page 11: ...padle wzgl dem podstawy i dokr ci ruby 1 1 1 Umie ci 3 uchwyty masztu w ka dym punkcie podstawy w spos b pokazany na ilustracji 1 2 U y 3 rednich rub M8x15 do po czenia wspornik w masztu i podstawy 2...

Page 12: ...3 Umie ci obudow butli na stojaku 4 4 1 Wykr ci 4 ruby z palnika 4 2 Poprowadzi przew d gazowy przez maszt 4 3 Zamocowa palnik do masztu za pomoc 4 rub...

Page 13: ...Uwaga Je li jest to niezb dne dla uzyskania odpowiedniego u o enia element w odb y nika przed dalszym monta em poluzowa wszystkie ruby i dokr ci ponownie po w a ciwym u o eniu wszystkich cz ci 6 1 Zs...

Page 14: ...un podk adk 6 na gwintowany koniec ruby M6 X 10 II i dokr ci lu no nakr tk JJ Powt rzy procedur do momentu zako czenia monta u czterech element w Dokr ci wszystkie ruby w zaokr glonej kraw dzi 7 Zamoc...

Page 15: ...danie szczelno ci Czynno t nale y wykona przed pierwszym u yciem raz w roku i za ka dym razem gdy jakiekolwiek komponenty gazowe zostan wymienione lub serwisowane Nie pal podczas wykonywania tego test...

Page 16: ...zbiornik LPG Wyjmij i wyczy Przekr zaw r na ON Wymie termopar Umie ci dysz poprawnie Ustawi prawid owo Je li istniej jakiekolwiek problemy z monta em lub u ytkowaniem urz dzenia nie pr buj go modyfik...

Page 17: ...oty przed uruchomieniem urz dzenia W musi by zgodny z odpowiedni norm dla kraju u ytkowania Zu yty lub uszkodzony w nale y wymieni Upewnij si e w nie jest zbity za amany ani nie styka si z adn cz ci o...

Page 18: ...t FOR YOUR SAFETY 1 Do not store or use gasoline or other flammable vapors and liquids in the vicinity of this or any other appliance 2 An LP cylinder not connected for use shall not be stored in the...

Page 19: ...rvice person 4 Improper installation adjustment alteration can cause personal injury or property damage 5 Do not attempt to alter the unit in any manner 6 Never replace or substitute the regulator wit...

Page 20: ...all not be used or if alight the gas supply shall be shut off and the appliance shall be investigated and rectified before it is used again 29 To check the hose at least once per month each time the c...

Page 21: ...case of a leak The heater must be checked with a full cylinder Make sure the safety control valve is in the OFF position Turn the gas supply ON In case of a leak turn off the gas supply Tighten any l...

Page 22: ...and the hose 3 Check the tightness of the gas valve and for damage If you suspect a damage have it changed by your gas dealer 4 Never storage liquid gas cylinder in a sub terrain or at places without...

Page 23: ...PARTS AND SPECIFICATIONS...

Page 24: ...the proper regulator according to outlet pressure of regulator as showed in the table above C Table of injector APPLIANCE CATEGORY I3 28 30 37 l3B P 30 I3B P 50 I3B P 37 TYPES OF GAS Butane Propane Bu...

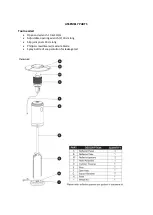
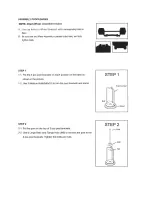
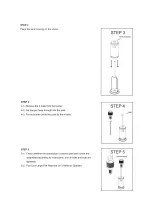
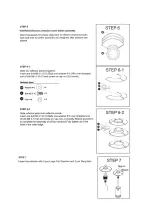
Page 25: ...ASSEMBLY PARTS Tool needed Open and wrench 10 13mm Adjustable opening wrench 2 20cm long Slip joint pliers 23cm long Philips screwdriver w medium blade Spray bottle of soap solution for leakage test...

Page 26: ......

Page 27: ......

Page 28: ......

Page 29: ...ile performing this test and remove all sources of ignition See Leak Testing Diagram for areas to check Turn all burner controls to the off position Turn gas supply valve on Brush a half and half solu...

Page 30: ...a suitable regulator that is certified to EN 16129 To connect the gas use a pressure reducing valve with the rated gas pressure of 37 mbar Please consult your LPG dealer for information regarding a s...

Reviews: