


22
Page 1
2.1
Positioning
Generally the Cam
i
no should be installed in a centrally
located position within the home. When deciding
where to position the appliance, you must consider the
following:
1. The place of installation of the pellet fi re must
comply with local and national regulations. The
pellet fi re must be fuelled only with quality pellets
manufactured to standard AS/NZS 4014.6. The
pellet fi re cannot operate using traditional fi re wood
or fuel other than wood pellets.
2. Do not install a pellet fi re in a bathroom, bedroom or
room where people sleep.
3. Camino has a convection fan which blows air through
tubes in the direction the fi re faces. For optimum
performance and heat circulation, locate the pellet
fi re in a large and open room that is centrally located
in the house.
4. The fi re requires a 230 volt power supply and comes
with a 2m plug in power lead. There must be easy
access to the socket so the fi re can be isolated
from the power if required . If the cable supplied is
not long enough to reach the nearest outlet, use a
suitable 3 pin extension cord. A surge protector is
recommended for use with all
a
R v il
l
e
pellet fi res.
2.2
Installing
Installation of the
a
R v il
l
e
Camino Wood Pellet Fire
must be undertaken by an approved installer, who must
then give the purchaser a declaration of conformity of
the appliance, and will assume all responsibility for the
fi nal installation and consequent correct function of the
installed product.
Please read this Manual thoroughly before commencing
installation, as failure to follow the instruction could cause
damage to the pellet fi re or property. It is also necessary
for the registered installer to take into consideration
all the laws and national, regional, provincial and local
regulations present in the country in which the appliance
has been installed. In the event of failure to respect these
precautions,
Solutions
ire
F
t
e
ll
e
P
declines all responsibility.
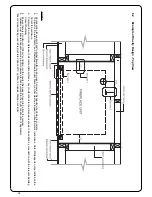
1. The fi re must be installed on a fl oor with suffi cient
carrying capacity. If the existing building does not
meet this requirement, appropriate measures must
be taken (i.e. a load distribution plate).
2. Camino must be installed on a non-combustible
surface. This surface must protrude a minimum
of 150mm from the front of the closed pellet fi re
door and a minimum of 200mm from the side of the
appliance. Please note that if a fl oating hearth is to
be installed, an allowance must be made below the
fi re for installation of the chosen surround.
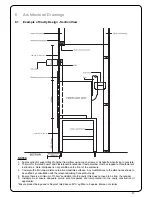
3. Check clearances to combustibles (see “5. Creating
f
u
s
e
r
u
s
n
e
o
t
)
6
2
e
g
a
p
n
o
”
y
ti
v
a
C
e
h
t
fi cent space
is created in the cavity, and that the position of
structural elements near the proposed fl ue have
adequate clearance.
4. Check clearance for service – as the Camino is
designed to be pulled out, as long as there is front
access, this should be suffi cient.
5. Check there is suffi cient ventilation for combustion
air and this is unaffected by mechanical extraction.
An external air intake may be required. (see
“5. Creating the Cavity” on page 26 for cavity
ventilation requirements).
6. There must be suffi cient circulation of air in the room
where the pellet fi re is installed. Never open the
door of the pellet fi re while it is functioning.
7. Check there is a suitable fl ue location (studs, joists,
rafters etc).
8. Camino has been Safety Tested to AS/NZS 2918:2001
using the Davins manufactured fl ue, Test Report
ARS 05/1185. Installation is not exclusive to these
nominated kits, though an alternative fl ue should
only be considered following consultation with your
local council.
9. Because of the positive pressure in the fl ue, sealing
This manual is designed for the technician/installer.
Please read this entire manual before operating your
Ravelli
Wood Pellet Fire. Failure to follow these
instructions may result in poor performance, damage to
the fi re, property damage, bodily injury or even death.
Any unauthorised modifi cation of the appliance or use
of replacement parts not supplied by the manufacturer
is prohibited.
All national and local regulations shall be complied with
when installing this appliance. Your local
Pellet
Solutions
ire
F
dealer will be happy to assist you in obtaining
information with regards to your local building codes and
installation regulations.
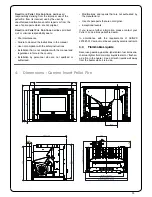
1. Introduction
2.
Positioning and Installation of the wood pellet re
Page 14
venting system should be inspected and cleaned at
least once every year or after every ton of pellets burnt.
We recommend contacting your dealer for professional
cleaning. To remove dust from the vent pipe, tap lightly
on the pipe to dislodge any loose ash. Open the bottom
of the
adapter box and vacuum as much of the ash
out of the vent pipe as possible.
8.10 Blower Mechanisms (yearly)
Pull the
forward to access the two blowers. Vacuum
all dust from motors and convection fan blades. DO
NOT lubricate these fans they have sealed bearings.
8.11 Post season clean-up
Once you are
using the pellet appliance for the
season, unplug the
for added electrical protection. It
is very important that the
be thoroughly cleaned and
serviced as stated above. Exposed metal part may be
painted with high temperate paint to prevent rusting over
the off season.
8.12 Cleaning the surfaces
To clean the surfaces on the painted metal parts, use a
damp cloth.
Important: the use of aggressive detergents or
abrasive cleaners can damage the surfaces of the
stove.
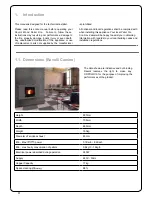
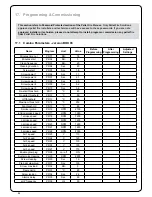
1.1.
Dimensions Ravelli
(
Camino)
Height
557mm
Width
705mm
Depth
650mm
Weight
150kg
Diameter of smoke exhaust
80mm
Min - Max
power
3.7Kw/h - 8.2Kw/h
Min - max hourly consumption of pellets
0.8kg/h - 1.9kg/h
Electrical power absorbed during operation
240W
Supply
220V - 50Hz
Hopper Capacity
17kg
Space Heating
88%
The data shown are indicative and not binding.
Ravelli
reserves the right to make any
for the purpose of improving the
performances of the product.