background image

11

9

10

5.

Maintenance and Cleaning

Before carrying out any maintenance, take the following precautions:

Make sure that the 

stove

 has been turned off, and that the general power supply has been disconnected

(Ensure that the plug is disconnected from the socket, thus avoiding accidental electric shocks).


.

d

l

o

c


e

r

a


e

v

o

t

s

 t

e

ll

e

p


e

h

f

o


s

t

r

a

p

 l

l

a

 t

a

h

e

r

u

s


e

k

a

M

Make sure that the ashes have cooled completely.

Make sure that the general switch is in the zero position (off).

Always use appropriate tools for maintenance.

When you have


.

n

i

a

g

a


e

v

o

t

s

 t

e

ll

e

p


e

h

g

n

i

s

u


e

r

o

f

e

b


s

d

r

a

u

g


y

t

e

f

a

s

 l

l

a

 l

l

a

t

s

n

i-

e

r


d,

e

h

s

i

n

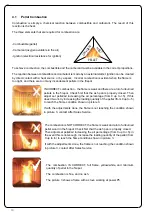
The pellet stove requires little maintenance if quality wood pellets are used, which is why we recommend 
pellet fuel that is manufactured to the AS/NZS4014.6.  

5.1 

Cleaning the surfaces

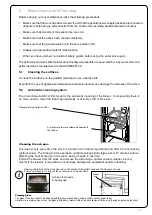
To clean the surfaces on the painted metal parts, use a damp cloth.

Important: the use of aggressive detergents or abrasive cleaners can damage the surfaces of the stove.

5.2

Automatic


r

o  

t

a   y

r

e

v

e

  t

r

a

t

s


f

o   

e

h

t

.

e

v

o

t

s


periodociallly

ri

f

 ep


o

t   n

a

e

l

c

 e

h

t


t

o

ne

o

n  

e

r

o

m


d

e

  r

e

h

t


s

i

e

Consequently

ri

f


 ep

l

c


f

o  

e

h

t


.

t

o

eaning

automatic 

m


s

i  

e

h

t


od


f

o  s

i

h

t


l

e

characteristic


n

i

a

m


 sy

 g

n

i

n

a

e

l

c


m

e

t

s

The


Pull

l

u

f

e

r

a

c

  o

t   e

h

t  

r,

e

i

z

a

r

b

  it may still be hot and may damage the equipment used for cleaning.  


t

u

o  

e

h

t   r

e

w

a

r

d


m

o

r

f


e

h

t  e

v

o

t

s


d

n

a   e

v

o

m

e

r


e

h

t  

h

s

a  

n

i

s

u

l

a

i

c

e

p

s

  m

u

u

c

a

v


r

e

n

a

e

l

c

e

b  y

r

e

v


c

x

e


n

i  e

h

t

  ,

m

o

o

r

  g

n

i

e

b


s

ti   s

t

r

a

p


n

i   t

s

a

c

  .

n

o

ri


han


e

g

he

g

n

it

c

e

f

f

a


e

h

t

 t

a

ti

w


ho


0

1  

s

e

t

u

n

i

m


t

u

abo


s

e

k

a

t


t

u

(work/cleaning/restart)

 op

tl

u

a

f

e

d

(

  )

e

u

l

a

v


e

h

T

.

  g

n

i

m

it


r

o

f  

s

i

h

t


n

o

it

a

r

e


g

n

i

k

r

o

w


ho

l

c

 s

t

e

s

  y

r

e

v

e

 e

m

it

 e

h

t

  e

v

o

t

s


s

i   d

e

n

r

u

t


n

o  

2

(  

s

n

o

it

a

t

o

r


y

b  

)

tl

u

a

f

e

d

 d

n

a

  r

e

t

f

a


8  s

r

u

ean

e

h

T


r

e


)

°

0

6

3


n

o

it

a

t

o

r

g

n

i

k

r

o

w

r

e

n

a

e

l

C


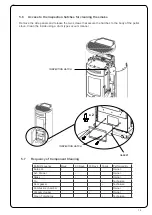
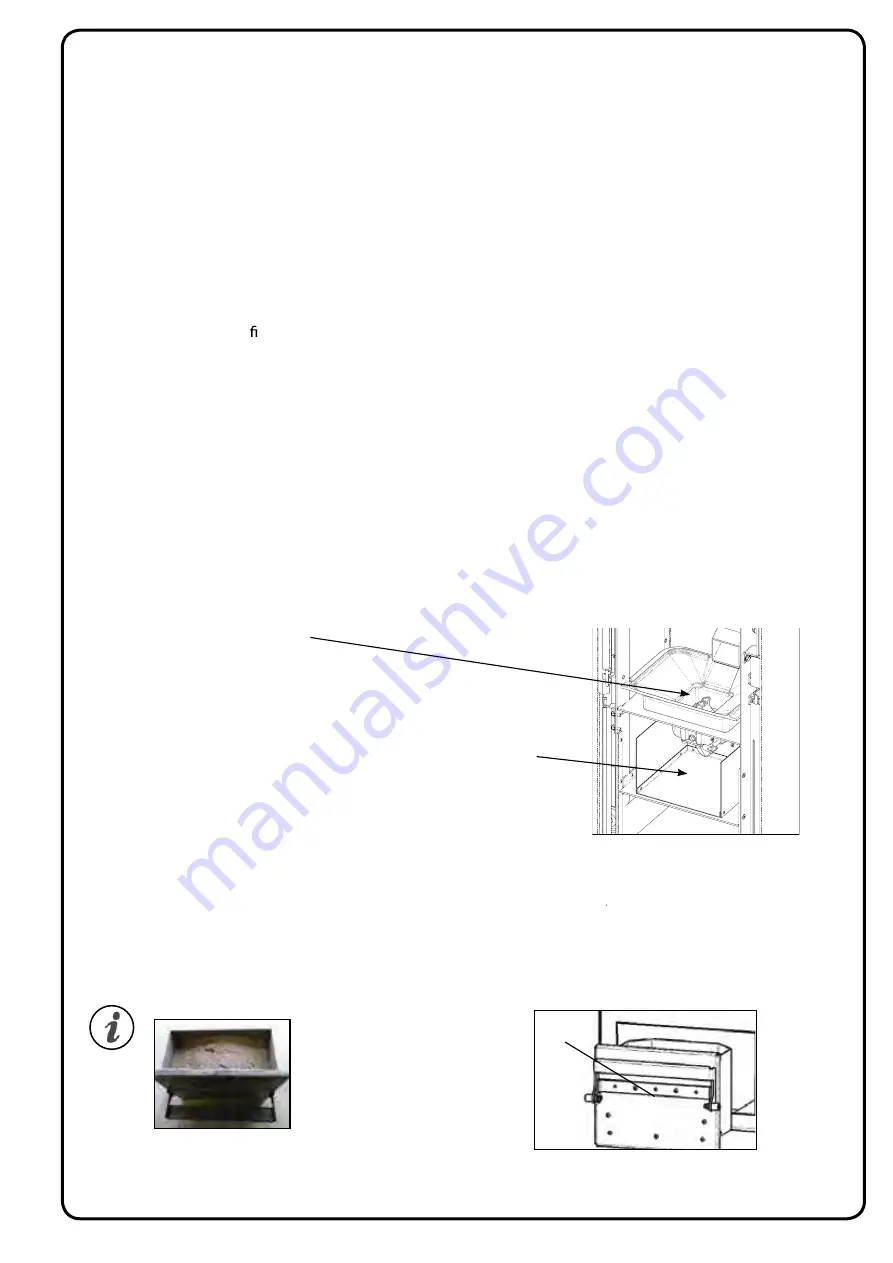
Ash-drawer: ashes are released underneath the 

epot

n

a

p

:


h

s

a


e

h

t


g

n

i

n

a

e

l

C

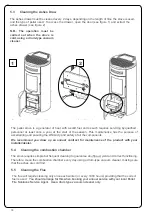
Cleaning operations of the stove depend on the quality of the pellets used and the frequency of use.

It may be necessary to carry out these operations on a daily basis.

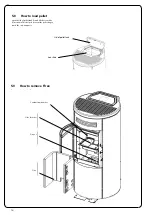
Drawer

ash

Ash pan that needs

to be emptied

Cleaning glass

Th

e glass of the door should be cleaned with the stove cooled down using a cotton cloth or paper towel.

Usually, we recommend you clean the glass with a damp (water) cloth and ash collected after burning (having an abrasive function).

4

Opuscule dédié au modèle 

Natural 7

Brochure for 

Natural 7

 model

Broschüre für Modell 

Natural 7

INSTALLAZIONE

L’apparecchio deve essere installato su un pavimento di adeguata capacità di carico. Se la costruzione esistente non soddisfa questo requisito, misure 

appropriate (es. piastra di distribuzione di carico) dovranno essere prese. / The stove must be installed on a floor with a sufficient carrying capacity. If

the existing building does not meet this requisite, appropriate measures must be taken (i.e. load distribution plate)/ le poêle doit être installé sur un sol 

ayant une capacité de charge adéquate. Si la construction existante ne satisfait pas cette exigence, il faudra prendre des mesuresappropriées (ex. : 

plaque de distribution de la charge). / Der Ofen muss auf einem Fußboden mit angemessener Tragfähigkeit aufgestellt werden. Falls die vorhandenen 

Baulichkeiten diese Anforderung nicht erfüllen, müssen entsprechende Maßnahmen getroffen werden (z.B. Platte zur Verteilung der Last)./ la estufa 

debe instalarse sobre un pavimento con adecuada capacidad de carga.Si la construcción existente no satisface este requisito se deben tomar las me-

didas adecuadas (por ejemplo, losa para la repartición de la carga)./ • Pilleovnen skal installeres på et gulv med passende belastningskapacitet. Hvis 
den nuværende konstruktion ikke opfylder dette krav, skal der tages passende forholdsregler (f. eks. plade til fordeling af vægten).

L’installazione dell’apparecchio deve garantire facile accesso per la pulizia dell’apparecchio stesso, dei condotti dei gas di scarico e della canna fuma-

ria/ The installer of the stove should guarantee an installation with easy access to the stove and of the chimney / l’installation de l’appareil doit garantir 
d’y acceder facilement pour le nettoyage desconduits des gaz de décharge et du tuyau de cheminée.

Ventilatori di estrazione(es. cappe di aspirazione), quando usati nella stessa stanza o spazio dell’apparecchio, possono causare pro-

blemi. / Extraction fans (eg. kitchen hoods), when used in the same room or environment of the applaiance, may cause problems.

Distanza minima da materiali infiammabili: / minimun clearances from combustible materials:

R = lato destro / right side 

200 mm          

L =  lato sinistro / left side 

200 mm

B =  posteriore / back side 

100 mm

S =  superiore / upper side    

600 mm

A =  frontale / front side         

800 mm

B

SISTEMA DI PULIZIA AUTOMATICA - AUTOMATIC CLEANING SYSTEM - SYSTEME AUTOMATIQUE DE NETTOYAGE

ITA 

- La principale caratteristica di questo modello di stufa è la pulizia automatica del braciere ove avviene la combustione. Di conseguenza non 

risulta più necessario garantire una pulizia periodica del braciere o, come in altri modelli privi di questo sistema, ad ogni accensione della stufa.

ENG

 - The main characteristic of this model is the automatic cleaning of the firepot. Consequently there is no more need to clean the firepot 

periodically or at every start of the stove.

FR

 - La caracteristique principale du cette modèle de poêle est le nettoyage automatique du brasier. De consequence ce n’est plus necessaire 

garantir un nettoyage periodique ou à chaque démarrage du poêle.

ESP

- La característica principal de este modelo de estufa es la limpieza automática del brasero. En consecuencia, no

es necesario limpiar periódicamente el brasero o, como en otros modelos sin este sistema, cada igniciòn de la estufa.

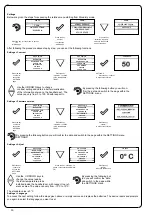
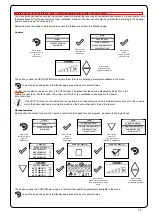
 Cleaner working (rotation 360°) 

Ash-drawer: ashes are released underneath 

the firepot

ITA 

- IL PULITORE SI ATTIVA AD OGNI ACCENSIONE DELLA STUFA (2 ROTAZIONI DI DEFAULT) E DOPO 6 ORE (VALORE DEFAULT) DI FUNZIONA-

MENTO CONTINUO DELLA MEDESIMA. IL CICLO DI SPEGNIMENTO E RIACCENSIONE DELLA STUFA DURANTE LA FASE DI PULIZIA CON PULITORE 

AVVIENE IN CIRCA 10min. TRATTANDOSI DI STUFE CON SCAMBIATORE IN GHISA, LA PROPAGAZIONE DEL CALORE VIENE OTTIMAMENTE 

GARANTITA PER TUTTO IL PERIODO DI PULIZIA E RIACCENSIONE DELL’APPARECCHIO STESSO.

ENG

 -  THE CLEANER SETS EVERY TIME THE STOVE IS TURNED ON (2 ROTATIONS BY DEFAULT) AND AFTER 6 HOURS WORKING (DEFAULT VALUE). 

THE TIMING FOR THIS OPERATION (WORK/CLEANING/RESTART) TAKES ABOUT 10 MINUTES WITHOUT AFFECTING  THE HEAT EXCHANGE IN THE 

ROOM, BEEING ITS PARTS IN CAST IRON.

FR 

- LE NETTOYEUR S’ACTIVE A’ CHAQUE DEMARRAGE DU POELE (2 ROTATIONS DU DEFAUT) ET APRES 6 HEURES DE TRAVAIL (DEFAUT).  LE 

CYCLE DE DEMARRAGE ET EXTINCTION DE L’APPAREIL PENDANT LE NETTOYAGE AVEC CE TYPE DE NETTOYEUR EST D’ENVIRON 10 MINUTES. 

DEPUIS L’ÉCHANGEUR DE POÊLE EST EN FONTE, LA PROPAGATION DE LA CHALEUR EST BIEN GARANTIE POUR  TOUTE LA DURÉE DU NETTOYAGE 

ET REDEMMARAGE DU POELE.

ESP

 - EL LIMPIADOR SE ACTIVA A CADA IGNICION DE LA ESTUFA (2 VUELTAS DE FORMA PREDETERMINADA) Y DESPUES DE 6 HORAS (PREDE-

TERMINADO) DE TRABAJO DE LA MISMA. EL TIEMPO PARA ESTA OPERACIÓN (TRABAJO / LIMPIEZA / REINICIO) TARDA UNO 10 MINUTOS SIN QUE 

AFECTAN EL INTERCAMBIO DE CALOR EN LA HABITACION, SIENDO SUS PARTES EN HIERRO FUNDIDO.

Summary of Contents for Dual 7

Page 1: ...nual PLEASE READ THIS ENTIRE MANUAL BEFORE INSTALLATION AND USE OF THIS WOOD PELLET FIRE FAILURE TO FOLLOW THESE INSTRUCTIONS COULD RESULT IN PROPERTY DAMAGE BODILY INJURY OR EVEN DEATH Contact your l...

Page 2: ...echnical programming and individualised air pressure adjustments to ensure it will operate safely and ef ciently and to avoid possible damage to the re or the home Installation of the Dual 7 Wood Pell...

Page 3: ...s 8 2 8 Safety Devices 8 2 9 Responsibilty 8 2 10 Spare Parts 8 3 What are Wood Pellets 9 4 The Components of the Stove 9 4 1 Pellet Combustion 10 5 Maintenance and Cleaning 11 5 1 Cleaning the surfac...

Page 4: ...f the Display 16 6 5 Time and Date Settings 17 6 6 Loading the Auger 18 6 7 Setting Operating Temperature and Power 19 6 8 Turning the Device on 19 6 9 Operating Phases of the Stove 20 6 9 1 Alarms 28...

Page 5: ...f fuel used IMPORTANT The above values were found during testing and may vary with the fuel type climate and installation style Testing Standard Description Class I IP 20 AS NZS 5078 2007 Appliance AS...

Page 6: ...l l a t s n I r e l a e d Solutions Fire personnel who must give the purchaser a declaration of conformity of the appliance and who will installed It is also necessary to take into consideration all t...

Page 7: ...circulation 3 Check clearances to combustibles refer page 37 2 3 Ash The ash content of the fuel and operation of your stove will directly determine the frequency of cleaning The use of high ash fuel...

Page 8: ...ponsibility due to Poor maintenance Failure to observe the instructions in the manual Use not compliant with the safety instructions Installation that is not compliant with the regulations in force in...

Page 9: ...d and can be 1 5 twice greater than that of natural wood The diameter of the cylindrical rods is 6 10 mm and their length can vary between 10 and 50 mm Their weight is equal to about 650 kg m Due to t...

Page 10: ...d Then adjust set pellet air increasing the air percentage from 0 up to 5 If this doesn t work try increasing the loading quantity of the pellet from 0 up to 5 to reach the flame condition shown in pi...

Page 11: ...n i m i t r o f s i h t n o i t a r e g n i k r o w ho l c s t e s y r e v e e m i t e h t e v o t s s i d e n r u t n o 2 s n o i t a t o r y b t l u a f e d d n a r e t f a 8 s r u ean e h T r e 0 6...

Page 12: ...ime the stove is used and the type of pellet used To access the drawer open the door 2 figure see drawer ashes the extract and 1 figure see N B The operation must be carried out when the stove is cold...

Page 13: ...1 e smontare i laterali come in fig 2 per accedere alle botole di ispezione Le piastre sono guarnizionate pertanto prima di rimontare le botole assicurarsi che le guarnizioni che permettono l ermetici...

Page 14: ...the iron slide 2 as shown This helps to prevent the pellet bag to touch the cast iron parts Lid of pellet tank Iron slide 1 2 5 8 How to load pellet 5 9 How to remove Firex 7 Opuscolo dedicato modello...

Page 15: ...FRQWDFW ZLWK KRW VXUIDFHV Manuale utente PALMARE IDRO TOUCH RADIO Pag 22 Vers 01 del 07 04 15 Wiring RQQHFW WKH SRZHU FRUG WR WKH EDFN RI WKH VWRYH DQG WKHQ WR D ZDOO VRFNHW 7KH 2 VZLWFK LQ WKH JXUH V...

Page 16: ...VLJQDO IURP WKH KDQGKHOG VHW SUHVVLQJ WKH HQWHU NH RQ WKH KDQGKHOG VHW WKH FRPSRQHQWV VWDUW FRPPXQLFDWLQJ ZLWK HDFK RWKHU FKHFN VLJQ RQ WKH GLVSOD DFFRPSDQLHG E D VRXQG VLJQDO VKRZV WKDW WKH LQLWLDOL...

Page 17: ...andheld set Moreover if you press the DOWN scroll key you will display the temperature settings that can be changed using the two UP DOWN keys Any change made is confirmed automatically within 3 secon...

Page 18: ...e Press the key confirm to access the SETTINGS page Press the key confirm to access the USER page Press the key con firm to access the page DATE TIME Press the key selection for selection to switch to...

Page 19: ...le the rotation of the auger The appearance of the message ADJUST THE RDS SYSTEM indicates that the initial parameter testing procedure and calibration has been unsuccessfully This indication does not...

Page 20: ...hermostat optional this must be connected to the appropriate connector on the rear side of the stove and you will have to activate the reading in SETTINGS EN ABLE THERMOSTAT On display appears the wri...

Page 21: ...TA 5 For example with the room temperature at 21 C the stove switches of f when this temperature is reached and restarts when the temperature reaches 15 C 21 C 5 C 0 5 C tolerance You can also activat...

Page 22: ...nge the quantity of pellet loaded in the brazier and the air inflow The stove is tested and inspected with DIN PLUS certified pellets If using another type of pellets or uncertified pellets fuel may n...

Page 23: ...of the stove useful for service during inspection Actual flow Fume extractor revolutions Fume temperature Stove state To exit the STOVE STATE page and return to Stand by page press the button repeated...

Page 24: ...of the information shwon on the handheld set The value can vary from 0 to 100 50 with respect to Settings Firmware version Press the key confirm to access the SETTINGS page Press the key selection to...

Page 25: ...t on the stove If the AUTO function is not enabled the fan operation is not depending on stove s installed power except for the cases in which the flame switches to modulation mode and the heat exchan...

Page 26: ...e WAITING FOR FLAME The pellets ignite and take advantage of the heat in the intake air that passes through the incandescent heater tube FLAME PRESENT The flame is visible in the grate AREAS The stove...

Page 27: ...quest from ECO STOP mode coincides with an automatic switch off condition from the TIMER the stove turns on ensuring total cleaning of the brazier before switching to FINAL CLEANING INFEED SCREW OVERF...

Page 28: ...setting from SET AIR PEL LETS If the problem persists contact the Support Service Support AL 07 RESET THERMAL BREAKER PELLET DOOR OR GATE OPEN The manual reset thermostat has tripped connected to the...

Page 29: ...efore switching on the stove it is necessary to check that the brazier is clean and so that they are always excellent combustion thus avoiding any overheating that may cause changes in the color of th...

Page 30: ...30 38 4 Maintenance Record DATE WORK CARRIED OUT SIGNATURE 40 7 Maitenace record...

Page 31: ...al service fees may apply if you are seeking warranty service from a dealer other than the dealer from whom you originally purchased the product Check with your dealer in advance for any costs to you...

Page 32: ...let Solution e r i F s approved venting components hearth components or other accessories used in conjunction with the appliance Any part of a pre existing replace system Pellet Ravelli i t u l o S on...

Page 33: ...wood pellet re purchase and attach the receipt and any other documents business cards from the retailer that sold you the re Name of Store where Pellet re was purchased Date of Purchase Amount Paid Pa...

Page 34: ...ioning the stove 38 2 6 Location of a power source 38 2 7 Internal Standard Flue Kit 50SBD N 39 2 8 External Standard Flue Kit 51ita 40 2 9 Seismic Restraint 41 2 10 Fixing to Timber Floor Framing 41...

Page 35: ...ter of smoke exhaust duct mm 80 Min max 1040 502 561 power calorofic kW 3 3 6 7 Min max hourly consump tion of pellets Kg h 86 0 95 1 5 Electrical power absorbed during operation W 240 Supply V Hz 220...

Page 36: ...down completely meaning the likelihood of any hot embers or burning fuel escaping from the combustion chamber is extremely minimal Therefore a 150mm forward projecting floor protector will be suffici...

Page 37: ...H A E External Flue J J F B I F E 7 Dual Pellet Fire Clearance to Combustibles B C A E D G F B F G E Internal Flue Location Dimension mm A B 150 C D E 100 F 0 1 0 G H I J 250 50 n a 50 0 1 0 50 25 Fr...

Page 38: ...pellet fire door 7 Dual has been Safety Tested to AS NZS 2001 2918 using the Davins manufactured flue Test Report ARS 05 1185 Installation is not exclusive to these nominated kits though alternative...

Page 39: ...6m The visible flue is finished in black and the ceiling plate is white The support angles for securing the liner to the ceiling are not shown Kit is supplied in a carton Heat resistant floor protect...

Page 40: ...and penetrating the soffit The overall height of the flue is 3 6m All visible flue has a galvanised finish and can be powdercoated on request Kit is supplied in a carton Note The Davin 51 External St...

Page 41: ...5 shall be provided 9 2 Installation 7 Dual should be installed in a centrally located position within the home This will assist the appliance to perform to the level required Dual As heats space by c...

Page 42: ...42 1 2 x 4 2 12 How to mount the side panels 10 Opuscule d di au mod le Dual 7 Brochure for Dual 7 model Brosch re f r Modell Dual 7 2 3 x 4...

Page 43: ..._________________ Phone ________________________________ Model __________________________ Serial Number ____________________ Date of Purchase __________ dd mm yy Date of Installation _________ dd mm y...

Page 44: ...44 38 4 Maintenance Record DATE WORK CARRIED OUT SIGNATURE 40...

Page 45: ...peration of my Pellet Fire I understand that warranty conditions require an authorised Pellet Fire Solutions Installer to complete the installation Signed Date Installation Details Pellet Fire Model S...

Reviews: