38
31
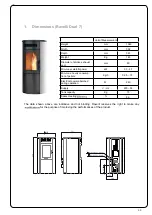
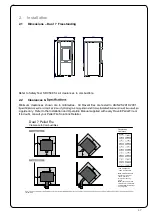
Side of Unit A
( )
50mm
Rear wall to Lined Flue C,
(
I
G,
)
25
mm
Rear wall to Unlined Flu C,
(
)I
G,
75mm
Rear of Unit (H)
0
1 0mm
Rear corners (Corner Installation) (F)
0
1 0mm
Floor protection (from glass) (B)
150mm
2.3
Minimum Clearance to Combustibles
2.4
Location of the Pellet Fire
Installation
of the
must
Heater
Burning
Pellet
Wood
Freestanding
7
Dual
Ravelli
be undertaken by an experienced installer. Please read the
7
Dual
Owners/Technical
Manual thoroughly before commencing installation as failure to follow the instruction could
cause damage to the pellet fire or property.
2.5
Positioning the fire:
Generally Dual
should be installed in a centrally located position within the home. When
deciding where to position the appliance in your room you need to consider the following:
2.6
•
•
must be installed on a non-combustible surface. This surface must protrude
150mm from the front of the closed pellet fire door.
•
7
Dual
has been Safety Tested to AS/NZS
:2001
2918
using the Davins manufactured
flue. Test Report ARS
05/1185.
Installation is not exclusive to these nominated kits,
though alternative flue should only be considered following consultation with your local
council.
•
Please see “Clearances & Specifications”
for the required clearances to combustible
material also ensure the position of structural elements near the proposed flue.
•
Because of the positive pressure in the flue, sealing of all 75mm stainless joints is
mandatory – use high temperature Maniseal. Both inner and outer flue joints must be
riveted.
•
Seismic Restraint: Please see “Seismic Restraint”
for requirements.
•
Warranty: To validate warranty following installation a copy of the completed Warranty/
Producer Statement must be forwarded to:
Pellet
pelletfiresolutions.co.nz
@
info
-
Solutions
Fire
2
7
Location of a power source
Dual 7 has a convection fan which blows air through tubes in the direction that the
fire faces, for optimum performance this location should be in a large room, facing
the area to be heated
Dual
7

