


Manuale uso e manutenzione S70- S90- SC90
Pag.38
Rev.0 18/05/2020
Failed ignition
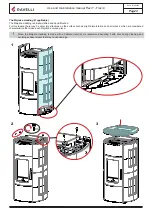
In models without a self-cleaning brazier, check that the brazier is empty and clean.
⚠
The brazier could be very hot: danger of burns!
⚠
Never empty the brazier inside the hopper.
Setting operating temperature and power:
Set the two values following the indications given in the chapter “Description of thr display”
Turning the device on
Keep the key ON/OFF pressed for a few seconds to turn on the stove.
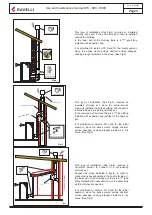
Operating phases of the appliance
Sequence of ignition phases
SWITCH-ON- initial pellet loading phase;
FLAME PRESENT - flame stabilization phase and reduction of combustibl
e inside the brazier;
WORK - operation phase described in the dedicated chapter;
Modulation
During the work phase, the appliance should reach the room temperature set; when this condition is met, the stove switches to
MODULATION
mode in which fuel consumption and ventilation are minimum.
📌
If you wish to detect the ambient temperature by means of an external thermostat (optional), this must be connected to
the appropriate connector on the rear side of the stove; and you will have to activate the reading in “SETTINGS - ENABLE
THERMOSTAT.” On display appears the writing TON / TOFF based on thermostat request.
⚠
Connect an external thermostat with a simple dry contact, therefore, not powered, moreover, we reccomend you use a
thermostat with a minimum offset of 3°C if you ntend to use the comfort clima function.
Description of menu functions
Press the key to access the MENU page
User’s manual HANDHELD TOUCH RADIO
User’s manual HANDHELD TOUCH RADIO
Pag.24
Pag.25
Vers. 01 of:07.04.14
Vers. 01 of:07.04.14
5
2
1
3
6
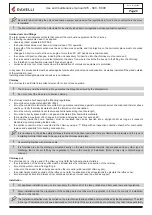
1
Settable switch-on program
2
Settable switch-off program
3
Day of the week with active program
4
Number of "chrono" program (1-2-3-4)
5
Setting the power upon programming
6
Setting ambient temperature
4
MENU
MENU
CHRONO
ENABLE CHRONO
ENABLE CHRONO
SET CHRONO
SET CHRONO
SET CHRONO
SET CHRONO
SET CHRONO 1
SET CHRONO 2
SET CHRONO 3
SET CHRONO 4
ENABLE CHRONO
ENABLE CHRONO
CHRONO
USER
MANUFACTURER
ENGINEER
MANUFACTURER
ENGINEER
USER
USER
USER
SCREW FEEDING
SCREW FEEDING
CHRONOTHERMOSTAT
CHRONOTHERMOSTAT
AIR-PELLET SET
STOVE STATE
AIR-PELLET SET
STOVE STATE
MENU
Flow
Flow
Flow
Flow
MANUFACTURER
ENGINEER
USER
USER
USER
SCREW FEEDING
SCREW FEEDING
CHRONOTHERMOSTAT
AIR-PELLET SET
STOVE STATE
CHRONOTHERMOSTAT
AIR-PELLET SET
STOVE STATE
USING THIS METHOD, IT IS NECESSARY TO VERIFY THAT AFTER EACH AUTOMATIC SHUTDOWN
THE GRATE IS ALWAYS VERY CLEAN TO GUARANTEE CORRECT AUTOMATIC SWITCH ON.
AUTOMATIC SWITCH ON.
The first setting allows the activation of the CLIMATE COMFORT function. This function is intended to ensure that the room tem
-perature set is maintained steady upon setting the maximum period of “X” minutes (SWITCH-OFF DELA
Y: 5 MIN) before switch-ing to ECO STOP phase. The STOVE maintains this state until the temperature drops below the set
value (CLIMATE COMFORT DELTA : 5℃).
For example, with the room temperature at 21 ° C, the stove switches of f when this temperature is
reached and restarts when the temperature reaches 15°C (21°C - 5°C - 0,5°C tolerance).
You can also activate the function using an external thermostat, keeping in mind that this does not include the value of the hyster
-esis.
We recommend you use an external thermostat with a histeresys value that can be set to maximum 3°C.
The operation of the stove could activate the switch ON/OFF phases for several times during the day;
this may affect the service life of the ignition coil.
Description of menu functions
Press the key to access the MENU page
The TECHNICIAN and MANUFACTURER menus are protected by password.
Chronothermostat
With the Chrono-thermostat function you can program the automatic switch ON/OFF of the stove for each day of the week
for each day of the week in 4 independent time intervals (SET CHRONO 1-2-3-4)
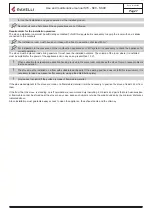
Below are given the steps for accessing the relative menu starting from Stand-By mode.
Press the key “access
menu” to access
the
MENU page
Press the key
“confirm”
to access the
USER page
Press the key
“selection”
to quickly switch to
CRONO-THERMOSTAT.
By pressing the Increment key you can change each value and, at step 3, enable the days of the week;
By pressing the Increment key you can change each value and, at step 3, enable the days of the week;
Press “confirm” to confirm the settings and switch to the next value;
Press the “back” button to return to the CHRONO-THERMOSTAT page.
As per the above example, it has been set as CHRONO 1 an ignition from 08.30 to 21.30 from MONDAY to FRIDAY at the oper
-
ating power 5 with a room temperature set at 21 ° C. Programmes 2-3-4 can be set in the same manner.
To exit the CHRONO-THERMOSTAT function and return to Stand-by page, press the button repeatedly.
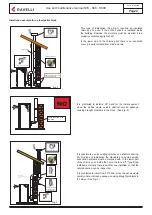
AIR / PELLETS setting
Setting of the PELLET-FLOW mix enables you to immediately change the quantity of pellet loaded in the brazier and the air inflow.
The stove is tested and inspected with DIN PLUS certified pellets. If using another type of pellets or uncertified pellets, fuel may
need adjustment. Usually, the variation involves the FLOW percentage to adjust the input air and, therefore, the combustion; should
the regulation of flow be insufficient, it may be necessary to also change the percentage of PELLET load.
Below are given the steps for accessing the relative menu starting from Stand-By mode.
Press the key “access
menu” to access
the
MENU page
Press the key
“confirm”
to access the
USER page
Press the key
“selection”
to quickly switch to
SET AIR / PELLETS.
As per the above example, you have set a percentage of -2 for PELLETS and +3 for the FLOW
, an indication
that a setting like this is a consequence of the fact that the oxygen needed for combustion is insufficient and pellet
size is smaller than the average size of 2 cm.
To exit the SET AIR - PELLET function and return to Stand-by page, press the button repeatedly.
NOTE: The number indicated during the change of parameters refers only to a percentage value that acts on the default
parameters set on the electronic board (exclusively in the WORK phase). These values should be changed in the event
of poor combustion, due in many cases to the purchase of pellets differing from those used during stove testing.
📌
The TECHNICAL and PRODUCER menus are password protected. Changing parameters within these menus could
compromise the operation and safety of the stove. In this case the warranty will be invalidated.
Summary of Contents for Flexi 7
Page 1: ...USE AND MAINTENANCE MANUAL Flexi 7 Flexi 9...
Page 2: ......


