background image

Use and maintenance manual Touch Radio Hydro

Pag.28 

Rev.0  18/05/2021

EN

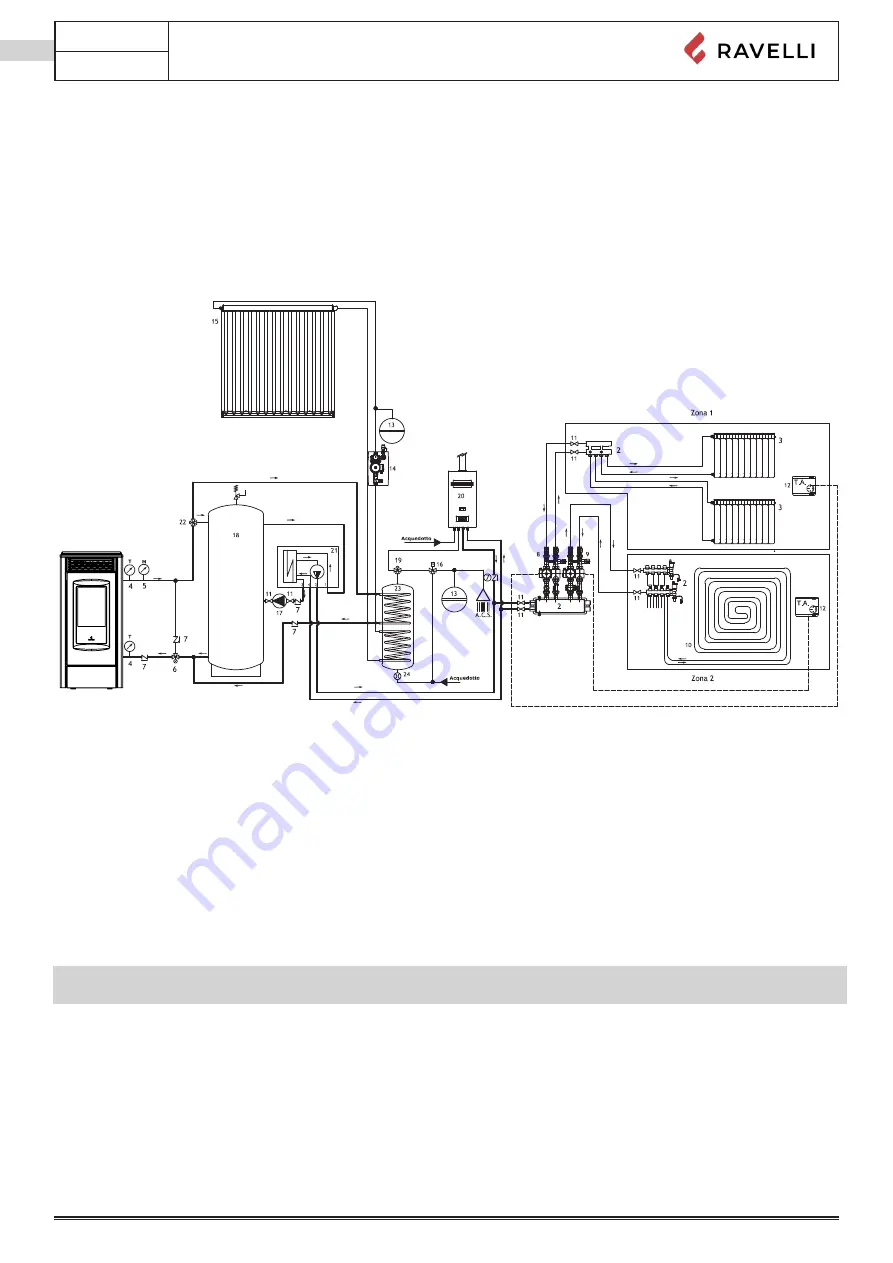
Diagram 3 (boiler buffer tank sensor)

Diagram 3 is to be used in a system where both a water buffer tank for the heating system and a DHW boiler are present.

The operating logic is similar to that of Diagram 1. Also in this type of circuit, the boiler water temperature is managed by the stove 

and room temperature by a control unit (not supplied) that controls the buffer tank and any zone valves. The buffer tank temperature 

is controlled by the thermo-stove through a sensor.

The diagram shown here is indicative and may not display all the components required to properly operate the system. Rely on a 

qualified thermal technician for the hydraulic system design.

System water characteristics

The chemical-physical characteristics of the system and replenishing water are important for the proper operation and service life 

of the thermo-stove; in fact, with the use of low quality water the most frequent problem is due to scale, which causes a reduction in 

heat exchange and generates corrosion.

Therefore, we invite you to check the quality and hardness of the water with your supplier.

We recommend the installation of a softener (limescale filter) in correspondence with the system loading. This precaution becomes 

essential in the conditions listed below: 

• 

medium and high water hardness (> 15 ° f)

• 

considerable quantities of make-up water or subsequent fillings

• 

plants of a certain complexity and size.


National and local laws may require the use of water softening systems. The technician responsible for the plumbing 

installation is invited to check what is reported in the regulations in force.

System water load

Once the plumbing connections have been completed, the appliance and its system can be LOADED.

To facilitate the escape of air, unscrew the cap of the automatic vent valve (Jolly valve) of the thermo stove and open the vent valves 

in the system. Bleed the air even after the first hours of operation and, if necessary, also periodically (for example in the event of 

noises and gurgling).

The filling pressure of the COLD system must be 1 bar (100 kPa). In order to ensure correct operation of the thermo stove, the HOT 

pressure must be approximately 1.5 bar (150 kPa).

If during operation the system pressure drops to values below the minimum indicated above, the user must bring it back to the initial 

value by acting on the filling tap.

It is possible to load the system and keep it at the correct pressure also by means of a special automatic filling unit.

Periodically check the system water pressure, using the appropriate function on the display.

Stufa a Pellet

LEGEND

1- Pellet stove

2- Distribution manifolds

3- Radiators

4- Thermometer

5- Pressure gauge

6- Anti-condensation valve

 7- Check valve

 8- Group of direct distribution

 9- Thermostatic distribution unit

10- Radiant panel (underfloor heating)

11- Shut-off valve

12- Thermostat

13- Expansion vessel (tank)

14- Pump station for solar thermal system

15- Solar thermal collector

16- Thermostatic mixing valve

17- Booster pump

18- Buffer tank

19- Motorised three-way valve with spring return

20- Gas boiler

21- Power separation system

22- Motorised three-way valve

23- DHW storage

24- Flow switch

Summary of Contents for Hydro

Page 1: ...USE AND MAINTENANCE MANUAL HYDRO Handheld Touch Radio Hydro...

Page 2: ......

Page 3: ...n do not discard it without reading it Incorrect installation maintenance and improper use of the product relieve the Manufacturer of all liability deriving from use of the stove For further informati...

Page 4: ...12 Safety devices 13 SHIPPING AND INSTALLATION 14 Safety warnings for transportation and installation 14 Set ups for the smoke evacuation system 15 Installation 16 CONNECTIONS 19 Chimney connection 19...

Page 5: ...ption of menu functions 34 Setting 38 Anti condensation system 39 Stove phase general layout 40 MAINTENANCE 45 Safety warnings for maintenance 45 Cleaning 45 Extraordinary maintenance 46 Failure cases...

Page 6: ...glass the gaskets the paint job the stainless steel or cast iron combustion grille the resistance the Majolica cladding the aesthetic parts any damages caused by unsuitable installation and or use of...

Page 7: ...ied therefore if any inconsistency arises it will be necessary to follow the text in the original language or contact our Technical Documentation Office Symbols used in the manual symbol definition Th...

Page 8: ...brigade Only use original spare parts Any tampering and or replacementsthathavenotbeenauthorisedbyRavellicanpose a danger to the user s safety In the event of particularly adverse weather conditions...

Page 9: ...ed in the contract and herein the operating manual procedures are followed routine maintenance is carried out according to the times and methods set forth extraordinary maintenance is promptly carried...

Page 10: ...stove to a regulation chimney provide a suitable system for the supply of combustion air air intake or intake duct for watertight stoves always perform maintenance with the stove off and cold perform...

Page 11: ...e distance Ravelli recommends using wood pellet classified A1 and A2 according to the EN ISO 17225 2 2014 standard or certified DIN PLUS more restrictive than the A1 class or ONORM M 7135 Pellet may b...

Page 12: ...tove is in the OFF state If one of them is not closed the pellet supply is interrupted the control unit emits an acoustic warning signal while the symbol ap pears on the display In this condition by t...

Page 13: ...y systems required by the standards It should be noted that the stove s operating program has been designed to stop stove operation in the event of malfunctions Anomalies Description Temperature in th...

Page 14: ...mpatibility has a priority over any other assembly or installation operation Local administrative regulations and particular requirements of the authorities pertaining to the installation of combustio...

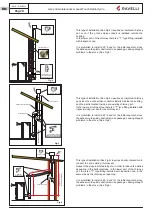
Page 15: ...g the following regulations it must observe product standard EN 1856 1 it must be made of materials that are suitable to guarantee resistance against normal mechanical chemical and thermal stress and...

Page 16: ...ion in the presence of other combustion appliances or VMC system it is necessary to check the appliance for correct operation The stove must be placed inside living quarters It must never be installed...

Page 17: ...stalled externally there is another one installed so that the outside section can be inspected It is prohibited to install two 90 bend since the ashes would quickly obstruct smoke passage causing drau...

Page 18: ...ial segment since the ashes would quickly obstruct smoke passage causing draught problems in the stove See Fig 2 INTERNAL CHIMNEY Fig 5 Protection from rain Covering sheet Air tight steel sheet metal...

Page 19: ...nctions of the electronic board with display Pressure indicator integrated in the functions of the electronic board with display Acoustic alarm integrated in the functions of the electronic board Auto...

Page 20: ...It is recommended that authorized personnel pay special attention to the electrical connections after any work on the product Switch Power plug Fuse Connection of external probe or thermostat To manag...

Page 21: ...er pump C1 Booster pump Three way valve V1 Domestic hot water DHW V2 Heating Probes S Flue gas probe J S1 Probe H2O return Probe Buffer L S2 Flame probe K S3 External thermostat Room probe S4 Probe DH...

Page 22: ...agrams Connections for diagram 0 heating system only S3 Connections for diagram 0 and DHW Kit The optional kit is required to use this diagram G3 S3 V1 V2 N Connections for diagram 1 boiler The option...

Page 23: ...EN Connections for diagram 3 boiler buffer tank The optional kit is required to use this diagram S3 S1 S6 S4 Connections for home automation and gas boiler For all schemes to use the home automation c...

Page 24: ...is forbidden to connect a shut off valve to the safety drain outlet The water coming out of the safety valve could be hot Danger of burns and damage to people and things The manufacturer is not respo...

Page 25: ...only In this type of circuit the stove is directly connected to the heating system This is the default set diagram The diagram shown here is indicative and may not display all the components required...

Page 26: ...h if connected detects DHW being used If the thermo stove is in ECO STOP mode or in WATER STAND BY mode a request by the Boiler of flow meter is added to diagram 0 standard start up conditions The dia...

Page 27: ...lls below this value The advantage of using a buffer tank is that it regulates the operation of the thermo stove The buffer tank can be connected to other heat production units such as solar panels an...

Page 28: ...require the use of water softening systems The technician responsible for the plumbing installation is invited to check what is reported in the regulations in force System water load Once the plumbin...

Page 29: ...in the menu Select the desired language with the scroll buttons and confirm your selection with the confirmation button In order to operate correctly the handheld set should be interfaced with the el...

Page 30: ...ove the protective cover of the battery on the back of the remote control as shown in Figure A and insert the 3 batteries mini pen style battery AAA 1 5V in the housing of the handheld set and observe...

Page 31: ...After loading the auger and before lighting the stove always remember to empty the brazier and check that the brazier is clean Never empty the brazier inside the hopper After each maintenance operatio...

Page 32: ...In this way this part of the display is highlighted and the currently set temperature is shown With the UP and DOWN arrow keys it is possible to modify this value The confirmation of each change takes...

Page 33: ...is possible to change the DHW temperature set by touching the UP arrow key In this way this part of the display is highlighted and the currently set temperature is shown With the UP and DOWN arrow key...

Page 34: ...protecting the circuit especially when COMFORT CLIMATE function is not active on boiler H2O If the boiler is not in this condition it switches to STAND BY mode to guarantee protection of the hydrauli...

Page 35: ...ription of operation Set power These stoves have been designed to automatically adjust the power according to the thermal demand However you can choose to run it at minimum power using this function T...

Page 36: ...lets vary in grain size and composition even bags of pellets of the same brand can have different characteristics If combustion is not optimal vary the flow parameter to adjust the combustion air If a...

Page 37: ...the palmtop or on the external thermostat the stove activates the modulation phase If the temperature reached is maintained for a set period of time DELAY SWITCH OFF the stove switches off automatical...

Page 38: ...confirm button to enable or disable the function In Home mode instead of room temperature measured and settable appears the line T ON if the room in which the thermostat is installed has not reached t...

Page 39: ...mtop increasing or decreasing it by the set value offset Make this adjustment carefully and only after having checked deviations from the actual room temperature with a reliable instrument Anti conden...

Page 40: ...s at an operating capacity dedicated to DHW flow switch request with DHW kit or DHW boiler MODULATE H2O The desired boiler water set temperature has been reached ROOM TEMPERATURE MODULATION The room t...

Page 41: ...let setting set pellets 5 is near the continuous load condition SOLUTION Set the value back to 0 GENERIC ALARM The stove is in alarm state refer to the troubleshooting chapter ANOMALY general The stov...

Page 42: ...e maintenance is required on the stove Signalling Reason Solution CLEAN THE GRATE only if the RDS sys tem is installed The door and the ash box are not closed correctly Make sure they are closed prope...

Page 43: ...and suction during switch on phase is incorrect Contact the Support Service The ignition coil is faulty or positioned incorrectly Contact the Support Service AL 06 PELLETS FINISHED The pellet tank is...

Page 44: ...he value requested for correct operation If the problem persists contact the Support Service AL 17 NO FLOW only if the RDS system is installed The flow meter does not measure an input air flow Check w...

Page 45: ...parts before restarting operation The quality of the pellet the stove operating mode and combustion control can affect maintenance activity frequency Cleaning Perform the cleaning operations so as to...

Page 46: ...d Cleaning the pellet tank To clean the pellet tank proceed as follows step action 1 Periodically remove the wood sawdust accumulated on the bottom of the tank using a vacuum cleaner Extraction duct c...

Page 47: ...iled Replace the electronic board contact the Technical Assistance Service AL 15 The flame does not ignite Check that the igniter warms up Check and if necessary replace the igniter AL 05 Air inlet du...

Page 48: ...the smoke duct AL 08 The door is not closed perfectly or the gasket are worn Close the door and have the gaskets replaced with original ones AL 05 AL 06 The stove stops automatically Alarm presence Ch...

Page 49: ...does not work Remote control battery low Replace battery or connection to the stove via cable Faulty remote control Replace remote control The stove always works at maximum power Temperature not set...

Page 50: ...the room is clear of any obstructions and that there are no other combustion appliances or extraction hoods that create a vacuum in the room Difficult lighting closely follow the directions in the de...

Page 51: ...r s parer cet appareil et ou les piles ou les accumulateurs des autres types de d chets et de le confier au service municipal de collecte On peut demander au distributeur de pr lever le d chet d appar...

Page 52: ...r at forebygge ventuelle skader for milj et eller sundheden bedes brugeren om at behandle dette udstyr og eller de medf lgende batterier eller akkumulatorerne separat fra andre affaldstyper og at leve...

Page 53: ......

Page 54: ......

Page 55: ......

Page 56: ...free to make any variations to the features of its products without notice Aico S p A Headquarter Via Consorzio Agrario 3 25032 Chiari BS Italy Research and Development Centre Viale del commercio 12 a...

Reviews: