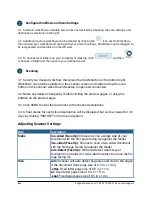
Configure Workflows and Scan Settings
2.1 A default workflow is available and can be customized by adjusting the scan settings and
destination selections on the right.
2.2 Additional custom workflows can be created by clicking the
icon next to Workflows,
then naming your workflow and saving with your custom settings. Workflows can be dragged to
be reorganized and reordered on the left view.
2.3 To choose local folders on your computer or desktop, click
and then
to choose a folder and then save to your destination list.
Scanning
3.1 Select your desired workflow, then press the SCAN button on the bottom right.
Workflows can also be selected on the scanner screen and started using the scan
button on the scanner when Raven Desktop is open and connected.
3.2 Make any desired changes by double clicking the preview pages, or using the
buttons on the preview page.
3.3 Click SEND to send the document to the chosen destinations.
3.4 A final status for each cloud destination will be displayed, but can be viewed for 30
days by clicking “HISTORY” on the top navigation.
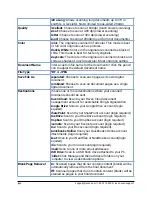
Adjusting Scanner Settings
Item
Description
Sides
One-sided (Face Up):
Choose to scan a single side of your
document with the first page facing Up against the feeder.
Two-sided (Face Up):
Choose to scan a two-sided document
with the first page facing Up against the feeder.
Auto-Detect (Face Up):
Will Auto-Detect whether your
document is one-sided or two-sided document and use the first
page facing Up.
Size
Auto:
Scanner will auto detect page size and crop to the edges
of the document (max page size of 8.5 in. x 14 in.)
Letter:
Fixed letter page size of 8.5 in x 11 in
A4:
Fixed letter page size of 8 ¼ x 11 ¾ in
Legal:
Fixed legal page size of 8.5 in x 14 in
14
support@raven.com | 1-800-713-9009 | raven.com/support


