Scanning to Neat
1. Connect your Neat account within your account settings by visiting
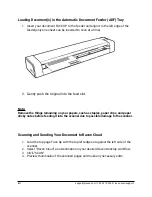
2. Load the top page Face Up with the top left edge set against the left side of the
scanner..
3. Select “Neat” as a destination in your desired Raven Desktop workflow.
4. Click “SCAN”
Scanning and Sending to Multiple Destinations
1. Load the top page Face Up with the top left edge set against the left side of the
scanner.
2. Select your preferred destinations in the “Destinations” section of Raven Desktop
by clicking on them to place an Orange Check Mark next to them.
Saving Contacts
1. Click “CONTACTS” on the top navigation menu
2. Select “Add Contact”
3. Input the contact name
4. Input the contact email address and/or fax number
5. Select “Save”
Using As A TWAIN Scanner With a Third Party Application
To use your Raven Standard Scanner with 3rd party applications, you must first install
Raven Desktop onto your computer and complete the driver installation. After
installation of Raven Desktop is completed and you have connected to your scanner, you
can close Raven Desktop and the Raven GO Duplex should be available for use with
other applications that are TWAIN compatible.
21
support@raven.com | 1-800-713-9009 | raven.com/support

