6
5. Carefully pull the grey wire to remove the Amp pin from the
connector.
6. Reinsert the pin into the pin 14 location on the cable
connector. Carefully push the wire to fully seat the pin into
the connector.
7. Test that the pin is properly seated by gently tugging on
the grey wire.
8. Replace the connector shroud and replace the retainer
and lock screws.
9. Reconnect the interface cable to the Viper Pro field
computer.
Viper Pro Firmware Update
To complete the field update of the Viper Pro, the following procedure must be
performed to update the field computer firmware.
1. Locate the 4-pin Deutsch connector labeled ‘CAN’ under the pump switch
instrument panel. The connector should be located near the factory power and
ground cluster found earlier in the field update process.
2. Disconnect the 4-pin connectors. To help prevent failure of the firmware update,
these connectors must remain disconnected throughout the firmware update
process to prevent .
3. Disconnect the cable connections on the back of the Raven CAN switch box or
Switch Pro. To help prevent failure of the firmware update, these connectors
must remain disconnected throughout the firmware update process.
4. Insert the provided USB flash drive (P/N 063-0173-427) into the Viper Pro.
5. Press the power button on the Viper Pro to power up the field computer.
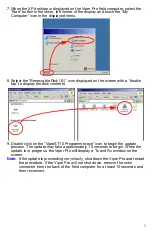
6. When the Initializing Viper prompt is displayed, select the Load XP Desktop
option.
Summary of Contents for Viper Pro
Page 1: ...for Raven Viper Pro Field Update Guide...
Page 11: ......


