
THE CRIMSON MONARCH
–
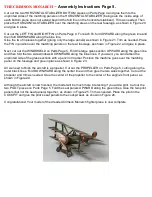
Assembly Instructions Page 3.
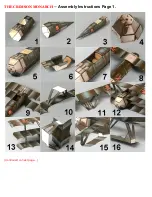
Next, cut out the FUSELAGE REAR on Parts Page 1. Fold the six rectangular tabs DOWNWARD, fold the
gray triangular tab DOWNWARD, and then fold DOWNWARD between all six panels. Glue the gray
triangular tab to the unprinted side of the opposite panel, forming a piece like the one shown in Figure 2.
Connect the FUSELAGE REAR to the FUSELAGE FRONT by gluing the rectangular tabs (on the rear
piece) directly over their matching areas (on the front piece.) Begin by gluing the top panel (the one with a
gas cap), then the bottom panel, and finish by gluing the side panels. The FUSELAGE should now resemble
Figure 3.
Cut out the ENGINE on Parts Page 1. Four of the gray tabs have a red edge. Cut along the red edges to
separate the tabs from their adjoining panels. Fold all six gray tabs DOWNWARD. Fold the six outer
rectangular panels DOWNWARD, fold all six side panels DOWNWARD and then fold DOWNWARD
between the connected side panels. Glue the four triangular gray tabs to the unprinted side of the center
panel. Glue the two remaining gray tabs to the unprinted side of the adjoining side panels to form a piece
like the one shown in Figure 4.
Add the ENGINE to the FUSELAGE FRONT in the same manner as we did the FUSELAGE REAR. Start
with the top panel (with the machine gun barrels), then glue the bottom panel and finish by gluing the side
panels. The FUSELAGE should now resemble Figure 5.
Now cut out the COCKPIT on Parts Page 1. Fold the two gray tabs UPWARD. Fold UPWARD between the
two seat panels, and fold the two side panels UPWARD, folding along the green lines. Then fold the front
panel (with machine guns), the rear panel and the two small side tabs DOWNWARD, folding along the blue
lines. Glue the two gray tabs to the unprinted side of the side panels as shown in Figure 6. Place the
COCKPIT into the FUSELAGE as shown in Figure 7. Glue the front panel, rear panel and side tabs to the
fuselage.
The fuselage is now finished and we can start adding wings! Cut out the LOWER WING on Parts Page 2.
Don't separate the two sides, just cut along the outer rectangle (this need not be very precise) and then fold
DOWNWARD in the center (being very precise). Glue the two halves together and then cut out the wing.
Trim as needed.
Glue the panel with a yellow dot to the matching panel on the fuselage bottom, as shown in Figure 8.
Cut out the CENTER WING on Parts Page 2 and assemble in the same manner as we did the LOWER
WING. Glue the center area (with machine guns) directly over the matching area of the fuselage, as shown
in Figure 9.
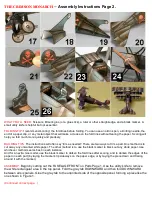
Cut out the UPPER WING on Parts Page 3 and assemble in the same manner as we did the other two
wings.
The cut out the UPPER WING BRACE on Parts Page 4. Fold the two outer side panels DOWNWARD along
the blue lines and glue them to the unprinted side of the matching inner side panels. Then fold the two
rectangular tabs UPWARD along the green lines and fold UPWARD along the green lines on both sides of
the center panel.
If you want, you can now use a small utility knife to carefully remove the black triangles in the two side
panels and trim as needed. If you'd rather not bother, the black triangles can be left in place.
(Continued on next page...)


