


10
GENERAL INFORMATION
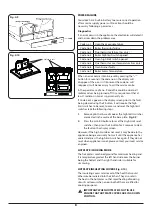
GRILLING
Turn the oven thermostat to a reasonably high setting and
this will give a greater temperature at the top of the main
oven. The flue gases are passing over the top face of this
oven, so this face is being heated on both sides. The roasting
tin supplied with the cooker contains a grill rack. Place
any foods that require grilling onto the rack, and place the
roasting tin as near to the top of the oven as possible. For
any gratin type recipe that requires browning, place the dish
on a shelf as near to the top of the oven as it will allow. For
a delicious breakfast, lightly grease the base of the roasting
tin and place slices of bread with a hole cut out of the centre,
onto the base, carefully breaking an egg into each hole.
Foods such as mushrooms and halved tomatoes can be
placed around the eggs. Place the grilling rack over the eggs
and lay the bacon, sausage, black pudding etc., onto the
grilling rack. The fat will drop onto the eggs, helping to cook
and flavour them. Fatty foods such as lamb cutlets are best
suited to this method of oven grilling, most of the fats are
drawn out into the roasting tin. Certain foods with little fat,
benefit from pan frying/dry frying, using a ribbed frying or
griddle pan. The foods cooked this way look attractive with
the bar markings from the pan.
THE CARE OF YOUR COOKER
The vitreous enamel finish on your cooker is tough and hard
wearing but should be treated with care. Acidic spills on
the hob should be wiped off with a clean damp cloth. The
vitreous enamel front, sides and hob only need a wipe with
a warm soapy cloth, then a polish with a dry one. Do not
use an abrasive cleaning material on the vitreous enamel.
If there are stubborn marks on the hob, use a good quality
enamel cleaner. Look for cleansers carrying the VEA (Vitreous
Enamel Association) Follow the manufacturer’s instructions
carefully. The hotplate will carbonise any food spilt on it,
which should be removed with a wire brush or metal scraper.
This will ensure a good contact between cooking utensil and
the hotplate. Take care when cleaning the insulating lids,
the hotplate may be hot. The ovens are self-cleaning, any
food that spills on the oven floors will carbonise and can be
brushed or scraped away. It is often easier to use the vacuum
cleaner to remove all the bits.


