background image

2

(Figure 1)

(Figure 2)

(Figure 3)

(Figure 4)

1.Smartphone WIFI Connection:  

Turn on the quadcopter and place on a flat surface.

The LED light on the camera will turn red. After about 15 seconds, the light will 

flash blue indicating it is transmitting a Wifi signal. Enter the menu in the smart 

phone, open the Wifi setting and search for "FPV-WIFI-****FPV" signal. Connect 

to "FPV-WIFI-****FPV" signal. When connect successfully, the red LED light light 

off, blue LED light light stable. Exit the phone set.

Smartphone APP Control Instructions

1 Icon: Take photo, automatically saves to phone

               and in icon 4 document.

2 Icon: Smartphone take video, press after take 

             video(icon turn red), automatically saves 

             to phone and in icon 4 document.

3 Icon: Smartphone file, check photo and video.

4 Icon: Wifi signal.

5 Icon: 2D/3D Image transfer, only real-time transmission has this function.

6 Icon: Return. 

7 Icon: Icon instruction manual.  

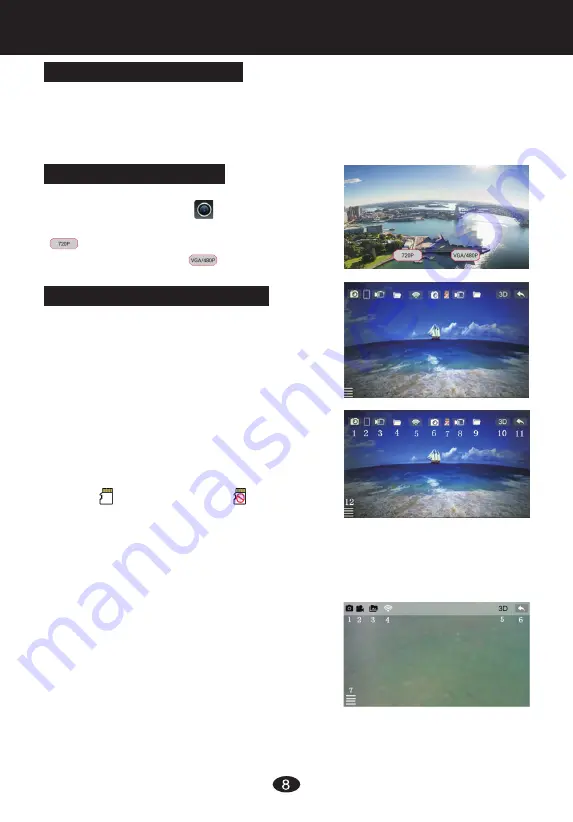
480P control interface”(Figure 4)

3.Smartphone APP Interface Function: 


Open the downloaded App "WIFI CAMERA"by 

pressing on the this icon        . The APP will open

to main page(Figure 1). If camera is 720P,  press

           icon, enter 720P control interface, if

camera is 480P,  press              icon, enter 480P

 control interface.   


2.Operate Smart Phone App:


1  Icon:  Take photo, automatically saves to phone 

               and in icon 4 document.

2  Icon:  Smartphone display.

3  Icon:  Smartphone take video, press after take

               video(icon turn red), automatically saves 

               to phone and in icon 4 document.

4  Icon:  Smartphone File, check photo and video.

5  Icon:  Wifi signal.

6  Icon:  TF card take photo, after press, screen 

                shows”Aerial photos”, save photo in 

               icon 9, smartphone or IT card.

7  Icon:          TF card inserted ,       TF card not 

               inserted .

8  Icon:  TF card take video, after press, screen 

                shows“Aerial photos”, at the same time icon 

                turn red,  begin to take video, save to Icon 9 docment, smartphone or TF card.

9  Icon:  TF file, check photo and video.

10  Icon: 2D/3D Image transfer, only real-time transmission has this function.

11  Icon: Return. 

12  Icon: Icon instruction manual.


720P control interface”(Figure 3)

Summary of Contents for Move Wing RD 200

Page 1: ......

Page 2: ...G Size L 66cmxW 56cmxH 15 5cm Main technical contents 2 4G TRANSMITTER INSTRUCTION On off switch Fast slow speed Turn right trim Left side fly trim Backward trim Headless mode Throttle Rudder Light control Turn left trim One key unlcok Landing Right side fly trim Forward trim Elevator Aileron Forward Backwar Right Left Take video photo Required 4 AA battery Short press take photo Long press take vide...

Page 3: ...ack bladeA bladeA bladeB bladeB Remote control installation instructions 1 Use screwdrivertoopenthebatterycover figure1 2 Base on the instruction in the battery slot to put battery figure 2 3 Tighten the screws in battery cover figure 3 Bladeinstallactionlocation B B B B B B A A A A B B B B B B VIDEO Take the camera and place it into the battery cover Image 4 5 Firmly screw PA2 0 10 screws in the ...

Page 4: ...toONposition at thesametime thelightwillbefastflash 3 Open the transmitter switch push the throttle stick thenpulldownthethrottlestick thetransmitter sindicator light will be stable the quadcopter s light also stable it means frequency connect sucessfully 4 Following figures shows three ways unlock Four paddles will be rotate slowly when quadcopter unlock it means unlock sucessfully Frequency conn...

Page 5: ... its charge automatically charging or discharging too often may reduce its life Warning on Li poly battery 1 Battery installation open battery door install battery into battery socket battery s plug aim to drone s power plug cover the battery door Figure1 2 Battery charging remove the battery from drone battery plug aim to USB adopter to charge Figure2 It will has LED red light on adopter when cha...

Page 6: ...hetransmitteralreadyreset atthistime youcantry to resetthequadcopter Resetway Placethequadcopter on the levelground turnon afterfrequencyconnect pull down transmitter rudder to left keep 2 3 seconds wait quadcopter light turn flash to stable Figure 1 3 Headless mode adjust If need to turn on headless mode during play before quadcopter fly up must adjust headless mode first Must adjust headless mod...

Page 7: ......

Page 8: ... control interface Figure 4 3 Smartphone APP Interface Function Open the downloaded App WIFI CAMERA by pressing on the this icon The APP will open to main page Figure 1 If camera is 720P press icon enter 720P control interface if camera is 480P press icon enter 480P control interface 2 Operate Smart Phone App 1 Icon Takephoto automaticallysavestophone and in icon 4 document 2 Icon Smartphone displ...

Reviews: