7.1 Tools required
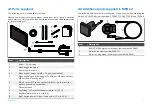
The following tools are recommended for installation:
1.
Power drill.
2. Hole cutter (appropriate size for corner diameters of the
Cut out
line
identified on the supplied mounting template):
• 15.40 mm (0.61 in) — Axiom® 2 XL 16, 19 and 24.
• 13.5 mm (0.53 in) — Axiom® 2 XL 22.
3.
Jigsaw.
4.
Half round file (or sandpaper).
5. Masking/self adhesive tape.
6. Hand router with a router bit an appropriate size for the 14.00 mm
(0.55 in) corner diameter required for the flush mount rebate.
7.
Marine grade sealant.
8. 8 mm (
5
/
16
”) wrench or small adjustable wrench.
9.
4 mm Hex wrench (Allen key).
Note:
* Items are only required when flush mounting the display.
7.2 Mounting options
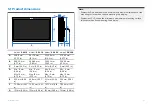
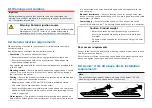
Axiom® 2 XL displays can be mounted flush with the mounting surface (flush
mount) or with the glass protruding from the mounting surface (surface
mount).
1.
Surface mount
2. Flush mount
Warning: 2 person installation required
To prevent potential product damage, vessel damage and
personal injury 2-person installation is recommended.
7.3 Rear access requirements
Access to the rear of the display and mounting surface is required to surface
and flush mount the display.
Ensure there is sufficient access and space behind the mounting surface to
attach and tighten the fixings and also to connect the cables.
30
Summary of Contents for AXIOM 2 XL
Page 2: ......
Page 4: ......
Page 22: ...CHAPTER 5 PRODUCT DIMENSIONS CHAPTER CONTENTS 5 1 Product dimensions page 23 22...
Page 39: ...CHAPTER 9 POWER CONNECTIONS CHAPTER CONTENTS 9 1 Power connection page 40 Power connections 39...
Page 56: ...CHAPTER 13 AUDIO CONNECTIONS CHAPTER CONTENTS 13 1 Audio RCA connections page 57 56...
Page 95: ...RayNet to RJ45 and RJ45 SeaTalkhs adapter cables Spares and accessories 95...
Page 102: ......
Page 107: ......


