•
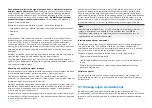
A
— Cut out (when flush mounting the cut out will be the same size as
for surface mounting.
•
B
— Flush mounting requires an extra rebate to recess the display fully in
the mounting surface.
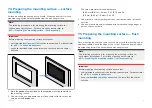
1. Mark the
cut out
line identified on the supplied mounting template on
the mounting surface.
2. Mark the
Rebate for flush mount
line identified on the supplied mounting
template on the mounting surface.
3. Use a drill and an appropriate size drill bit or hole cutter to cut out the
corners of the
Cut out
line.
The corner diameter for the displays are:
• 15.40 mm (0.61 in) — Axiom® 2 XL 16, 19 and 24.
• 13.5 mm (0.53 in) — Axiom® 2 XL 22.
4. Use a jigsaw or similar cutting tool to cut out the remainder of the cut
out area.
5. Use a router hand tool to recess the marked rebate area to a depth of
9.00 mm (0.35 in).
6. Use a half round file and/or sandpaper to smooth and rough edges or
burs on the cut out hole.
7.6 Fitting the gasket tape
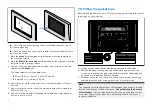
Before fitting the display you must fit the mounting gasket tape to the rear of
the display, as shown below.
1. Starting at the bottom center, affix the gasket tape to the display.
2. Remove the paper backing from the tape before going around the
corners, ensuring that the tape remains tight all around the display, and
no air gap exists between display and tape.
3. When you reach the end, leave a small overlap to ensure that no gap
exists between the ends of the gasket when it is compressed.
Note:
The supplied gasket tape provides a seal between the unit and a suitably
flat and stiff mounting surface or binnacle.
The gasket should be used in
all installations
. It may also be necessary to use a marine-grade sealant
if the mounting surface or binnacle is not entirely flat and stiff or has a
rough surface finish.
32
Summary of Contents for AXIOM 2 XL
Page 2: ......
Page 4: ......
Page 22: ...CHAPTER 5 PRODUCT DIMENSIONS CHAPTER CONTENTS 5 1 Product dimensions page 23 22...
Page 39: ...CHAPTER 9 POWER CONNECTIONS CHAPTER CONTENTS 9 1 Power connection page 40 Power connections 39...
Page 56: ...CHAPTER 13 AUDIO CONNECTIONS CHAPTER CONTENTS 13 1 Audio RCA connections page 57 56...
Page 95: ...RayNet to RJ45 and RJ45 SeaTalkhs adapter cables Spares and accessories 95...
Page 102: ......
Page 107: ......

