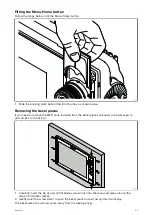
background image

3.1 Selecting a location

Caution: Product weight

• Refer to the technical specification for your product to ensure the intended

mounting surface is suitable to bear its weight.

• 2 people may be required for installation of larger / heavier products.

Warning: Switch off power supply

Ensure the vessel’s power supply is switched OFF before starting to install this
product. Do NOT connect or disconnect equipment with the power switched
on, unless instructed in this document.

Warning: Potential ignition source

This product is NOT approved for use in hazardous/flammable atmospheres. Do
NOT install in a hazardous/flammable atmosphere (such as in an engine room
or near fuel tanks).

General location requirements

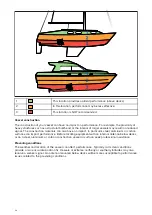
When selecting a location for your product it is important to consider a number of factors.

Key factors which can affect product performance are:

Ventilation

— To ensure adequate airflow:

– Ensure that product is mounted in a compartment of suitable size.

– Ensure that ventilation holes are not obstructed. Allow adequate separation of all equipment.

Any specific requirements for each system component are provided later in this chapter.

Mounting surface

— Ensure product is adequately supported on a secure surface. Do not mount

units or cut holes in places which may damage the structure of the vessel.

Cabling

— Ensure the product is mounted in a location which allows proper routing, support

and connection of cables:

– Minimum bend radius of 100 mm (3.94 in) unless otherwise stated.

– Use cable clips to prevent stress on connectors.

– If your installation requires multiple ferrites to be added to a cable then additional cable clips

should be used to ensure the extra weight of the cable is supported.

Water ingress

— The product is suitable for mounting both above and below decks. Although

the unit is waterproof, it is good practice to locate it in a protected area away from prolonged and
direct exposure to rain and salt spray.

Electrical interference

— Select a location that is far enough away from devices that may cause

interference, such as motors, generators and radio transmitters / receivers.

Power supply

— Select a location that is as close as possible to the vessel’s DC power source.

This will help to keep cable runs to a minimum.

EMC installation guidelines

Raymarine equipment and accessories conform to the appropriate Electromagnetic Compatibility
(EMC) regulations, to minimize electromagnetic interference between equipment and minimize the
effect such interference could have on the performance of your system

Correct installation is required to ensure that EMC performance is not compromised.

Note:

In areas of extreme EMC interference, some slight interference may be noticed on the

product. Where this occurs the product and the source of the interference should be separated
by a greater distance.

For

optimum

EMC performance we recommend that wherever possible:

• Raymarine equipment and cables connected to it are:

22

Summary of Contents for AXIOM PRO

Page 1: ...2021 Raymarine UK Limited 87319 3 Document number 01 2021 Date English en US Installation instructions...

Page 2: ......

Page 3: ...more than three copies of this manual for your own use You may not make any further copies or distribute or use the manual in any other way including without limitation exploiting the manual commerci...

Page 4: ......

Page 5: ...FD Operation instructions 14 2 2 Applicable products 15 Axiom Pro Multifunction Displays 15 2 3 Compatible transducers Axiom Pro MFDs 16 RealVision transducers 16 DownVision transducers 18 CHIRP conic...

Page 6: ...ection 45 Chapter 5 Maintaining your display 47 5 1 Service and maintenance 48 Routine equipment checks 48 5 2 Product cleaning 48 Cleaning the display case 48 Cleaning the display screen 48 Cleaning...

Page 7: ...specification 70 8 4 NMEA 0183 sentences 70 8 5 NMEA 2000 PGNs 71 Chapter 9 Spares and accessories 73 9 1 AXIOM Pro accessories 74 Axiom transducer adaptor cables 74 Legacy MFD adaptor plates 74 9 2 A...

Page 8: ...8...

Page 9: ...by errors in chart data or information utilized by the product and supplied by third parties This product supports electronic charts provided by third party suppliers which may be embedded or stored...

Page 10: ...on fonctionnement Cet appareil num rique de la classe B est conforme la norme NMB 003 du Canada Japanese approvals In the frequency band used for this device campus radio stations radios stations that...

Page 11: ...quipment at a recycling center or other collection point For more information about suitable collection points for waste electrical and electronic equipment in your region refer to the Raymarine websi...

Page 12: ...12...

Page 13: ...nts 2 1 Product documentation on page 14 2 2 Applicable products on page 15 2 3 Compatible transducers Axiom Pro MFDs on page 16 2 4 Parts supplied Axiom Pro 9 and 12 on page 19 2 5 Parts supplied Axi...

Page 14: ...ne co uk view id 5175 to order a printed manual delivered directly to your door For further information about the Print Shop please visit the Print Shop FAQ pages http www raymarine co uk view id 5751...

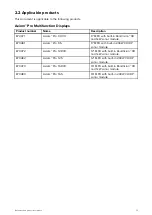
Page 15: ...sonar module E70481 Axiom Pro 9 S 9 MFD with built in 200W CHIRP sonar module E70372 Axiom Pro 12 RVX 12 MFD with built in RealVision 3D and 1kW sonar module E70482 Axiom Pro 12 S 12 MFD with built in...

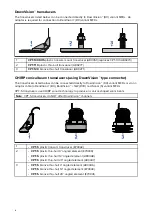
Page 16: ...transom mount transducer A80464 2 RV 200 RealVision 3D bronze 0 thru hull all in one transducer A80465 RV 212P and RV 212S RealVision 3D bronze 12 thru hull split pair transducers T70318 RV 212P port...

Page 17: ...rd transducer A80617 RV 420P and RV 420S RealVision 3D stainless steel 20 thru hull split pair transducer T70451 RV 420P port transducer A80618 RV 420S starboard transducer A80619 Document and product...

Page 18: ...ed below can be connected directly to DownVision DV variant MFDs or via an adaptor cable to RealVision RV RealVision 1kW RVX and Sonar S variant MFDs CPT S transducers use CHIRP sonar technology to pr...

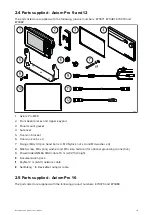
Page 19: ...7 Fixings M4 x 40 pan head bolt x 4 M4 Nylock nut x 4 and M4 washer x 4 8 M3x5 screw M3 spring washer and M3 crimp terminal for optional grounding connection 9 Power Video NMEA 0183 cable 1 5 m 4 92...

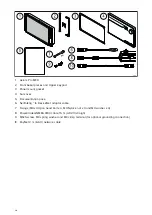
Page 20: ...tion pack 6 SeaTalkng to DeviceNet adaptor cable 7 Fixings M4 x 40 pan head bolt x 4 M4 Nylock nut x 4 and M4 washer x 4 8 Power Video NMEA 0183 cable 1 5 m 4 92 ft straight 9 M3x5 screw M3 spring was...

Page 21: ...Chapter 3 Installation Chapter contents 3 1 Selecting a location on page 22 3 2 Mounting options on page 27 3 3 Surface mounting on page 28 3 4 Bracket trunnion mounting on page 30 Installation 21...

Page 22: ...ows proper routing support and connection of cables Minimum bend radius of 100 mm 3 94 in unless otherwise stated Use cable clips to prevent stress on connectors If your installation requires multiple...

Page 23: ...GPS AIS or VHF products and their antennas as possible Ensure that any power cables for external equipment are not entangled with the power or data cables for these devices Consider fitting one or mo...

Page 24: ...lso have an impact In particular steel aluminium or carbon surfaces can impact performance Before locating equipment with an internal antenna below decks or on a steel aluminium or carbon construction...

Page 25: ...ucts installed close to their maximum wireless range may experience slow connection speeds signal dropouts or not being able to connect at all Line of sight For best results the wireless product shoul...

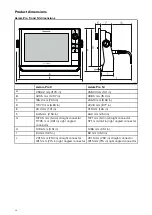
Page 26: ...1 31 in 31 9 mm 1 26 in F 64 5 mm 2 54 in 64 4 mm 2 54 in G 137 05 mm 5 4 in straight connector 117 05 mm 4 61 in right angled connector 137 1 mm 5 4 in straight connector 117 1 mm 4 61 in right angle...

Page 27: ...m 5 46 in straight connector 118 6 mm 4 67 in right angled connector F 15 2 mm 0 6 in G 207 mm 8 15 in straight connector 187 mm 7 36 in right angled connector 3 2 Mounting options Axiom Pro 9 12 and...

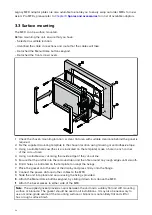
Page 28: ...ake a hole in each corner of the cut out area 4 Using a suitable saw cut along the inside edge of the cut out line 5 Ensure that the unit fits into the removed area and then file around any rough edge...

Page 29: ...move the MFD once installed then the bezel pieces will need to be removed to gain access to the fixings 1 Carefully insert the tip of a small flat blade screw driver into the recessed areas around the...

Page 30: ...ave Sourced adequate fixings to secure the bracket to your mounting surface Attached the Menu Home buttons and bezel pieces 1 Using the Bracket as a template Mark and drill 5 x pilot holes on the moun...

Page 31: ...onnection on page 34 4 3 NMEA 2000 SeaTalkng connection on page 40 4 4 NMEA 0183 connection on page 40 4 5 Transducer connection Axiom Pro on page 41 4 6 Network connection on page 43 4 7 GA150 connec...

Page 32: ...antenna GA150 s fitted cable NMEA 2000 connection SeaTalkng backbone NMEA 2000 backbone SeaTalkng to DeviceNet adaptor cable DeviceNet cables Network connection x 2 RayNet network or device RayNet ca...

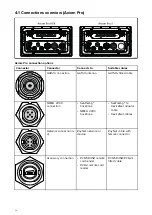
Page 33: ...optional dedicated drain wire section for details Note Refer to Chapter 9 Spares and Accessories for available cables Depending on MFD variant different transducer connections are available Axiom Pro...

Page 34: ...the device being connected has been installed in accordance with the installation instructions supplied with that device 3 Ensuring correct orientation push cable connectors fully onto the correspondi...

Page 35: ...breaker is dependent on the number of devices you are connecting If in doubt consult an authorized Raymarine dealer Your product s power cable may have a fitted in line fuse If not you must fit an in...

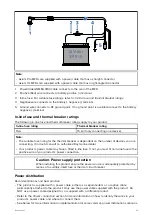
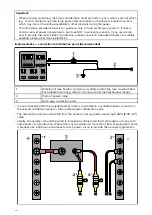
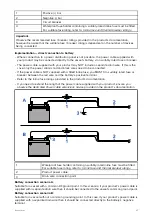
Page 36: ...distribution panel Recommended 1 Waterproof fuse holder containing a suitably rated inline fuse must be fitted For suitable fuse rating refer to In line fuse and thermal breaker ratings 2 Product pow...

Page 37: ...line fuse you MUST fit a suitably rated fuse or breaker between the red wire and the battery s positive terminal Refer to the inline fuse ratings provided in the product s documentation If you need to...

Page 38: ...are of a sufficient gauge ensure that there is a continuous minimum voltage of 10 8 V dc at the end of the cable where it enters the product s power connector even with a fully flat battery at 11 V d...

Page 39: ...on vessels without an RF ground system the negative battery terminal The dc power system should be either Negative grounded with the negative battery terminal connected to the vessel s ground or Float...

Page 40: ...tails on creating a backbone 3 Refer to Chapter 9 Spares and accessories for a list of available SeaTalkng cables 4 4 NMEA 0183 connection NMEA 0183 devices can be connected to your MFD using the NMEA...

Page 41: ...range White Positive output 6 Port 2 negative input Orange Green Negative output Note Refer to instructions provided with your NMEA 0183 device for wire color signal and port information 4 5 Transduce...

Page 42: ...e following adaptor cable are available to enable connection of a wider selection of transducers Axiom DV adaptor cables A80484 Axiom DV to 7 pin Embedded Transducer Adapter A80485 Axiom DV to 7 pin C...

Page 43: ...able network cables 4 7 GA150 connection The GA150 A80288 can be used to improve your MFD s GNSS receiver s reception For installation details refer to the documentation provided with your GA150 Note...

Page 44: ...ov files External SD or External USB must be selected as the Save Files location on the Photo Video recording tab in the Video app settings menu In addition to the storage uses listed above the USB sl...

Page 45: ...nector on the supplied Power Video NMEA 0183 cable Your MFD will stream the feed over the SeaTalkhs network to other compatible MFDs 1 Power Video NMEA 0183 cable supplied with your MFD 2 Analog video...

Page 46: ...46...

Page 47: ...Chapter 5 Maintaining your display Chapter contents 5 1 Service and maintenance on page 48 5 2 Product cleaning on page 48 Maintaining your display 47...

Page 48: ...orm the following routine checks on a regular basis to ensure the correct and reliable operation of your equipment Examine all cables for signs of damage or wear and tear Check that all cables are sec...

Page 49: ...ay stick to this surface To avoid damaging the monitor display clean the sun cover regularly following this procedure 1 Carefully remove the sun cover from the display 2 Rinse the sun cover with fresh...

Page 50: ...50...

Page 51: ...age 52 6 2 Power up troubleshooting on page 53 6 3 GNSS GPS troubleshooting on page 54 6 4 Sonar troubleshooting on page 55 6 5 Wi Fi troubleshooting on page 58 6 6 Touchscreen troubleshooting on page...

Page 52: ...oducts are subjected to comprehensive testing and quality assurance programs If you do experience problems with your product this section will help you to diagnose and correct problems in order to res...

Page 53: ...power supply may be wired incorrectly ensure the installation instructions have been followed Product will not start up restart loop Possible causes Possible solutions Power supply and connection See...

Page 54: ...location GNSS GPS connection fault Ensure that external GNSS connections and cabling are correct and fault free External GNSS GPS receiver in poor location For example Below decks Close proximity to...

Page 55: ...ransducer fitted Ensure the transducer is compatible with your system External sonar module SeaTalkhs RayNet network problem Check that the unit is correctly connected to the multifunction display or...

Page 56: ...s as relevant and recheck Poor problematic image Possible causes Possible solutions Vessel stationary Fish arches are not displayed if the vessel is stationary fish will appear on the display as strai...

Page 57: ...uled transducer Check the condition of the transducer ensuring it is not damaged and is free from debris fouling Damaged transducer cable Check that the transducer cable and connection is free from da...

Page 58: ...ve power Power cycle reboot devices and retry the connection Trying to connect to the wrong Wi Fi network Ensure you are trying to connect to the correct Wi Fi network the Wi Fi network s name can be...

Page 59: ...i enabled or older Bluetooth enabled devices Bluetooth and Wi Fi both operate in the 2 4 GHz frequency range some older bluetooth devices may interfere with Wi Fi signals 1 Change the Wi Fi Channel of...

Page 60: ...t installed Install mobile app from relevant app store Raymarine app version not compatible with MFD software Ensure mobile app and MFD software are latest available versions Mobile apps not enabled o...

Page 61: ...ross the Power button swipe area to de activate the TouchLock Screen is not being operated with bare fingers for example gloves are being worn Bare fingers must make contact with the screen for correc...

Page 62: ...the display Check that the power source is of the correct voltage and sufficient current Software mismatch on system upgrade required Go to www raymarine com and click on support for the latest softwa...

Page 63: ...Chapter 7 Technical support Chapter contents 7 1 Raymarine product support and servicing on page 64 7 2 Learning resources on page 66 Technical support 63...

Page 64: ...fic E Mail emea service raymarine com Tel 44 0 1329 246 932 United States US E Mail rm usrepair flir com Tel 1 603 324 7900 Web support Please visit the Support area of the Raymarine website for Manua...

Page 65: ...thorized Raymarine distributor E Mail info mikstmarine ru Tel 7 495 788 0508 Viewing product information LightHouse 3 Use the Settings menu to view hardware and software information about your MFD and...

Page 66: ...l Raymarine will NOT be held liable for damage or injury to equipment or persons caused by the use of a remote connection to your MFD Do not disclose your AnyDesk ID to anyone other than authorised Ra...

Page 67: ...8 1 Axiom Pro technical specification on page 68 8 2 Internal sonar specification on page 69 8 3 Internal GNSS GPS GLONASS receiver specification on page 70 8 4 NMEA 0183 sentences on page 70 8 5 NME...

Page 68: ...s S 22 56 Watts RVX 40 8 Watts S 31 44 Watts Note Power consumption figures for RVX variants were taken using a RealVision transducer and S variants using a CPT S transducer Environmental Axiom Pro 9...

Page 69: ...x RayNet type SeaTalkhs connector 10 100 1 000 Mbits s Wi Fi 802 11 b g n Bluetooth Bluetooth V4 0 LEN Load Equivalency Number 1 Storage Axiom Pro 9 Axiom Pro 12 Axiom Pro 16 Internal 16 GB Solid Stat...

Page 70: ...tibility GPS GLONASS Beidou Galileo SBAS compatibility EGNOS GAGAN MSAS QZSS WAAS Operating frequency 1574 MHz to 1605 MHz Signal Acquisition Automatic Almanac Update Automatic Geodetic Datum WGS 84 a...

Page 71: ...000 PGNs For a list of supported NMEA 2000 PGNs please refer to the LightHouse 3 Advanced Operations manual To obtain the latest version of the manual visit www raymarine com manuals Technical specifi...

Page 72: ...72...

Page 73: ...cessories Chapter contents 9 1 AXIOM Pro accessories on page 74 9 2 AXIOM Pro spares on page 75 9 3 RayNet to RayNet cables and connectors on page 76 9 4 SeaTalkng cables and accessories on page 78 Sp...

Page 74: ...86 Axiom DV to 9 pin DV 7 Pin Embedded Transducers Y Cable A80487 Axiom DV to 9 pin DV 7 Pin CP370 Transducers Y Cable Axiom RV adaptor cables A80488 Axiom RV to 7 pin Embedded Transducer Adapter A804...

Page 75: ...EA 0183 cable 1 5 m 4 9 ft R62379 Angled Power Video NMEA 0183 cable 1 5 m 4 9 ft with right angled connector R70029 Keypad assembly R70600 Trim kit Replacement bezel pieces R70383 R70387 R70598 Mount...

Page 76: ...e other end Suitable for connecting at 90 right angle to a device for installations where space is limited 3 RayNet cable puller 5 pack 4 RayNet to RayNet right angle coupler adapter Suitable for conn...

Page 77: ...he other end along with a locking gland for a watertight fit 3 Adapter cable with a RayNet male plug on one end and an RJ45 SeaTalkhs waterproof male plug on the other end 4 Adapter cable with a RayNe...

Page 78: ...cable 1 m 3 3 ft A06035 Backbone cable 3 m 9 8 ft A06036 Backbone cable 5 m 16 4 ft A06068 Backbone cable 9 m 29 5 ft A06037 Backbone cable 20 m 65 6 ft A06043 SeaTalkng to bare wire spur cable 1 m 3...

Page 79: ...6046 SeaTalkng to DeviceNet Male adaptor cable 1 5 m 4 92 ft Allows the connection of NMEA 2000 devices to a SeaTalkng system A06076 SeaTalkng to DeviceNet Male adaptor cable 1 m 3 3 ft Allows the con...

Page 80: ......

Page 81: ...nformity 11 Dedicated grounding 39 DeviceNet cables 79 Diagnostics 65 Dimensions Axiom Pro 12 26 Axiom Pro 16 27 Axiom Pro 9 26 DownVision transducers 18 E Electromagnetic Compatibility 22 EMC See Ele...

Page 82: ...RayNet connection 43 RCR SDUSB 14 RealVision transducers 16 Recovery mode 53 Routine checks 48 S SeaTalkhs connection 43 SeaTalkng cables 78 SeaTalkng connection 40 Service Center 64 Servicing 48 Supp...

Page 83: ......

Page 84: ...Raymarine Marine House Cartwright Drive Fareham Hampshire PO15 5RJ United Kingdom Tel 44 0 1329 246 700 www raymarine com a brand by...

Reviews: