background image

See the 'General Operation' chapter of the Reference Manual. 

?

More information...

D6

72

4_

3

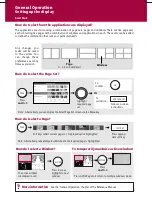
How do I insert a CompactFlash card?

Fit the card the correct way around.  DO NOT force.
Ensure card door is firmly closed at all times. 
DO NOT use a metallic instrument (e.g. screwdriver or pliers) to aid card removal.
Follow the correct procedure for removing a card (see below).
DO NOT remove card during either a read or write operation.

CAUTION

CompactFlash Card

In order to protect your E-Series Display and CompactFlash cards from irreparable 
damage, please adhere to the following:

... with the unit powered

Press 

MENU

. The Setup menu is displayed.

Use  trackpad  (up/down)  to  highlight  and  then 
(right) to select CF CARD REMOVAL.  The  system 
will now complete its checks.

When  instructed  to  do  so,  open  the  chart  card 
door and remove the card.

Firmly  click  the  chart  door  shut  and  press 

OK 

twice.

... with the unit powered down

Open the chart card door.

Grip the card and pull to remove it from its slot.

Firmly click the chart card door shut.

How do I remove a CompactFlash card?

General Operation

Using CompactFlash cards

Card No. 4

Check that you are using the correct type of card. 
Raymarine  recommend  Navionics  Chart  cards  or 
SANDISK CompactFlash cards.

Open the chart card door, located on the front left 
of the display.

Insert the card as shown, with the lip of the card 
facing inwards. It should position easily. If it does 
not, DO NOT force it, check the direction in which 
the lip is facing.

Gently press the card home and then firmly click 
the chart card door shut.

Narrow

Groove

Lip

1.

2.

3.

4.

1.

2.

3.

1.

2.

3.

4.

Summary of Contents for GPS Kit

Page 1: ...the fishfinder Card 18 Card 19 What is around me Understanding the radar Avoiding a collision Using MARPA AIS Card 13 Card 14 Card 15 Card 16 Where am I going Monitoring a course Card 17 Basic Navigat...

Page 2: ...place waypoint at your boat s position Press and hold to place a Man Overboard MOB marker at your current position Press and hold again to exit MOB RANGE Press to change the display scale so that a s...

Page 3: ...hlight the next option If a key displays a single value or a slider above use the rotary control to adjust Within the text of this document they are written in capitals e g SORT LIST Buttons Soft keys...

Page 4: ...onfirm Highlight required page set Note Alternatively you can display the Select Page Set screen via the Menu key To customise EDIT PAGE SET Follow on screen instructions Or PAGE OK PAGE ACTIVE SOFT K...

Page 5: ...CF CARD REMOVAL The system will now complete its checks When instructed to do so open the chart card door and remove the card Firmly click the chart door shut and press OK twice with the unit powered...

Page 6: ...reaches window edge chart pans to a different area Press and hold to pan larger areas Press RANGE OUT to see a larger area of the chart Press RANGE IN to see a smaller area in more detail To change th...

Page 7: ...It is used in conjunction with motion mode see below to control how your boat and chart relate to one another and how they are displayed on screen The default mode is North Up N UP This displays your...

Page 8: ......

Page 9: ......

Page 10: ......

Page 11: ...Shows aerial view from above your boat What can I see Using the 3D chart Card No 10 How do I find where I am on the 3D chart If you cannot see your boat symbol Synchronize 3D chart with 2D chart D873...

Page 12: ...ecommend that you regularly back up your waypoints by archiving them to a CompactFlash card Waypoints can also be transferred to another NMEA compatible instrument Networked systems If you have networ...

Page 13: ......

Page 14: ...ations that you make a nearby small object may appear the same size on the screen as a distant large object However with experience the approximate size of different objects can be determined by the r...

Page 15: ......

Page 16: ...for up to 10 targets and provides continuous and rapid situation evaluation MARPA tracks the selected targets and calculates target bearing range true speed course Closest Point of Approach CPA and Ti...

Page 17: ...optional shows predicted distance travelled within given time Uncertain target Calculated CPA TCPA value uncertain AIS target symbols Lost target When signal of a dangerous AIS target not received fo...

Page 18: ...Press DATA CHART VECTORS COG HDG VECTORS Use the Course Deviation Indicator CDI With your display receiving accurate heading and position information you can monitor your course and accurately steer t...

Page 19: ......

Page 20: ...LIT OFF Toggle as required FISHFINDER SETTINGS Both 200 kHz 50 kHz displayed simultaneously Only available if FREQ MODE set to DUAL 50 kHz for maximum depth penetration in deep water 200 kHz for maxim...

Page 21: ...amera VIDEO 1 VIDEO 2 VIDEO 3 VIDEO 4 PRESENTATION The engine monitor application enables you to view data from up to three compatible engines The information is displayed in a series of panels which...

Page 22: ...he Reference Manual 1 2 Setup Chart Setup Cartography Setup AIS Layer Setup Navtex Messages To run the Sirius Weather application you will need to purchase an SR100 weather receiver and a subscription...

Page 23: ...ont purple Stationary front red blue Trough brown Isobars grey 1012 1010 Dry line brown Or Surface pressure Hurricane Category 1 5 Tropical storm Tropical disturbance or tropical depression Storm Trac...

Page 24: ...s not switched on or because a master has not been selected an alarm will sound and you will be prompted to set a master display How is the network controlled How do I change the master display D8487_...

Reviews: