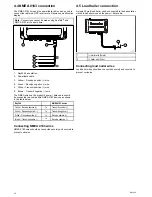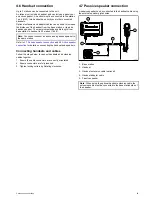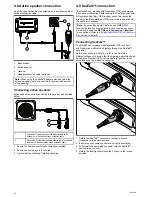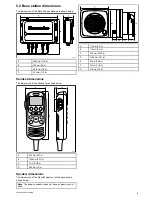
6.7 Entering your ATIS ID
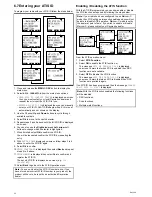
To program your radio with your ATIS ID follow the steps below.
OK
HI
---MAIN MENU----
gGPS SETUP
ATIS OPERATION
CONNECTION
B
ACK
HI
-ATIS OPERATION-
MY ATIS ID
ATIS FUNCTION
[
BACK
]
B
ACK
HI
-MY ATIS ID-----
ENTER MY ATIS ID
ID : -
--------
B
ACK
HI
- MY ATI S I D- - - - -
ENTER AGAI N
I D :-
-
- - - - - - -
B
ACK
OK
HI
-MY ATIS ID-----
ENTER MY ATIS I D
ID:12 3456 789
PRESS
[
OK
]
B
ACK
OK
HI
- MY ATI S I D- - - - -
ENTER AGAI N
I D :1 2 3 4 5 6 7 8 9
PRESS
[
OK
]
N
O
YES
HI
- MY ATI S I D- - - - -
CONFI RMED
I D :1 2 3 4 5 6 7 8 9
REGI STER
?
B
ACK
HI
- MY ATI S I D- - - - -
I D :1 2 3 4 5 6 7 8 9
D12622-2
1. Press and release the
MENU / DSC
button to display the
main menu.
2. Select
ATIS OPERATION
from the main menu options.
• If
NO ATIS ID CONTACT DEALER
is displayed on-screen
then you must contact your local Raymarine dealer and
request them to input the ATIS ID for you.
• If
ENTER MY ATIS ID
is displayed then you can manually
enter your ATIS ID. All ATIS IDs begin with a 9, this is set
automatically and not shown on the display.
3. Use the Channel
Up
and
Down
buttons to cycle through
available numbers.
4. Select
Ok
to move to the next character.
5. Repeat steps 3 and 4 above until the full ATIS ID is displayed
on-screen.
6. You can also use the
Right arrow
and
Left arrow
soft
buttons to change which character is highlighted.
7. When finished select
Ok
to confirm the ATIS ID.
You will be requested confirm the ATIS ID by repeating the
entry.
8. With
ENTER AGAIN
displayed on-screen follow steps 3 to 6
above to enter the ATIS ID again.
9. Select
Ok
to confirm.
10. If
NOT CONFIRMED
is displayed then select
Back
and repeat
steps 2 to 9 above.
11. If
CONFIRMED
is displayed then select
Yes
to confirm and
register the ATIS ID.
The saved ATIS ID is displayed on-screen (e.g.
ID:
123456789
).
12. Select
Back
to go back to the ATIS Operation menu.
Note:
You can only enter the ATIS ID number once, if you
have stored an incorrect ATIS ID number in your product, the
product will have to be reset by an authorized Raymarine
dealer.
Enabling / Disabling the ATIS function
With the ATIS ID programmed you can now enable or disable
the ATIS function as required by following the steps below.
Note:
If your radio has been configured to use Marcom-C
mode then ATIS will be permanently enabled and you will not
be able to disable ATIS operation. Marcom-C mode is set by
the dealer at point of sale. If you wish to enable or disable
Marcom-C, please contact your Raymarine dealer.
HI
- ATI S FUNCTI ON- -
ON
OFF
[
BACK
]
O
K
HI
- ATI S FUNCTI ON- -
ON
OFF
[
BACK
]
O
K
HI
- ATI S FUNCTI ON- -
ATI S ON
THEN DSC OFF
PRESS
[
OK
]
O
K
B
ACK
HI
- ATI S FUNCTI ON- -
ATI S OFF
THEN DSC ON
PRESS
[
OK
]
O
K
B
ACK
O
K
HI
- ATI S OPERATI ON-
MY ATI S I D
ATI S FUNCTI ON
[
BACK
]
D
12623-1
From the ATIS operation menu:
1. Select
ATIS Function
.
2. Select
ON
to enable the ATIS function, or
The message
ATIS ON THEN DSC OFF
is displayed
on-screen to warn that when ATIS is enabled then DSC
functions are not available.
3. Select
OFF
to disable the ATIS function.
The message
ATIS OFF THEN DSC ON
is displayed
on-screen to warn that when ATIS is disabled then DSC
functions are available again.
If no ATIS ID has been programmed then the message
PLEASE
INPUT ATIS ID FIRST
is displayed.
Note:
With the ATIS function enabled the following functions
will be disabled:
• DSC functions.
• Scan functions.
• Multiple watch functions.
36
Ray260
Summary of Contents for Ray260
Page 2: ......
Page 4: ......
Page 18: ...18 Ray260 ...
Page 30: ...30 Ray260 ...
Page 52: ...52 Ray260 ...
Page 60: ...60 Ray260 ...
Page 64: ...64 Ray260 ...
Page 68: ...68 Ray260 ...
Page 72: ...72 Ray260 ...
Page 80: ...80 Ray260 ...
Page 92: ...92 Ray260 ...
Page 93: ......
Page 94: ...www raymarine com ...

