background image

86

Ray49E Marine VHF Radio

If the caller had requested a change to an unsupported working channel, Unable 
to Comply appears, indicating the radio could not comply with the channel 
change request.

Log Entry Options

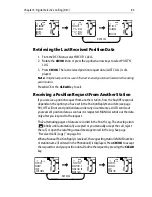
The DSC Call Logs provide additional options for each entry. When the prompt 
appears PRESS [OK] FOR MORE OPTIONS, press the 

CH/OK 

knob. Select from the 

following:


• Call Back. Makes a routine Individual Call to the caller listed in the entry. 
• Delete. Remove this entry from the log.
• Save. Stores any undefined MMSI number into the Phonebook and enables 

you to assign a corresponding name to it. If a name is already assigned for this 
MMSI number in the phonebook, you are prompted to edit the name.

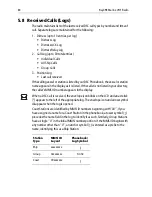
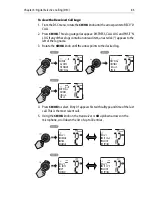
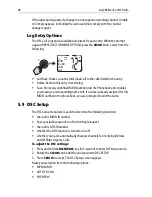
5.9 DSC Setup

The DSC Setup menu item is used to determine the following functions:

• the radio’s MMSI ID number
• how your radio responds to a Position Reply request
• the radio’s ATIS ID number
• whether the ATIS function is turned on or off
• whether your radio automatically changes channels for incoming Distress 

and All Ships Urgency Calls

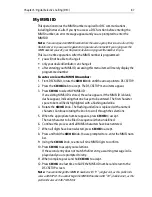
To adjust the DSC settings:

1. Press and hold the 

MENU/DSC

 key for 3 seconds to enter DSC Menu mode.

2. Rotate the 

CH/OK

 knob until the arrow points to DSC SETUP.

3. Press 

CH/OK 

to accept. The DSC Setup screen appears.

Make your selection from the following options:
• MY MMSI ID
• AUTO CH CHG
• POS  REPLY

D10321-1

72

OPTIONS
>CALL BACK
 DELETE 
 SAVE

Summary of Contents for Ray49E

Page 1: ...Ray49E Marine VHF Radio Owner s Handbook Document number 81297 1 Date June 2007 ...

Page 2: ... and registered trademarks Raymarine is a registered trademark of Raymarine plc All other product names are trademarks or registered trademarks of their respective owners Contents of this handbook Raymarine 2007 ...

Page 3: ...EMC Conformance 12 Duty Cycle 12 Product Disposal 12 Declaration of Conformity 12 Chapter 1 Introduction 13 1 1 Ray49E Fixed Station VHF Radios 13 1 2 Features 13 Digital Selective Calling DSC 14 Chapter 2 Installation 15 2 1 Unpacking and Inspection 15 Removing the Sun Cover 15 Equipment Supplied 16 2 2 Planning the Installation 17 2 3 Cable Connections 19 Power 20 External Speaker 20 NMEA Data 2...

Page 4: ... 26 7 Automatic Channel Changing Blocked 26 8 Weather Alert 27 9 U I C WX Channel Set 27 10 A B Channel Status 27 11 Channel Number 27 12 Battery Voltage Alert 27 13 Dot Matrix Display 27 14 HI LO Transmit Power 28 15 ATIS Active 28 3 3 Turning the Power ON and OFF 28 3 4 Setting the Volume 28 3 5 Setting the Squelch 28 3 6 Tuning the Channel 29 3 7 Selecting a Weather Channel If Available 29 Weat...

Page 5: ...Saving Channels to Memory 41 Using the Watch Modes 42 Dual Watch 43 Tri Watch 43 Frequency Band 44 Channel Name 44 Sensitivity 46 4 3 GPS Time Setup 46 Manual Position 47 Settings 49 Latitude Longitude Display 49 Time Display 49 Time Offset 49 Time Format 49 COG SOG Display 49 NMEA Output 50 4 4 ATIS Operation 50 My ATIS ID 50 ATIS Function 53 4 5 System Configuration 55 Backlight Adjustment 55 Co...

Page 6: ...ing Entry 70 Deleting an Existing Entry 71 5 4 Individual Calls 71 Making DSC Calls to Coast Stations 71 Transmitting an Individual Call 71 Receiving Individual Calls 73 5 5 Group Calls 75 Group MMSI Setup 75 Adding a New Group 75 Transmitting a Group Call 76 Receiving Group Calls 78 5 6 All Ships Calls 79 Transmitting an All Ships Call 79 Receiving an All Ships Call 79 All Ships Routine or Safety...

Page 7: ... General 93 Transmitter 94 Receiver 94 Appendix B Radio Controls 95 Microphone Keys 95 Transceiver Controls 96 Transceiver Push Keys 96 Appendix C Menu Structure 97 Appendix D Channel List 99 International Marine VHF Channels Frequencies 99 U S Marine VHF Channels and Frequencies 102 Canadian Marine VHF Channels and Frequencies 105 European Private Channels and Frequencies 110 WX Channels North Am...

Page 8: ...8 Ray49E Marine VHF Radio ...

Page 9: ...ur knowledge the information in this handbook was correct as it went to press However our policy of continuous product improvement and updatingmaychangespecificationswithoutpriornotice Asaresult unavoidable differences between the product and handbook may occur from time to time Raymarine cannot accept liability for inaccuracies or omissions it may contain For the latest handbook revisions and pro...

Page 10: ...ansmitter Identification System ATIS If you purchased your Ray49E to include use on the inland waterways of the contracting governments of the Regional Arrangement Concerning the Radiotelephone Service on Inland Waterways also known as the Basel Agreement1 your Ray49E will be programmed by your dealer to include Automatic Transmitter Identification System ATIS functionality ATIS includes data at t...

Page 11: ...f 3dBi Accounting for the height of an average adult 2 meters the minimum height of the antenna above the deck to meet RF exposure compliance requirements is 3 5 meters Antennas with more gain require a greater MPE radius Do not transmit when anyone is within the MPE radius of the antenna unless shielded from the antenna field by a grounded metallic barrier WARNING Maximum Permissible Exposure Fai...

Page 12: ...ling of waste electrical and electronic equipment While the WEEE Directive does not apply to some of Raymarine s products wesupportitsrequirementsaspartof ourenvironmentalpolicy and we ask you to be aware of how you should dispose of this product The wheelie bin symbol found on our products signifies that it should not be disposed of in general waste or landfill Please contact your local dealer na...

Page 13: ...rogrammed all US and Canadian marine and weather channels Refer to the Frequency Tables in Appendix D which list all marine VHF channels available in your radio You should familiarize yourself with these tables to ensure proper channel usage 1 2 Features The Ray49E is designed and manufactured to provide ease of operation with excellent reliability The Ray49E has many enhanced features including W...

Page 14: ...importantly DSC enables digital distress calls that automatically notify other ships and shore stations where you are and that you are in a distress situation Note An MMSI ID number is required to operate the DSC equipment in thisradio You can request an MMSI number from thesame agency that issues radio or Ship Radio licenc es in yourarea Once obtained youcanprogram theMMSI number yourselfonetimeo...

Page 15: ...ton and the interior packing material in the event you must return the unit to the factory Removing the Sun Cover The Sun Cover was designed to remain on the radio even in rough seas To remove the Sun Cover 1 Place your thumb in the dimple and push downward 2 At the same time pull up the lift tab with your index finger 3 Pinch your fingers towards each other as you lift up D10529 1 ...

Page 16: ...ok for Ray49E Screws x5 for Mounting Bracket Microphone Hanger Screw Lock Washer x1 for Grounding OPTIONAL A46053 Rear Flush Mount Kit for Ray218E Ray55E Ray49E E46006 10W External Speaker Part No Description E43039 Ray49E white VHF Radio R49217 Sun Cover white for Ray49E R49218 Mounting Bracket for Ray49E R49165 Bracket Knob for Ray218E Ray55E Ray49E R49166 Microphone Hanger for Ray218E Ray55E R4...

Page 17: ...ionwheretheremaybeflammablevapors suchasin anengine room or compartment or in a fuel tank bay water splash or spray from bilges or hatches whereit is atriskfrom physical damage from heavy items such as hatch covers tool boxes etc or where it might be covered by other equipment Locate the radio at least 1 5 meters from the antenna Safe Compass Distance is 1 meter for a common compass To be sure you...

Page 18: ... D10241 1 179mm 7 05 in 126mm 4 96 in 167mm 6 57 in 175mm 6 89 in 138mm 5 43 in 40 mm 1 57 in 76 8mm 3 02 in 43 7mm 1 72 in 87 7mm 3 45 in 90 3mm 3 56 in 150 7mm 5 93 in 45mm 1 77 in 130mm 5 12 in 17 3mm 0 68 in 58 1mm 2 29 in 73mm 2 87 in ...

Page 19: ... that follow The ends of the external speaker wires are clipped at the factory so that no bare metalis exposed You muststrip back the insulation beforeinstallation Ifyou are notconnectinganexternalspeaker leavethewiresinsulated Ifyou havestripped back a wire that you will not be connecting clip the bare wire down to the insulation Color Signal Connects to Gray Purple NMEA IN NMEA IN GPS Blue Brown...

Page 20: ...he power cable to the DC supply and that the lug connections be both crimped and soldered The Ray49Eis designed to be operated on a 12 volt nominal system If battery voltage drops below 10 5 VDC BATTERY LOW appears on the LCD Discon tinue using the radio if a low voltage condition occurs as performance would be unreliable If voltage increases to 15 8 VDC BATTERY HIGH appears External Speaker Conne...

Page 21: ...u install a VHF Marine band antenna with a minimum height of 8 ft and gain of at least 3 dBi The coaxial VHF antenna cable connects to the Ray49E antenna jack on the rear panelusingaPL 259 VHF typeconnector Theantennacablelengthcan becritical to performance If you are uncertain contact a professional installer or call Raymarine Product Support If a longer cable length is required RG 8x 50 ohm mari...

Page 22: ...ated at least 1 5 meters 5 feet from the radio connected to the radio before transmitting WARNING Antenna Mounting and EME Exposure Ensure that the antenna is mounted so that no one can enter the maximum permissible exposure radius for RF radiation See the Safety Notice entitled Antenna Mounting and EME Exposure on page 11 Grounding While special grounding is not generally required for VHF radiote...

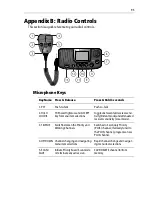
Page 23: ...hesecond lineofthekeyisaccessed by pressingandholding thekey for greater than 3 seconds Microphone Keys 1 PTT Press this Push to Talk key to transmit 2 HILO LOC DIST Press and releaseto toggle the transmitpowerfrom HI to LO Can also be used to select items in menu mode Press and hold for to toggle between full receiver sensitivity Distant mode and attenuated receiver sensitivity Local mode 3 16 PL...

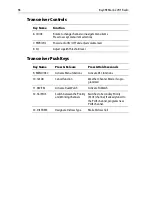
Page 24: ... VOL Use this knob to turn the radio ON and OFF and to set the volume 8 SQ Use this knob to set the squelch threshold which cuts off the receiver when the signal is too weak for reception of anything but noise Transceiver Push Keys 9 MENU DSC Press and release this key to select Menu Mode which is used to set up the radio Menu operations are fully described in Chapter 4 Press and hold for 3 second...

Page 25: ...3 seconds to initiate Tri Watch mode 12 16 PLUS Use this key to switch to the priority channel or to change the value of the Secondary Priority PLUS Channel 13 DISTRESS Push up the spring loaded cover and press this key to make a DSC Distress Call Instructions for making a Distress Call are described in Section 5 2 3 2 Transceiver LCD The following describes the function of the characters on the r...

Page 26: ...ndicatesthattheradio has received a DSC Call Details of thecall can be viewed in theassociated log See Received Calls Logs on page 84 The icon disappears when the call is accepted the call is rejected or the associated message is viewed in the log 6 NO GPS GPS indicates that positional data is available NO GPS indicates that positional data is not available 7 Automatic Channel Changing Blocked Ind...

Page 27: ...rnational channel 6 for example the A does not appear Note Simplexmeansthattheradiotransmitsandreceivesonthesamefrequencyforthis channel Semi duplex channels use separate frequencies to transmit and receive B Receive only Channel The subscript B indicates that you cannot transmit on the currently selected channel it is receive only Used with Canadian channels only 11 Channel Number Displays the cu...

Page 28: ...ilable extended position data is displayed with the off set time This information will be displayed when display option for the posi tion and time is enabled on the Menu See Section 4 3 When the MMSI number is not programmed you are prompted to enter the number as described on page 87 You must then press CH OK to continue To turn the unit OFF rotate the PWR VOL knob completely counterclockwise unt...

Page 29: ...med to receive 10 weatherchannels and sound an alarm if a weather alert is received To enter Weather mode press and hold the CLEAR key for 3 seconds on the transceiver The WX indicator appears in thechannel set field Rotate the CH OK knob on the transceiver or use the channel up down keys on the microphone to select from channels WX01 through WX10 Press and release the CLEAR key again to return to...

Page 30: ...eceiveweather alert broadcasts in the USor Canada onlyif the unit has been programmed by the distributor to use WX Channels 3 8 Selecting the Priority Channel The Ray218E Ray55E provides you with a dedicated key for switching to the Priority Channel16 Pressand releasethe 16 PLUSkey toswitch tochannel16at high power The label 1ST PRIORITY appears If already on channel 16 press and release 16 PLUS t...

Page 31: ...release the 16 PLUS key to switch to Priority Channel 16 at high power Reprograming Secondary Priority PLUS Channel 1 Pressandhold the 16 PLUSkeyfor3secondstoswitch tothecurrentSecond ary Priority PLUS Channel 2 Press and hold the 16 PLUS key for 3 seconds again to switch to Reprogram mode The message CHG 2ND PRI appears with YES highlighted 3 Press the CH OK knob to accept The confirmation messag...

Page 32: ...or 5 minutes transmission is discontinued the message TX TIMEOUT appears and an alert tone sounds Afterthetimeout the alarm continues to sounduntil PTT isreleased TheTX time out timer is reset and the radio returns to receive mode once the PTT key is released Note Ifthecurrent channelis receive only an alert tone sounds when PTT ispressed in dicating such a transmission isnot permitted 10 15 20 25...

Page 33: ... MENU DSC key while in standby mode to enter Menu Mode Menu mode is fully described in Chapter 4 3 12 DSC Call Operation Press and hold the MENU DSC key for greater than 3 seconds while in standby operation mode to enter DSC Call Mode DSC Call mode is fully described in Chapter 5 ...

Page 34: ...34 Ray49E Marine VHF Radio ...

Page 35: ...g selections using the CH OK knob on the transceiver 2 However you can also press the microphone up down keys to make your selections and then press the microphone HI LO key to accept To make Menu selections 1 Press and release the MENU DSC key to enter Menu mode The list of avail able menu groups appears 2 Use the CH OK knob on the transceiver or CH up down key on the micro phone to scroll throug...

Page 36: ... to highlight the desired sub menu 5 Press CH OK on the transceiver or the HI LO key on microphone to accept The options under that sub menu are displayed 6 Rotate the CH OK knob on the transceiver or press the CHup down key on the microphone to highlight the desired option D10251 1 SYS CONFIG BACKLIGHT CONTRAST KEY BEEP D10252 1 SYS CONFIG BACKLIGHT CONTRAST KEY BEEP D10253 1 KEY BEEP LOUD QUIET ...

Page 37: ...he set for any that are broadcasting If a transmission is received the scan stops on the receiving channel as long as it is present If the signal is lost for five seconds the radio resumes scanning You can directlyaccesstheScan Modemenu bypressing and releasing the SCAN SAVE key onthemicrophone When aScan Mode is active you can terminatethe scan and return the radio to standby mode by pressing and...

Page 38: ...ert tone is detected thescan is halted to receivethe Weather Alert broadcast To terminate the SCAN mode and return to standby mode press SCAN SAVE key on the microphone CLEAR key on the transceiver All Scan In All Scan mode all channels in the channel set are scanned in sequence After the last channel number has been scanned the cycle repeats When active SCAN ALL appears on the display D10257 1 VH...

Page 39: ...n mode only the channels that have been saved in memory are scanned in sequence After the lastsaved channel number has been scanned the cycle repeats Whenactive SCANSAVED appearsonthedisplay Ifno channelshavebeensaved into memory when you select this feature an error tone sounds SCAN ALL 16 SCAN ALL 16 SCAN ALL 16 SCAN ALL 16 SCAN ALL 16 SCAN ALL 16 SCAN ALL 16 D10259 1 SCAN SAVED SCAN SAVED SCAN ...

Page 40: ...on and transmitting conditions As a part of marine communications courtesy initial contact should always be attempted using low power You should switch to high power only when contact can not be made on low power or in emergency situations InternationalRegulationsstatethatyou mustusetheminimum power possible for satisfactory communication Rotate the CH OK knob to toggle the TX power from LOW 1 wat...

Page 41: ...ned in the Saved Memory Scan mode see page 39 Any number of channels can be saved as memory channels Separate memory channel groups exist for USA International and Canadian frequency sets To add or remove a channel to from memory 1 Navigate to SAVE CH in the VHF OPS menu 2 Press CH OK to select SAVE CH 3 Rotate CH OK to select channel to be added to removed from memory 4 Press CH OK to confirm orC...

Page 42: ...nelisalready saved pressingand holding the key removes the channel from memory Using the Watch Modes The Watch Modes monitor the programmed Priority Channel and other user selected channel s Thewatch is halted when activity is detected on a monitored channel The Ray49E is equipped with 2 types ofmonitoroperations DualWatch and Tri Watch Note Monitor modes are disabled when the ATIS operation is ac...

Page 43: ... appears on the top line of the display Tri Watch is demonstrated in the figure to the left the sample working channel is channel 72 Press and release the 16 PLUS key to terminate Watch mode and switch to the Priority Channel Press and release the CLEAR key to terminateWatch mode and return to the last used channel Note During TriWatch Mode theCH key isinactiveand an error beep sounds ifpressed D1...

Page 44: ...vigate to CH NAME 2 Press the CH OK knob to select 3 Rotate CH OK to display the channel whose name you want to edit 4 Press CH OK to select Two options are presented edit and delete 5 Press CH OK again to select EDIT The name for the currently selected chan nel appears The firstcharacter is underlined and blinking indicating that it is ready to be edited 6 Use the CH OK knob to modify thefirst ch...

Page 45: ...er the name is deleted no name is displayed for this channel D10267 1 VHF OPS WATCH MODE FREQ BAND CH NAME 06 CH NAME SELECT CH OK CLR 06 SAVE CHANNEL SELECT CH OK CLR 72 CH NAME EDIT DELETE 72 EDIT NAME PLEASURE HOLD OK 72 EDIT NAME FLEASURE HOLD OK 72 72 EDIT NAME FISHING HOLD OK 72 FISHING 50 46 1718N 001 17 7189W AM11 57LOC 10 15 20 25 30 35 40 45 50 55 60 5 ...

Page 46: ...sanddecodesappropriate latitude longitude position and time or COG SOG When position data is available the GPS icon appearsonthetoplineoftheLCD IftheGPSnavigation receiver is not connected or is not functional a manual latitude longitude position and UTC time can be entered and used in the DSC distress transmitted message D10268 1 VHF OPS FREQ BAND CH NAME SENSITIVITY 77 SENSITIVITY DISTANT LOCAL ...

Page 47: ...flashing underline A more detailed description of manual character entry can be found in Add ing a new Entry on page 68 3 Using the CH OK knob scroll through available characters 4 When the desired characterappears press CH OK to accept it The next char acter to be filled in sequence is underlined _ Continue this process until all latitude data has been selected Whenthedirectioncharacterisflashing...

Page 48: ...isplayed in UTC When complete the radio displays the manual lat lon and time data D10270 1 GPS SETUP MANUAL POS SETTING BACK 73 MANUAL POS N W UTC 73 MANUAL POS 5 N W UTC 73 MANUAL POS 50 46 1700N W UTC 73 MANUAL POS 50 46 1700N 0 W UTC 73 73 MANUAL POS 50 46 1700N 001 17 7100W UTC MANUAL POS 50 46 1700N 001 17 7100W 1 UTC 73 73 SHIP SHIP 50 46 1700N 001 17 7100W MAN10 00UTC ...

Page 49: ...e Time Offset The TIME OFFSET setting indicates the amount of time to add or subtract from UTC time to equal your local time Rotate the CH OK knob to select a value from between 13 to 13 hours of UTC and then press ACCEPT to confirm After setting up TimeOffset LOC isdisplayed totherightoftheTimefield toindicate local time Time Format TheTIMEFORMATsettingindicateswhetherthetimeisdisplayedin12houror...

Page 50: ...atic Transmitter Identification System ATIS functionality The Basel Agreement includes Germany Austria Belgium Bulgaria Croatia France Hungary Luxembourg Moldova the Netherlands Poland Romania Russian Federation the Slovak Republic Switzerland theCzechRepublic UkraineandtheFederalRepublicofYugoslavia This section describes how to setup and activate ATIS in your radio My ATIS ID ATIS includes data ...

Page 51: ...the ATIS ID is blank dashes appear indicating that one has yet to be entered 4 ToentertheATISIDnumber rotatethe CH OKknob to displaythefirstdigitin the ATIS ID Actually this is the second digit in the number as the initial 9 has automatically been input for you but is not displayed 5 Press in CH OK to confirm and move on to the next position 6 Continue in this manner until all numbers have been se...

Page 52: ...EL 72 ATSI OPS MY ATIS ID ATIS FUNC BACK 72 72 INPUT MY ATIS ID 567891234 INPUT MY ATIS ID 567891234 HOLD OK 72 72 INPUT MY ATIS ID 567891234 HOLD OK 72 RE ENTER MY ATIS ID _ 72 INPUT MY ATIS ID 567891234 72 INPUT MY ATIS ID _ 72 INPUT MY ATIS ID 5 ATSI OPS MY ATIS ID ATIS FUNC BACK 72 72 INPUT MY ATIS ID 5 ...

Page 53: ...ctive When ATIS is enabled the following occurs DSC functions are disabled Dual Watch Tri Watch and all Scan functions are disabled The following International Channels are limited to 1 watt output power 6 8 10 11 12 13 14 15 17 71 72 74 75 76 77 and 31 if enabled To enable disable ATIS 1 From the Main Menu item point to ATIS OPS 2 Press CH OKto select TheATISOPSmenu itemsappearwith thearrowpoint ...

Page 54: ... MENU VHS OPS GPS SETUP ATIS OPS 72 72 ATIS FUNC ATIS ON THEN DSC OFF PRESS OK 72 ATSI FUNC ON OFF BACK 72 ATSI OPS MY ATIS ID ATIS FUNC BACK 72 ATSI FUNC ON OFF BACK ATSI OPS MY ATIS ID ATIS FUNC BACK 72 72 ATSI OPS MY ATIS ID ATIS FUNC BACK ...

Page 55: ...microphone up down arrow keys to selectthe desired backlight level The number of blocks illuminated in the bar indicates the level one through ten ForHIall10 are illuminated for OFF none are illuminated Press the transceiver CH OK knob or microphone HI LO key to accept D10275 1 MAIN MENU VHF OPS GPS SETUP ATIS OPS 08 MAIN MENU ATIS OPS SYS CONFIG EXIT 08 D10276 1 SYSTM CONFIG BACKLIGHT CONTRAST KE...

Page 56: ...D For HI all 10 blocks are illuminated for LO none are illuminated Key Beep This setting is used to set the volume of the beep that sounds when a key is pressed Select LOUD QUIET or OFF D10277 1 SYSTM CONFIG BACKLIGHT CONTRAST KEY BEEP 73 CONTRAST LO HI PRESS OK 73 CONTRAST LO HI PRESS OK 73 SYSTM CONFIG BACKLIGHT CONTRAST KEY BEEP 73 D10278 1 SYSTM CONFIG BACKLIGHT CONTRAST KEY BEEP 77 77 KEY BEE...

Page 57: ...y all data including information received from other instruments on the system The speed unit appears on the LCD when COG SOG is displayed see page 49 D10279 1 SYSTM CONFIG CONTRAST KEY BEEP BEARING MOD 06 BEARING MODE TRUE MAGNETIC BACK 06 06 BEARING MODE TRUE MAGNETIC BACK 06 DISTRESS 50 46 1718N 001 17 7189W 111 M 12 4KT D10280 1 SYSTM CONFIG KEY BEEP BEARING MOD SPEED UNIT 16 SPEED UNIT KNOTS ...

Page 58: ... signal received NO NMEA signal not received BATTERY OK Battery voltage within nominal limits 10 5 15 8 VDC NO Battery is below 10 5 VDC or above 15 8VDC DSC OK DSC processor is operating properly NO DSC processor is not operating properly SYSTM CONFIG BEARING MOD SPEED UNIT SYSTEM TEST 16 SYSTEM TEST GPS OK BATTERY OK DSC OK 16 D10282 1 SYSTM CONFIG SPEED UNIT SYSTEM TEST VERSION 08 VERSION SOFT ...

Page 59: ... to HI SAVE CH The Saved Channel list is cleared SENSITIVITY Set to DISTANT GPS SETUP SETTING L L DISPLAY is set ON TIME DISPLY is set ON TIME OFFSET is set to 0 TIME FORMAT is set to 12 HR COG SOG is set OFF SYSTEM CONFIG KEY BEEP Set to QUIET BEARING MODE Set to MAGNETIC D10283 1 72 SYSTM CONFIG SYSTEM TEST VERSION RESET SYSTM CONFIG SYSTEM TEST VERSION RESET 72 SYSTEM RESET YES NO BACK 72 ...

Page 60: ...60 Ray49E Marine VHF Radio SPEED UNIT Set to KNOTS DSC MENU RECV D CALLS All logs are cleared DSC SETUP AUTO CH CHG is set AUTO ...

Page 61: ...edon thetypeofcall WhenreceivingaDSCcallfromanothervesseloracoast station an alert sounds and DSC data appears in the LCD such as time of a call the caller and the type and priority of a call Note Ifyou purchased your Ray49E to includeuse on the inland waterways of the con tracting governments ofthe Regional Arrangement Concerning the Radiotelephone Ser vice on Inland Waterways also known as theBa...

Page 62: ... MMSI number GROUP Sends transmissions that are only received by radios sharing a com mon Group MMSI number Up to 3 Group MMSI numbers can be stored and called ALL SHIPS Sends out a message to all stations withinrange that you have impor tant information but the situation is not serious enough for a Distress Call All Ships calls should only be used if hailing for assistance on channel 16 fails The...

Page 63: ...ate DSC equipment know where you are and that you are in a Distress situation Your call can specify the nature of the Distress designated call or not undesignated call Sending a Distress Call Lift the spring loaded door on the front panel of the transceiver Undesignated Quick Distress Call To send a distress call without specifying its nature Press and hold thered DISTRESS key for3 secondsto initi...

Page 64: ...istress 5 PressandholdtheDISTRESS key for3secondstoinitiatethecall During this time the radio beeps the display flashes and a timer counts down 03 02 01 just as with the Undesignated Distress Call illustrated above UNDESIG NATED SINKING FIRE ADRIFT FLOODING ABANDONING COLLISION PIRACY GROUNDING MANOVERBD LISTING EXIT D10286 1 PRESS and HOLD for 3 SECS 10 15 20 25 30 35 40 45 50 55 60 5 DISTRES CAL...

Page 65: ...ress resend Press CLEAR a second time The Distress Call is resent randomly every 3 5 4 5 minutes until an acknowledgement is received or the call is manually cancelled Receiving Acknowledgement After the call is sent the radio waits for acknowledgement The display stops flashing and the alarm sounds continuously until muted or an ACK is received D10287 1 Release Press 10 15 20 25 30 35 40 45 50 55...

Page 66: ...o also receives distress relays Note Class D DSC radios such as the Ray49E are forbidden by law from automatically acknowledging or relaying DSC distress calls Upon receiving a distress call you may hail the vesselin distress on channel 16 and standby to lend assistanceif requested When a Distress Call is received the Ray49E automatically tunes to channel 16 and sounds the Distress Alarm Tone If y...

Page 67: ...OK Thealerttoneismuted theenvelope icon disappearsandtheradio automatically switches to channel 16 Press PTT to communicate with Auto Channel Change OFF 72 SHIP SHIP 50 46 1718N 001 17 7189W PM12 44LOC D10289 1 with Auto Channel Change ON 72 DISTRESS CH CHANGE REQ TO CH16 72 DISTRESS FIRE 50 46 1718N 001 17 7189W 72 DISTRESS 12 34UTC PRESS OK OR PRESS CLR 72 DISTRESS FROM 232123456 16 DISTRESS FRO...

Page 68: ... that you can selectformaking an IndividualCall The numbersarestored by nameand contain the station s MMSInumber You can add edit and delete entries from the Phonebook muchasyouwouldonacellulartelephone TheNAMEfieldcanbeup to 11 alpha numeric characters all capitals in length 13 symbols are also available Rotate the CH OK knob to make an item appear on the dot matrix display and then press in CH O...

Page 69: ... final MSSIID digit thecursor moveson to the NAME field The first character in this line is a symbol assigned by the radio based on the MMSI number you entered Coast Stations are identified by 00 at the beginning of the station name If you enter 00 asthe leading digits of the MMSI ID the radio recognizes thisas a coast station and automatically enters a tower symbol D10291 1 DSC MENU POS REQUEST R...

Page 70: ...rs have been entered 10 When complete press CH OK to accept 11 Press CH OK again to SAVE The new entry appears in the list Editing an Existing Entry 1 FromthePhonebook rotatetheCH OKknobuntilthearrowispointingtothe entry you wish to edit 2 Press CH OK The list of options appear 3 Rotate the CH OK knob until the arrow is pointing to EDIT 4 Press CH OK to select 5 Make your changes to the NAME and M...

Page 71: ...ent working channel within its acknowledgement The Ray49E automatically detects the correct procedures for you based on the type of MMSI number you enter manually or with or the phonebook If 00 is detected as the first two characters of the MMSI Coast Station procedures are implemented automatically Note When making a callto a coast station you willnot beasked to select aworking channelbecausethat...

Page 72: ... 5 Rotate the CH OK knob to select the working channel to be used for the Indi vidual Call and then press in CH OK to accept Select from 06 08 09 10 13 15 16 17 67 68 69 71 72 73 or 77 Note Individual Calls to a Coast Station removethis step from the operating proce dures The Coast Station controls and indicates the working channel within its ACK D10296 1 DSC MENU INDIVIDUAL GROUP ALL SHIPS 72 72 ...

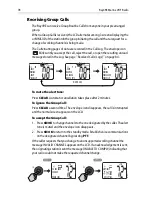
Page 73: ...vidualCallisreceived analerttonesounds theenvelopeiconblinks and the LCD alternates among 3 screens displaying the name or MMSI ID of the station initiating the call and that a request for a change of working channels is being made The channel does not change until you accept The 3 alternating pages of data are recorded in the Call Log The envelope icon blinks until you accept the call reject the ...

Page 74: ...press CH OK to send 3 WhenthecallerrespondstotheACK pressCH OKtoreturntostandbymode Establish voice communications on the designated channel by pressing PTT If the caller requests that you change to an unsupported working channel the messageINVALID CHANNEL appears on the LCD If an acknowledgementissent the originating station is sent the message UNABLE TO COMPLY indicating that your radio could no...

Page 75: ...pMMSIIDnumbersarealready stored those values appear If blank EMPTY 1 EMPTY 2 etc are shown to indicate that the Group IDs have not yet been programmed Select the first available empty group location 5 Press CH OK to select The GROUP MMSI field appears The initial 0 is automatically entered for you indicating that this is a Group MMSI ID The first character space thatyou can modify ishighlighted wi...

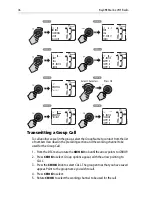
Page 76: ...ear with the arrow pointing to CALL 3 Press the CH OK knob to select CALL The group entries that you have saved appear Point to the group name you wish to call 4 Press CH OK to select 5 Rotate CH OK to select the working channel to be used for the call D10301 1 Select Characters Press OK DSC MENU INDIVIDUAL GROUP ALL SHIPS 73 GROUP CALL MY GROUP ID BACK 73 73 GROUP CALL MY GROUP ID BACK 73 MY GROU...

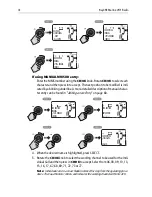
Page 77: ...king channel to be used for the Group Call 8 Press CH OK to confirm and converse on the designated channel l D10302 1 DSC MENU INDIVIDUAL GROUP ALL SHIPS 77 GROUP CALL MY GROUP ID BACK 77 77 GRP ROUTINE 023212345 023254321 EMPTY 77 GRP ROUTINE 023212345 SELECT CH PRESS OK 06 GRP ROUTINE 023212345 SELECT CH PRESS OK 06 GRP ROUTINE 023212345 SEND CANCEL 06 TX COMPLETE CH HAS BEEN CHANGED PRESS OK 06...

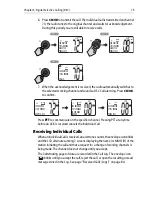
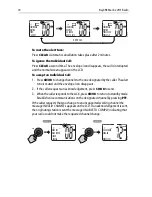
Page 78: ...CLEAR a second time The envelope icon disappears the call is interrupted and the normal screen appears on the LCD To accept the Group Call 1 Press CH OKtochangechannelstotheonedesignatedbythecaller Thealert tone is muted and the envelope icon disappears 2 Press CH OK to return to the standby mode Establish voice communications on the designated channel by pressing PTT If the caller requests that y...

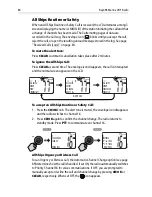
Page 79: ...Transmitting an All Ships Call 1 From the DSC menu rotate the CH OK knob until the arrow points to ALL SHIPS 2 PressCH OK toselect Choosethetypeofcallyouwishto make URGENCYor SAFETY 3 Press CH OK again to transmitthe call The callis transmitted on channel 70 and then the radio tunes to channel 16 at high power 4 Press CH OK to reconfirm the All Ships Call The radio returns to standby mode Press PT...

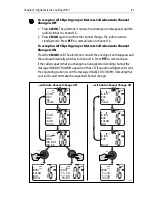
Page 80: ...he LCD To accept an All Ships Routine or Safety Call 1 Press the CH OK knob The alert tone is muted theenvelopeicon disappears and the radio switches to channel 16 2 Press CH OK again to confirm the channel change The radio returns to standby mode Press PTT to communicate on channel 16 All Ships Urgency or Distress Call For an Urgency or Distress Call the Automatic Channel Change option see page 8...

Page 81: ...nel 16 Press PTT to communicate If the caller requests that you change to an unsupported working channel the messageINVALID CHANNEL appearson theLCD If an acknowledgement issent the originating station is sent the message UNABLE TO COMPLY indicating that your radio could not make the requested channel change D10307 1 with Auto Channel Change OFF 06 ALL SHIPS URGENCY FROM 232123456 06 ALL SHIPS URG...

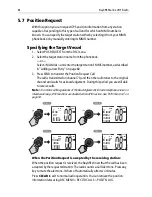
Page 82: ... the original channel and waits for acknowledgement During this period you are still able to receive calls Note To conform with regulations ofthe BaselAgreement for radiotelephoneservice on inlandwaterways DSCfunctionsaredisabledwhen ATISisactive See ATISFunction on page 53 When the Position Request is accepted by the receiving station When the position request is received the Ray49E shows that th...

Page 83: ...nces AUTO sends out yourvessel sposition dataassoon asitisrequested MANUAL sendsoutthe data only after you respond to the request The2 alternating pagesof dataarerecorded in thePosit n Log Theenvelope icon blinks until automatically accepted or you manually accept the call reject the call or open the resulting unread message stored in the Log See page Received Calls Logs on page 84 When aManualPos...

Page 84: ...er s MMSI ID number appears in the display When a DSC Call is received the envelope icon blinks on the LCD and an asterisk appearsto theleftoftheappropriatelog Theenvelopeicon and arrowsymbol disappear when the log is opened Coast Stations are identified by MMSI ID numbers beginning with 00 If you have assigned a name for a Coast Station in the phonebook a tower symbol precedes the name field in t...

Page 85: ...he desired log 4 Press CH OKtoselect Entry 01appearsfirstwith calltypeandtimeofthelast call This is the most recent call 5 Using the CH OK knob on the transceiver orCH up down arrows on the microphone scroll down the list of up to 30 entries D10312 1 DSC MENU ALL SHIPS POS REQUEST RECV D CALL 72 RECV D CALL DISTRESS CALL LOG POS LOG 72 72 RECV D CALL DISTRESS CALL LOG POS LOG D10320 1 72 CALL 01 I...

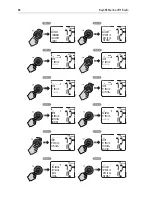
Page 86: ...g nametoit Ifanameisalreadyassigned forthis MMSI number in the phonebook you are prompted to edit the name 5 9 DSC Setup The DSC Setup menu item is used to determine the following functions the radio s MMSI ID number how your radio responds to a Position Reply request the radio s ATIS ID number whether the ATIS function is turned on or off whether your radio automatically changes channels for inco...

Page 87: ...the value appears If the MMSI ID is blank dashes appear indicating that one has yet to be entered The first character space to be modified is highlighted with a flashing underline 4 Rotate the CH OK knob The flashing underline is replaced with a numeric character Continue rotating the knob to scroll through the selections 5 When the appropriate number appears press CH OK to accept The next charact...

Page 88: ...ETUP MY MMSI ID AUTO CH CHG POS REPLY 72 72 INPUT MY MMSI ID 2320123456 INPUT MY MMSI ID 2320123456 HOLD OK 72 72 INPUT MY MMSI ID 2320123456 HOLD OK 72 RE ENTER MY MMSI ID _ 72 INPUT MY MMSI ID 2 72 INPUT MY MMSI ID 2320123456 72 INPUT MY MMSI ID _ 72 INPUT MY MMSI ID 2 DSC SETUP MY MMSI ID AUTO CH CHG POS REPLY 72 ...

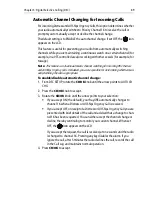
Page 89: ...her man uallydeclining the callis appropriate To enable disable automatic channel change 1 From DSC SETUP rotate the CH OK knob until the arrow points to AUTO CH CHG 2 Press the CH OK knob to accept 3 Rotate the CH OK knob until the arrow points to your selection If you accept ON the default your Ray49E automatically changes to channel 16 when a Distress or All Ships Urgency Call is received If yo...

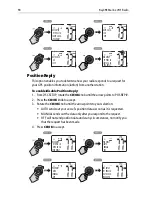
Page 90: ...selection AUTO sends out your vessel s position data as soon as it is requested MANUAL sends out the data only after you respond to the request OFF will not send position data under any circumstances nor notify you that the request has been made 4 Press CH OK to accept AUTO CH CHG ON OFF 73 73 AUTO CH CHG ON OFF D10328 1 73 DSC SETUP MY MMSI ID AUTO CH CHG POS REPLY DSC SETUP MY MMSI ID AUTO CH CH...

Page 91: ...cking the Find Answers link routes you to our solution database Search questions and answers by product category keywords or phrases If the answer you are seeking is not available click the Ask Raymarine tab to submit your own question to our technical support staff who will reply to you by e mail Product Repair and Service In the unlikely event your Raymarine unit should develop a problem please ...

Page 92: ...tems and parts are available through your authorized Raymarine distributor Please refer to the lists of component part numbers and optional accessories in the Installation chapter of this manual and have the Raymarine part number ready when speaking with your dealer If you are uncertain about what item to choose for your unit please contact our Customer Services Department prior to placing your or...

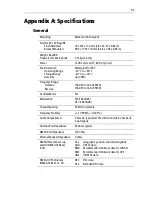
Page 93: ...Receive 156 050 to 162 425 MHz 156 050 to 163 275 MHz Oscillate Mode PLL Modulation FM 16K0G3E DSC 16K0G2B Channel Spacing 25 kHz Increments Frequency Stability 10 PPM 0 001 Audio Output Power 3 5watts typical at10 distortionwith4ohmload 5 wattspeak Antenna Port Impedance 50 ohms typical NMEA Port Impedance 100 ohms External Speaker Impedance 4 ohms NMEA IN Sentences sup ported NMEA 0183 ver 3 01 ...

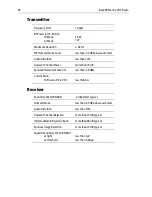
Page 94: ... 70 dB Spurious Harmonic Emissions less than 36 dBm Current Drain Hi Power at 13 6V DC less than 6 A Sensitivity 20dB SINAD 4 dBμV emf typical Hum and Noise less than 40 dB below audio level Audio Distortion less than 10 Adjacent Channel Rejection more than 70 dB typical Intermodulation Rejection Ratio more than 68 dB typical Spurious Image Rejection more than 70 dB typical Squelch Sensitivity 12d...

Page 95: ...ver sensi tivity Distantmode andattenuated receiver sensitivity Local mode 3 16 PLUS Switch between the Priority and Working Channels Switches to Secondary Priority PLUS channel If already tuned to the PLUS channel programs a new PLUS channel 4 UP DOWN Channel changing and navigating menu item selections Rapid channel change and navigat ing menu item selections 5 SCAN SAVE Initiate Priority Saved ...

Page 96: ...h threshold level Key Name Press Release Press Hold 3 seconds 9 MENU DSC Activate Menu functions Activate DSC functions 10 CLEAR Cancel function Weather Channel Mode if so pro grammed 11 DW TRI Activate Dual Watch Activate Tri Watch 12 16 PLUS Switch between the Priority and Working Channels Switches to Secondary Priority PLUS channel If already tuned to the PLUS channel programs new PLUS channel ...

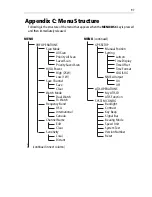
Page 97: ...isplay Time Offset Time Format COG SOG HI LO Power High 25W Low 1 W Save Channel Save Clear On Off Watch Mode Dual Watch Tri Watch Channel Name Edit Clear Sensitivity Local continued in next column Distant Frequency Band USA International Canada MENU GPS SETUP Manual Position Setting NMEA Output SYSTEM CONFIG Backlight Contrast ATIS OPERATIONS My ATIS ID ATIS Function Key Beep Signal Bar Bearing M...

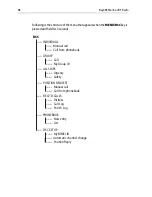
Page 98: ...ssed and held for 3 seconds PHONEBOOK New entry List DSC INDIVIDUAL Manual call Call from phonebook GROUP Call My Group ID ALL SHIPS Urgency Safety POSITION REQUEST Manual call Call from phonebook RECV D CALLS Distress Call Log Posit n Log DSC SETUP My MMSI ID Position Reply Automatic channel change D9311 2 ...

Page 99: ...p Movement 10 156 500 156 500 x Intership Port Operations and Ship Movement 2 11 156 550 156 550 x Port Operations and Ship Movement 12 156 600 156 600 x Port Operations and Ship Movement 13 156 650 156 650 x Intership Safety Port Operations and Ship Movement 3 14 156 700 156 700 x Port Operations and Ship Movement 15 156 750 156 750 x Intership and On board Communications at 1W only 4 16 156 800 ...

Page 100: ...Public Correspondence Port Operations and Ship Movement 64 156 225 160 825 Public Correspondence Port Operations and Ship Movement 65 156 275 160 875 Public Correspondence Port Operations and Ship Movement 66 156 325 160 925 Public Correspondence Port Operations and Ship Movement 67 156 375 156 375 x Intership Port Operations and Ship Movement 2 68 156 425 156 425 x Port Operations and Ship Moveme...

Page 101: ...the broadcast of Marine Safety Information by the Maritime and Coast Guard Agency in the UK only 3 Channel 13 is designated for use on a worldwide basis as a navigation safety communication channel primarily for intership navigation safety communications 4 Channels 15 and 17 may also be used for on board communications provided the effective radi ated power does not exceed 1 Watt 5 The use of Chan...

Page 102: ...156 550 156 550 x Commercial VTS in selected areas 12 156 600 156 600 x Port Operations VTS in selected areas 13 156 650 156 650 x Intership Navigation Safety Bridge to bridge Ships 20metersinlengthmaintainalisteningwatchonthischannel in US waters 2 6 14 156 700 156 700 x Port Operations VTS in selected areas 15 156 750 x Environmental Receive only Used by Class C EPIRBs 3 16 156 800 156 800 x Int...

Page 103: ...ble only in New Orleans Lower Mississippi area 64A 156 225 156 225 x U S Coast Guard only 65A 156 275 156 275 x Port Operations 66A 156 325 156 325 x Port Operations 67 156 375 156 375 x Commercial Used for Bridge to bridge communications in lower Mississippi River Intership only 6 68 156 425 156 425 x Non Commercial 69 156 475 156 475 x Non Commercial 71 156 575 156 575 x Non Commercial 72 156 62...

Page 104: ...VHF channel13 in addition to VHF channel 16 when oper ating within U S territorialwaters 3 Channelis Receive Only 4 Channel16 isused for calling other stations or for distress alerting 5 Output power is fixed at 1 watt only 6 Output power is initially set to 1 watt User can temporarily override this restriction to transmit at high power 81A 157 075 157 075 x U S Government only Environmental prote...

Page 105: ...ip Commercial and Safety Also assigned for operationsin the Lake Winnipeg area 09 156 450 156 450 AC Intership Ship Shore Commercial Non commercial and ShipMovement Maybeusedtocommunicatewithaircraft and helicopters in predominantly maritime support opera tions 10 156 500 156 500 AC GL Intership Ship Shore Commercial Non commercial Safety andShipMovement Mayalsobeusedforcommuni cations with aircra...

Page 106: ...56 950 156 950 PC Intership and Ship Shore Various Government departments 20 157 000 161 600 All areas Ship Shore Safety and Ship Movement Port operations only with 1 watt maximum power 21A 157 050 157 050 All areas Intership and Ship Shore Canadian Coast Guard only 21B 161 650 All areas Safety Continuous Marine Broadcast CMB service 3 22A 157 100 157 100 All areas Intership Ship Shore Commercial ...

Page 107: ...rcial Commercial fishing only 65A 156 275 156 275 Intership Ship Shore Commercial Non commercial Safety Search rescue and antipollution operations on the Great Lakes Towing on the Pacific Coast Port operations only in the St Lawrence River areas with 1Wmaximum power Pleasure craft in the inland waters of Alberta Saskatchewan and Manitoba excluding Lake Winnipeg and the Red River 66A 156 325 156 32...

Page 108: ...ommercial fishing only 73 156 675 156 675 All areas except EC Intership Ship Shore Commercial Non commercial Safety May also be used for communications with aircraft engaged in coordinated search and rescue and antipollu tion operations 74 156 725 156 725 EC PC Intership Ship Shore Commercial Non commercial and Ship Movement 77 156 875 156 875 Intership Ship Shore Safety and Ship Movement Pilotage...

Page 109: ...ive Only 4 Channel70 is used exclusively for DigitalSelectiveCalling DSC and is not available for regular voice communications 5 Channels 75and 76arereserved as guard bands for Channel16 and are not availablefor regular voice communications 82A 157 125 157 125 PC Intership Ship Shore and Safety Canadian Coast Guard use only 82A 157 125 157 125 Intership and Ship Shore Canadian Coast Guard use only...

Page 110: ...hese frequencies WX Channels North America only Country Channel Number TX Freq RX Freq Channel Use Belgium 96 162 425 162 425 Marina Denmark L1 L2 155 500 155 525 155 500 155 525 Leisure Leisure Denmark Finland Norway Sweden F1 F2 F3 155 625 155 775 155 825 155 625 155 775 155 825 Fishing Fishing Fishing Finland Norway Sweden L1 L2 L3 155 500 155 525 155 650 155 500 155 525 155 650 Leisure Leisure...

Page 111: ...Selective Calling DSC is a system used to send digital messagestostationsidentifiedby aunique MMSInumber Con tained within the message isthe working channel on which voice communications are to be made DSC enables you to make digital Distress Calls and to specify the stations that you wishtocontact anIndividual station all stations within a spec ified Group or All Ship stations within range Dual W...

Page 112: ...o talk switch RF Radio Frequency RTCM Radio Technical Commission for Maritime Services RX Receive SAR Search And Rescue Saved Scan Scans only user selected memory channels Semi duplex Channels using separate frequencies to transmit and receive Simplex Channels transmitting and receiving on the same frequency SOG Speed Over Ground Squelch Acircuitthatsetsthethresholdforcuttingoffthe receiverwhen th...

Page 113: ... cable 19 external speaker 20 GPS 20 NMEA 20 power 20 Contrast adjustment 56 Conventions 9 Customer Support 91 D Deleting channels from memory 41 Display 25 Distress Calls 63 key 25 Receiving 66 Receiving Distress Relay 68 Sending a Designated call 64 Sending an Undesignated QUICK call 63 DSC 61 All Ships Calls 79 Call icon 26 Distress Calls 63 Group Calls 75 Individual Calls 71 key 35 Log 84 Opti...

Page 114: ...50 DSC Setup 86 GPS Time Setup 46 Phonebook 68 Adding entries 68 Deleting entries 71 Editing entries 70 Settings 49 MENU DSC key 24 35 61 Messages 84 Microphone 23 35 62 95 MMSI 87 Monitor Mode Dual Watch 43 Tri Watch 43 My ATIS ID 50 My MMSI ID 87 N NMEA connections 20 NMEA Output 50 P Phonebook 68 Adding entries 68 Deleting entries 71 Editing entries 70 PLUS channel 23 25 31 Position Reply 90 Po...

Page 115: ...ime Display 49 Time Format 49 Time Offset 49 Speaker 20 Specifications 93 Speed Unit 57 Squelch 24 28 Standard equipment 16 19 Sun cover removal 15 System Configuration 55 Backlight 55 Bearing Mode 57 Contrast 56 Key Beep 56 Reset 59 Speed Unit 57 System Test 58 Version Number 58 System Test 58 T Time Display 49 Format 49 Offset 49 Setup 46 Transmitting 32 Tri Watch 25 43 TX 26 32 U Unable to Comp...

Page 116: ...116 Ray49E VHF Radio ...

Reviews: