6.2 Operation and features overview
The camera features can be accessed using the thermal camera
application of a compatible Raymarine multifunction display, or from
a dedicated JCU (Joystick control unit).
This handbook covers methods using the JCU, for details on how
to operate this product using a compatible Raymarine multifunction
display please refer to the thermal camera application section of the
manual supplied with your multifunction display.
The main Thermal camera operations are outlined below:
Control the camera:
• Switch the camera between operational and standby modes.
• Pan and tilt
• Zoom
• Home position
• Pause the camera image
• Switch between visible light and thermal camera lenses. (Dual
payload only)
• Surveillance mode
Adjust the camera image:
• Color palette
• Scene presets
• Reverse video (white hot / black hot)
In addition to the above, the camera also provides setup menus to
configure the system to your requirements.
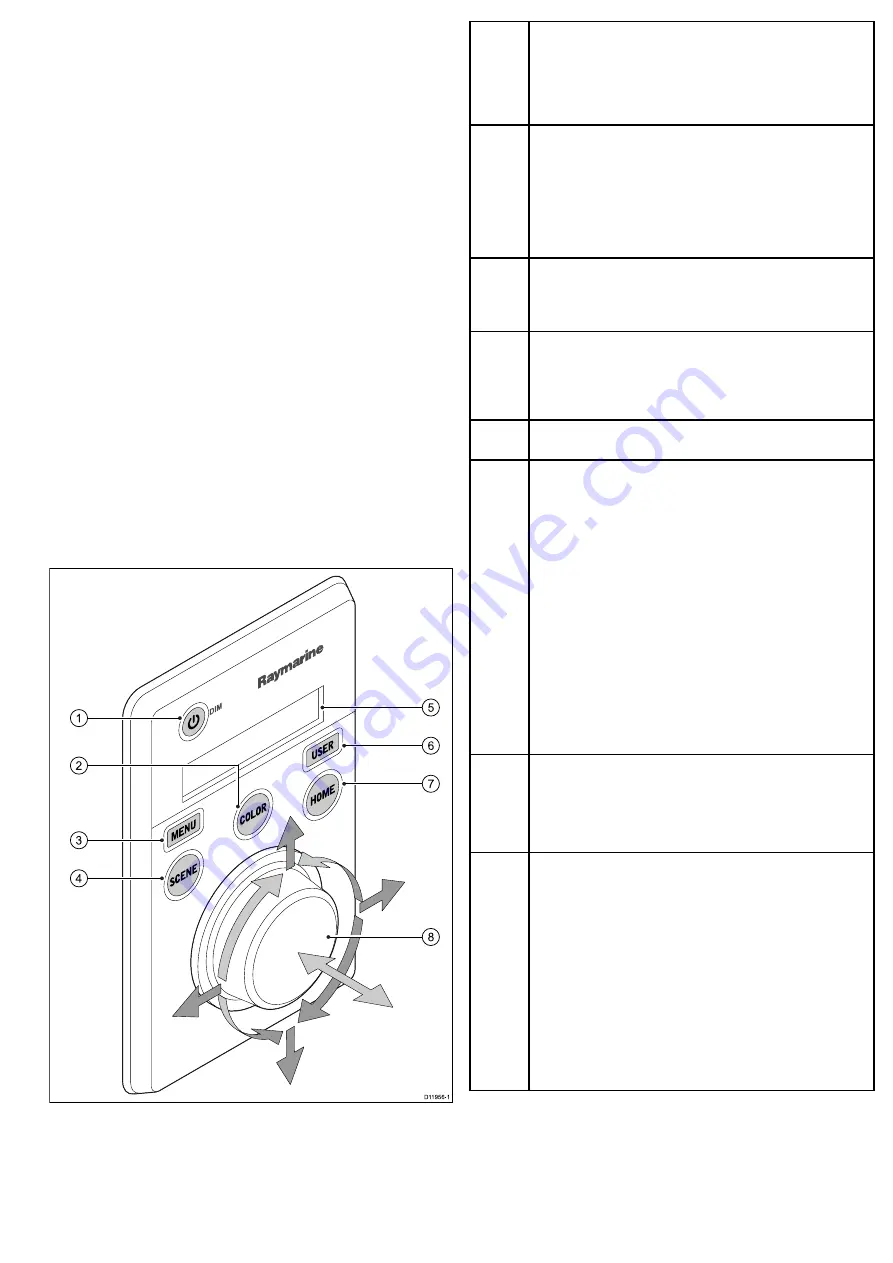
JCU controls overview
D11956-1
1
3
4
6
5
7
8
2
1
STANDBY / DIM
• Press and hold – “Wake” the camera from standby mode or
access the power menu.
• Momentary press – Change JCU display brightness (3 different
levels).
2
COLOR
The factory default is for a red color image to suite night navigation.
You may change this using the setup menus.
• Momentary press – Cycle through the available color settings.
(Greyscale, Red, Sepia, Rainbow and Fusion.)
• Press and hold – Perform FFC (Flat Field Correction) operation.
This performs a correction for the current ambient temperature.
3
MENU
– Access the camera setup menus.
• Press once – display on–screen setup menu.
• Press again – exit setup menu.
4
SCENE
• Short press – Select between the available scene presets.
• Long press (dual payload only) – switch between the thermal
and visible-light image.
5
Display
– Provides information regarding the JCU and camera
status.
6
USER
– A programmable button for accessing a favorite setting or
function not provided on the other keys. The default operation is the
Reverse Video function (white-hot / black-hot).
• Short press – Perform the programmed action.
• Press and hold – Program the
USER
button with another function.
The
USER
button can be programmed for the following functions:
•
Search Settings
•
Switch Thermal / VIS Video
•
Hide / Show All Icons
•
Reverse Video
•
Rearview Mode
•
Surveillance Mode
•
Point Mode
7
HOME
• Momentary press – Return camera to home position.
• Press and hold – Set current position as camera home.
• 4 x press – Reset the camera (realign home and stow positions).
8
PUCK
– Use the puck to control the camera and navigate the setup
menus.
Control camera:
• Move up, down left right – Pan / Tilt camera.
• Press down (and hold) – Zoom thermal image in .
• Lift up – Zoom thermal image out.
• Double-click (2 quick presses) – Pause thermal image. (Move
puck in any direction to unfreeze.)
Navigate setup menus:
• Move up, down – Scroll through menu options.
• Press down – Select highlighted menu option.
System operation and setup
31
Summary of Contents for T303
Page 2: ......
Page 4: ......
Page 6: ...6 T Series...
Page 18: ...18 T Series...
Page 24: ...24 T Series...
Page 28: ...Thin panel mounting D11989 1 Thick panel mounting D11990 1 28 T Series...
Page 40: ...40 T Series...
Page 43: ......
Page 44: ...www raymarine com...


