background image


PAGE 6 OF 33 

UG-TN200 V1.3  


TN-200

 
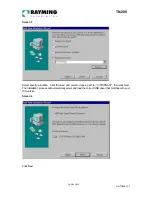
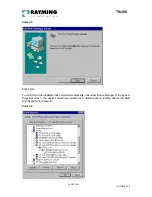
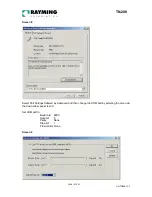
Screen 3 


Select specify a location.  Click “Browse” and select or type a path to: “C:\TRIPNAV2”, then click Next.  
The installation process will automatically select and load the correct USB driver that matches with your 
O/S version. 

 
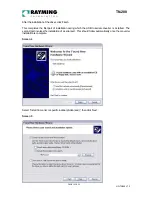
Screen 4  


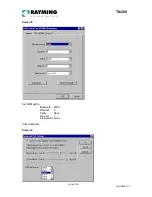
Click Next.  


Summary of Contents for TripNav TN-200

Page 1: ...All rights reserved No part of this manual may be reproduced transmitted copied or stored in any storage medium for any purpose without prior written consent from Rayming Corporation Rayming Corporati...

Page 2: ...Windows 98 5 2 2 Installing FT8U232 USB Driver under Windows 2000 11 2 3 Installing FT8U232 USB Driver under Windows XP 16 3 USING TRIPNAV 21 4 UN INSTALL THE USB DRIVER 22 4 1 Uninstalling FT8U232 U...

Page 3: ...lation to the surrounding streets in your travel area You ll find that almost any NMEA compliant street mapping software is compatible with the TripNav USB GPS receiver Visit our web site for recommen...

Page 4: ...ED WITH TRIPNAV These are only a few simple steps that you need to follow before using your TripNav receiver Install the USB driver and onto your laptop PC from the included CD ROM or download the fil...

Page 5: ...PAGE 5 OF 33 UG TN200 V1 3 TN 200 2 1 Installing the FT8U232 USB Driver under Windows 98 Screen 1 Click Next Screen 2 Click Next...

Page 6: ...en 3 Select specify a location Click Browse and select or type a path to C TRIPNAV2 then click Next The installation process will automatically select and load the correct USB driver that matches with...

Page 7: ...Click Finish To confirm that the installation has completed successfully look under Device Manager of the System Properties screen The device should have installed as a USB Serial Port COMx attached t...

Page 8: ...t properties select the USB Serial Port and then click Properties This allows you to change serial port properties such as baud rate data bits etc Of particular use is the ability to change the COM po...

Page 9: ...PAGE 9 OF 33 UG TN200 V1 3 TN 200 Screen 8 Set COM port to Baud rate 4800 Data bit 8 Parity None Stop bit 1 Flow control None Click Advanced Screen 9...

Page 10: ...you do not select a COM port that is in use Note This is particularly important when running programs like HyperTerminal which only works with COM1 through to COM4 When you return to the Device Manag...

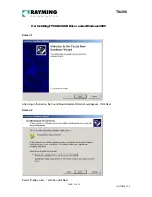
Page 11: ...UG TN200 V1 3 TN 200 2 2 Installing FT8U232 USB Driver under Windows 2000 Screen 1 After plug in the device the Found New Hardware Wizard should appear Click Next Screen 2 Select Display a list and th...

Page 12: ...n 3 Select Specify a location and then click Next Enter or select a path to C TRIPNAV2 and click Next The installation process will automatically select and load the correct USB driver that matches wi...

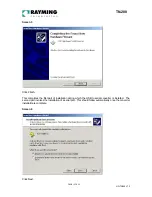
Page 13: ...This completes the first part of installation during which the USB to serial converter is installed The second part involves the installation of a serial port This should follow automatically once th...

Page 14: ...ached to USB High Speed Serial Converter The screen below is shown after selecting Control Panel System Properties Hardware Device Manager then Select View Devices by connection Screen 7 To change the...

Page 15: ...200 Screen 8 Select Port Settings followed by Advanced and then change the COM port by selecting the menu via the down arrow see screen 9 Set COM port to Baud rate 4800 Data bit 8 Parity None Stop bi...

Page 16: ...scroll to the desired COM port Click OK Please ensure that you do not select a COM port that is in use Note this is particularly useful for programs such as HyperTerminal which only work with COM1 th...

Page 17: ...ter plug in the device the Found New Hardware Wizard should appear Select Install from a list or specific location Advanced then click Next Screen 2 Enter the location of the USB Driver in the edit bo...

Page 18: ...rst part of installation during which the USB to serial converter is installed The second part involves the installation of a serial port This should follow automatically once the converter installati...

Page 19: ...er the installation of the driver click Finish Screen 7 Once the installation of the serial port has completed confirm that the installation has been successful by looking under Device Manager of the...

Page 20: ...stem Hardware Device Manager then Select View Devices by connection Screen 8 Select Port Settings followed by Advanced and then change the COM port by selecting the menu via the down arrow see screen...

Page 21: ...GPS fix coordinates of the current position To do this take your laptop PC with your USB driver and the mapping software loaded and configured to an open area that has a clear view to the sky such as...

Page 22: ...N INSTALL THE USB DRIVER 4 1 Uninstalling FT8U232 USB Driver from Windows 98 To uninstall the USB driver unplug the device and Select Add Remove Software under the Control Panel Select FTDI USB to Ser...

Page 23: ...the drivers will be removed Uninstalling FT8U232 USB Driver from Windows 2000 Under Windows 2000 there is a two stage process requiring the running of Add Remove Software as well as Add Remove Hardwa...

Page 24: ...This will bring up the FTDI Uninstaller screen which asks if it s OK to delete the drivers Click OK to remove the drivers Screen 2 Click Finish to complete the driver uninstall The next stage involves...

Page 25: ...PAGE 25 OF 33 UG TN200 V1 3 TN 200 Screen 4 Check Uninstall Unplug a device then click Next Screen 5 Check uninstall a device then click Next...

Page 26: ...PAGE 26 OF 33 UG TN200 V1 3 TN 200 Screen 6 Check Show hidden devices highlight USB Serial Port COM11 and then click Next Screen 7 Check Yes I want to uninstall the device and then click Next...

Page 27: ...ow need to remove the USB to serial converter to complete the driver removal Repeat the steps shown in screens 3 to 5 check Show hidden devices and then scroll down the screen until you find the USB H...

Page 28: ...river from Windows XP To uninstall the USB driver unplug the device and Select Add Remove Software under the Control Panel Select FTDI USB to Serial Converter then Change Remove Screen 1 Click Change...

Page 29: ...the GPS receiver to be unable to get a location fix If you are parked in a covered parking lot or near a tall building it is recommended that you drive away until you have a clear view of the sky befo...

Page 30: ...ak this period may be slightly extended Please allow an adequate amount of time for the GPS receiver s boot up process to complete before contacting Technical Support Regarding erratic mouse cursor If...

Page 31: ...ntal special or consequential damages that results from your use or your inability to use or the performance of the product s with respect to any liability loss or arising out of any breach of this wa...

Page 32: ...does not cover a Damage or failure caused by or attributable to acts of God abuse accident misuse improper or abnormal usage failure to follow the instructions improper installation or maintenance al...

Page 33: ...F binary GPS Output Data SiRF binary position velocity altitude status and control NMEA 0183 MEA0183 V2 2 protocol and supports command GGA GSA GSV RMC VTG GLL v2 2 VTG and GLL are optional GPS transf...

Reviews: