background image

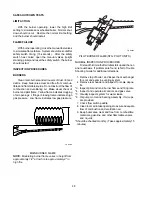
 j) Reverse above procedure to re-install.

  9. Fast Response Temperature Sensor Module

Replacement

a) Shut-off electrical power to the boiler.

b) Remove control cover screws and open

control compartment.

c) Disconnect wiring connections to the board.

d) Carefully pull out the control board from the

nylon pin supports.

e) Reverse above procedure to re-install.

10. Fast Response Temperature Sensor Probe

Replacement

a) Shut off electrical power to the boiler.

b) Shut off water supply to the boiler and open

drain valve to remove water to the sensor

probe level.

c) Remove control cover screws and open

control compartment.

d) Disconnect wire leads from control board.

e) Remove upper access panel.

 f) Remove sensor probe from in/out header.

g) Reverse above procedure to re-install.

11. Circulator Replacement

a) Shut off electrical power to the boiler.

b) Shut off water supply and open drain valve

to remove water in the  piping at the pump

level.

CAUTION

To avoid damage to electrical components

keep water  from getting into the control compartments

and gas valve.

c) Disconnect wiring and conduit connections to

the pump.

d) Disconnect  the by-pass tube connections to

the inlet flange.

e) Remove the nuts and bolts at the inlet and

outlet flanges.  Remove old gaskets.

 f) Remove the pump.

g) Reverse the above procedure to re-install.

 Use new gaskets and make sure they are

 seated properly when tightening the nuts

and bolts.

12. 2-Staged Controller (Models 90, 135 & 180)

a) Shut off electrical power to the boiler.

b) Remove control cover screws and open con-

trol compartment.

c) The control is factory set at 160°F.  To reset

to another setting, use a small screw driver

and turn dial clockwise

to lower the

temperature or counter-clockwise

to

raise the setting.

d) To replace the staged controller, disconnect

the wiring connections.

e) Remove screws (2) holding the staged

controller.

f) Remove upper access panel.

g) Remove the wedge or retaining clip holding

the sensing bulb in the control well in the in/

out header.

h) Pull out the sensing bulb carefully from the

control well.

i) Remove the staged control with capillary

from unit.

j) Reverse above procedure to re-install.

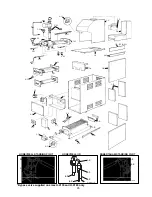
6. REPLACEMENT PARTS LIST

NOTE:


To supply the correct part it is important that you

state the model number, serial number and type of gas

when applicable.

Any part returned for replacement under standard

company warranties must be properly tagged with

RAYPAK return parts tag, completely filled in with the

heater  serial  number, model  number etc., and

shipped to the Company freight prepaid.

If determined defective by the Company and within

warranty, the part will be returned in kind or equal

substitution, freight collect.  Credit will not be issued.

RAYPAK, INC.

31111 Agoura Road

Westlake Village, CA 91361-4699

34

Summary of Contents for 0090B 0135B

Page 1: ...so may result in an explosion or fire WARNING Improper installation adjustment alteration service or maintenance can cause property damage personal injury or loss of life Refer to the user s informati...

Page 2: ...SIONS 4 3 INSTALLATION PROCEDURES 4 Code Requirements 4 Mounting Base 4 Clearance Requirements 4 Combustion Ventilation Air 5 Venting Connections 7 Vent Damper Installation 10 Gas Supply Connections 1...

Page 3: ...t in sub base for combus tible flooring Models are available with standing pilot or with intermittent ignition device I I D The boilers are equipped with the following components water circulation pum...

Page 4: ...5 Comb Alcove 6 6 6 16 6 0180 2 A front clearance of at least 24 is recommended for adequate service of burner tray and controls 3 Except for carpeted flooring boilers are certified for installation o...

Page 5: ...e shall the small est dimension be less than 3 inches VENTING CONNECTIONS These boilers have built in drafthoods Vent piping the same size or larger than the draft hood outlet is recommended however w...

Page 6: ...ng space causing serious health injury For connections to gas vents or chimneys vent installations shall be in accordance with Part 7 Venting of Equipment of the National Fuel Gas Code ANSI Z223 1 or...

Page 7: ...or pipe to visually check spillage f After it has been determined that each appliance remaining connected to the common venting sys tem properly vents when tested as outlined above return doors windo...

Page 8: ...ion Fig 8994 DO NOT plug the hole if installing the vent damper on a continuous pilot system as this will create a hazardous condition Fig 8183 0 INSTALLING THE VENT DAMPER IN HORIZONTAL VERTICAL VENT...

Page 9: ...T ONCE A YEAR BY A TRAINED EXPERIENCED SERVICE TECHNICIAN THE NAME OF THE PERSON WHO ORIGINALLY INSTALLED YOUR VENT DAMPER IS SHOWN ON THE INSTALLATION LABEL DAMPER MUST BE IN OPEN POSITION WHEN BOILE...

Page 10: ...em design and pump performance As a rule of thumb 50 solution of propylene glycol will require the system flow GPM to increase by 14 and thesystemhead Ft Wtr by23 inordertomaintainthe same heat transf...

Page 11: ...for wiring hook up The boiler when used in connection with a refrigeration system mustbeinstalledsothechilledmediumispipedinparallelwiththeboilerwithappropriatevalvestoprevent the chilled medium from...

Page 12: ...DIRECT DOMESTIC HOT WATER SUPPLY Fig 8998 1 ZONE VALVES HEATING UNITS FEED VALVE COLD WATER INLET CIRCULATOR PIPE PRESSURE RELIEF VALVE TO DRAIN DIAPHRAGM EXPANSION TANK AIR SCOOP AIR VENT HOT WATER S...

Page 13: ...g 9000 1 HEATINGUNITS CIRCULATORS COLD WATER INLET FEED VALVE PIPEPRESSURE RELIEF VALVE TO DRAIN DIAPHRAGM EXPANSION TANK AIR SCOOP AIR VENT 12 MAX AIR VENT AIR SCOOP COLD WATER INLET FEED VALVE PIPEP...

Page 14: ...or its equivalent See wiring diagram key for 150 C wire indication ELECTRICAL WIRING The electrical power supply requirement for these boilers is 115 volts 60 Hz Field wiring connections and electric...

Page 15: ...Fig 2223e See page 14 wiring diagram key information 15 WIRING DIAGRAM STANDING PILOT 24 V 2 STAGE MODELS 90 135 180...

Page 16: ...TERMITTENT IGNITION DEVICE IID MODELS 30 42 66 See page 14 wiring diagram key information REFER TO INSTALLATION OPERATING INSTRUCTIONS AND WIRING DIAGRAM SUPPLIED WITH VENT DAMPER VENT DAMPER OPTIONAL...

Page 17: ...NT IGNITION DEVICE IID MODELS 90 135 180 Fig 2358 See page 14 wiring diagram key information 17 REFER TO INSTALLATION OPERATING INSTRUCTIONS AND WIRING DIAGRAM SUPPLIED WITH VENT DAMPER VENT DAMPER OP...

Page 18: ...lve WIRING DIAGRAM Dual Zone Taco Valve WIRING DIAGRAM Dual Zone Honeywell Valve NOTE Maximum three 3 zone valves per one 1 40 VA transformer NOTE Maximum five 5 zone valves per one 1 40 VA Transforme...

Page 19: ...th 3 Zone Pumps NOTE Check VA rating of each relay coil Total load must not exceed VA rating of transformer Fig 2232e Fig 2233e Fig 2234e WIRING DIAGRAM Power Vent System w Zone Valve Taco Zone Valve...

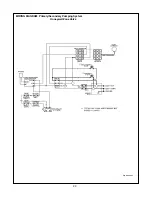
Page 20: ...20 WIRING DIAGRAM Primary Secondary Pumping System Honeywell Zone Valve Fig 2223 2e...

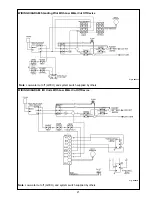
Page 21: ...Low Water Cut Off Device Fig 2223 1e Note Low water cut off LWCO and system switch supplied by others WIRING DIAGRAM IID Units With Low Water Cut Off Device Note Low water cut off LWCO and system swit...

Page 22: ...med trial for ignition period ends Then the module goes into safety shutdown or lockout Lockout de energizes the first main valve operator and closes the first main pilot valve in the gas control stop...

Page 23: ...ir Flush system before putting into operation to as surethatforeignmaterialdoesnotdamagepumpseals SECTION 2 Checking the Circulator Before lighting the boiler and after system is filled make sure that...

Page 24: ...iler area for gas Be sure to smell next to the floor because some gas is heavier than air and will settle on the floor WHAT TO DO IF YOU SMELL GAS Do not try to light any appliance Do not touch any el...

Page 25: ...0 135 180 1 Set the thermostat to the lowest setting 2 Turn off all electric power to the boiler 3 Push in and move gas control lever counter clockwise to OFF position Do not force FOR AUTOMATIC IGNIT...

Page 26: ...ll electric power to the boiler 9 Set thermostat to desired setting 10 If the boiler will not operate follow the instruction To Turn Off Gas To Boiler and call your service technician or gas supplier...

Page 27: ...ervice technician or your gas supplier d Return pilot adjustment screw counter clock wise same number of turns as in step b ROBERTSHAW7200 GASVALVE Models 90 135 180 e Replace pilot adjustment cover s...

Page 28: ...SAFE SHUTDOWN TESTS LIMIT ACTION With the burner operating lower the high limit setting to simulate an overheated boiler Normal shut down should occur Restore the normal limit setting and the burner...

Page 29: ...mpingement and this usu ally necessitates replacement of these parts 2 Lift burners from slotted spacer and slide from orifices Clean with a wire brush 3 Orifices usually do not need to be replaced To...

Page 30: ...ating pump for a minimum of 1 2 hour with boiler shut off 8 Shut down entire system and vent all radiation units and high points in system piping Check all strain ers for debris Expansion tank water l...

Page 31: ...rmostat and wiring circuit Replace thermostat or repair wiring connections 3 Check secondary voltage If no 24V replace transformer 4 Check relay coil or contacts Replace as required 5 Replace pump 1 L...

Page 32: ...gas line or increase gas line piping 1 Refer to installation instructions re garding combustion air require ments 2 Refer to installations instructions 3 See yellow flame section above 10 Defective i...

Page 33: ...electrical power to the boiler b Remove wiring connections to switch c Remove the screws 2 d Reverse above procedure to re install 5 Ignition Module Replacement a Shut off electrical power to the boil...

Page 34: ...everse the above procedure to re install Use new gaskets and make sure they are seated properly when tightening the nuts and bolts 12 2 Staged Controller Models 90 135 180 a Shut off electrical power...

Page 35: ...lied on sizes H 0135 and H 0180 only Fig 8190 0 3 P 1 P 2 P 6 P 8 P 3 P 1 P 2 P 6 P 8 P Fig 8189 3 1 P 2 P 9 P 6 P 8 P Fig 9112 4 C 5 M 3 H 3 M 6 H 1 M 9 H 2 H 1 H 7 H 1 V 2 V 2 S 1 R 30 42 1 S 6 H 4...

Page 36: ...36 BOILERSMANUFACTUREDAFTERAUGUST11 1994WITHSERIAL 9408116901ORLATER HAVEIIDIGNITIONIN LIEU OF HSI IGNITION...

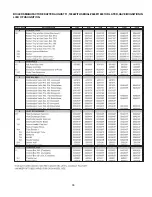
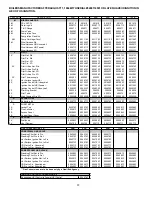
Page 37: ...enwal 601129F 601129F 601129F 601129F 601129F 601129F Ignition Control IID Honeywell 004935F 004935F 004935F 004935F 004935F 004935F 6 P Pilot Mtg Bracket 306239 306239 306239 306239 306239 306239 8 P...

Page 38: ...8 889 1500FAX 818 889 4522 Raypak Canada LTD 2805 Slough Street Mississauga Ontario Canada L4T 1G2 905 677 7999 FAX 905 677 8036 Raypak Australia Pty Ltd 7 Geddes St Mulgrave Victoria Australia 3170 6...

Reviews: