DHG0000004 RB Universal SR1000™ Installation Manual
1
Installing the
Antenna Cable
This section will explain the proper method
for connecting the cable to the antenna, as
well as routing the coaxial cable from the
antenna to the indoor unit (IDU) location.
7.1 Routing the Cable
There are two basic techniques for bringing
the antenna cable into the vehicle, through an
existing point of entry (POE) or by drilling
the POE.
7.2 Technique 1
The first option is to route the cable into
the vehicle through an existing POE, such
as behind the rear hatch, between two body
panels or through a grommet.
TOOLS & INSTALLATION
Only a trained automotive
technician should perform
this installation.
RaySat is not responsible
for any damage caused to vehicles by the
improper drilling or installation of antenna
cable through the roof or body of the
vehicle.
7.2.1 Routing Cables Through the
Rear Hatch
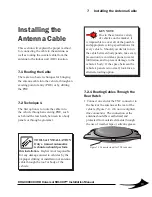
1. Connect one end of the TNC connector to
the back of the antenna at the rear of the
vehicle (Figure -1).
Do not overtighten
this connection
. The connection at the
antenna should be weatherized and
protected from outside elements through
the use of weather tape or silicone grease.
KEY NOTE
Due to the extensive variety
of vehicles on the market, it
is impossible to cover all of the possible
and appropriate wiring specifications for
every vehicle. Should you decide to run
the cable between body panels, take every
precaution to avoid areas prone to water
infiltration, and to prevent damage to the
vehicle’s body. If the space between the
vehicle’s panels is too small, look for an
alternate routing option.
Figure -1 Connector input for TNC connector.
7 Installing the Antenna Cable


