2–19
Installation
F232048
19.
Tighten the two rear nuts firmly.
Note: Check and retighten the locknuts after
five to ten days of operation and every three
months thereafter.
Concrete Foundation Pad
As noted previously, if the existing floor fails
to meet the minimum foundation
requirements, a concrete foundation pad must
be constructed.
Note: Expansion bolts should not be used in
single machine concrete foundation pads.
1.
Break up the floor to a depth of
approximately 9" (230 mm), making
certain that the sides of the hole slope
outwards.
The bottom of the hole should be 5" (127
mm) larger all around than the top; note
that the top of the pad should extend a
minimum of 6"
(152 mm) out from the machine on all
sides.
2.
Wet the hole well and brush the bottom
and sides with cement grout.
3.
Prepare a form and fill with concrete to
join the foundation. Verify that foundation
is level. The height of the pad must not
exceed 8" (203 mm).
4.
Use rebar or other appropriate material to
ensure that the concrete foundation pad
will be sufficiently connected to the
existing floor.
5.
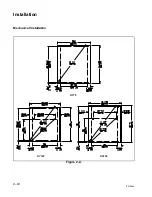
Use the mounting bolt layout in Figure 2–
4 to properly position the mounting bolts
in the wet concrete. When using J-bolts,
allow 1 1/2"
(38 mm) to extend above the surface of the
concrete.
6.
Allow concrete to dry.
7.
Place the machine carefully over the
mounting bolts. Never attempt to lift the
machine by the door handle or by pushing
on the cover panels.
8.
Attach the washers and locknuts to the
mounting bolts. Tighten the lock nuts by
even increments—one after the other—
until all are tightened evenly and the
machine is fastened securely to the floor.
Note: Check and retighten the locknuts after
five to ten days of operation and every three
months thereafter.


