background image

9

To the right of the SIM card is a micro-SD card slot. In case a micro-

SD card is inserted in your phone, the micro-SD card will store 

additional voices for the phone and must not be removed as this will 

stop your phone from working properly.

Inserting/Replacing Batteries

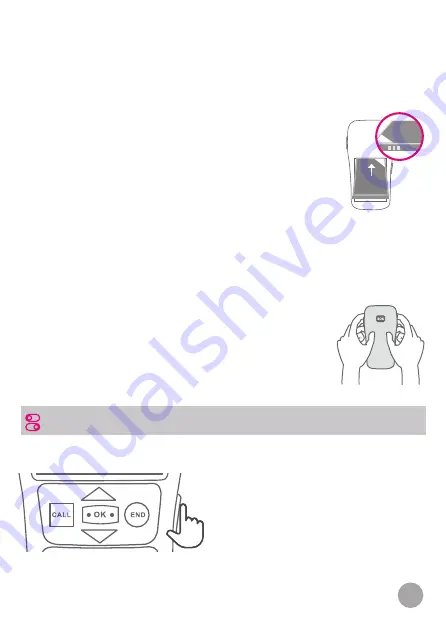
The battery will only fit into the compartment one 

way. Please do not force it as this may damage your 

phone. The battery has gold contacts on one of its 

edges, line these up with the three contacts in the 

top right of the battery compartment and insert the 

battery first onto the contacts then lay the battery 

flat into the compartment.

Additionally, there is a black triangle in the top right 

corner of the battery compartment and a white 

one on the battery, indicating the correct battery 

position.

Fitting the Battery Cover

Place the battery cover on to the back of the phone 

and press around the edges until the clip, positioned 

around the edges of the phone, lock.

To turn the phone on, push up the 

slider and hold it in that position 

for at least 3 seconds. Your phone 

will vibrate, letting you know that 

the phone is starting the activation 

process. After it vibrates, release the 

slider. Within a few seconds, LUCIA 

will begin to speak.

TURNING THE PHONE ON AND OFF

Summary of Contents for Lucia

Page 1: ...QUICK START GUIDE Welcome to the world of www luciaphone com Mobile phone for individuals who are blind visually impaired or hard of hearing and for seniors ...

Page 2: ... PDF version of the LUCIA User Guide Tutorial videos Frequently Asked Questions Customer Support If you have any questions you may also contact Customer Support Web chat www luciaphone com support Email service luciaphone com Phone 41 41 51 00 800 Included with your LUCIA phone LUCIA MOBILE PHONE LUCIA mobile phone Battery USB Type C Cable Wall charger Quick start guide ...

Page 3: ...ill begin to speak Plug the cable into the phone to charge the battery The charger is supplied in two pieces a wall charger and a USB Type C cable Insert the larger of the two ends into the USB port of the wall charger You re now ready to plug in and charge your phone GENERAL DESCRIPTION Let the LUCIA Mobile Phone read to you with its built in voice guide On screen information is spoken aloud Scro...

Page 4: ... 10 Allows to find what you re looking for quickly with its simple menu system SOS button Sound Boost providing an additional 25 dB Compatible for use with hearing aids HAC Unlocked for compatible GSM networks ORIENTATION FRONT This section will assume that you have the phone laid flat on a table with the buttons closest to you Earpiece End Cancel Backbutton OK button Navigation arrow up Call butt...

Page 5: ...in the standard four rows of three buttons with the first row from left to right containing one two and three The second row has four five and six Thethirdrowcontainsseven eightandnine Thelastrowhasthestar zero and pound the phone refers to the pound button as a hash ORIENTATION EDGES Right Edge There are three buttons on this edge From top to bottom they are as follows the repeat speech button So...

Page 6: ...s a standard socket for a 3 5 mm plug Bottom Edge On the bottom edge on the left there is the USB Type C port used for charging On the right are small openings for the speaker Earphone socket USB Type C socket Speaker Back The back is a solid one piece cover with a recessed SOS button in the top center The back also serves as the battery cover and is attached by clip on the inside It can be opened...

Page 7: ...yed as only partially full In the default setting the time is displayed in the center of the screen Assuming the keypad is unlocked see Turning the Phone on and off along the bottom of the screen you will find the words Menu and Call in blue and green respectively To access the Menu press the blue OK button in the center To use Call press the green CALL button to place a call after dialing a numbe...

Page 8: ...safely release the other clip Removing the Battery To remove the battery simply start lifting it from the bottom Inserting Removing the SIM Card If you need to remove or install a SIM card simply follow these directions the SIM tray is located in the bottom left corner of the battery compartment underneath the battery The SIM card lies with the metal contacts face down and the cut off corner at th...

Page 9: ...t and insert the battery first onto the contacts then lay the battery flat into the compartment Additionally there is a black triangle in the top right corner of the battery compartment and a white one on the battery indicating the correct battery position Fitting the Battery Cover Place the battery cover on to the back of the phone andpressaroundtheedgesuntiltheclip positioned around the edges of...

Page 10: ...will then read back the full date you have set before asking you to enter the time Follow the same process to set the time You can adjust the time and date at any time When the phone isn t used for a period of time the keypad lock is automatically activated You can unlock the keypad by sliding up the lock unlock slider located on the right edge of the phone You can also lock the phone by sliding u...

Page 11: ...main menu and navigate down to contacts When you enter your contact list your first contact will be read aloud to you Your contacts are listed alphabetically Use the navigation arrows to highlight the contact you wish to call Then select the contact s number you wish to dial work home or mobile and press the CALL button Or press the OK button you will then be asked to confirm that you want to call...

Page 12: ...r the corresponding letter Press the pound key to switch between capitals lower case and numbers There are three submenus in Call Log These are Dialed Calls Received Calls and Missed Calls You can view each submenu by using the navigation arrows to highlight the submenu you wish to view and pressing the OK button to confirm Each submenu will list the calls by name if they are in your contact list ...

Page 13: ...ce guide to the selected language After that you need to choose the voice you would like to apply from the availablevoicenamesbyusingtheupordownnavigationarrows Press OK to save your selection There will be a delay of approximately five seconds after which LUCIA will confirm your selection delete any errors LUCIA will then confirm that contact s number has been successfully saved New contacts will...

Page 14: ...y in Settings The screen brightness can be adjusted between 0 and 100 Use the up and down navigation arrows to change the brightness in 5 increments and press the OK button to save Ringtones The Ringtones settings option can be found under the category Sound in Settings There is a choice of different ringtones Whenever you add a new contact it will automatically use the default ringtone SOS Forpea...

Page 15: ...y work if you have an active wireless service In an emergency however you will always be able to call emergency services whether or not you have a positive balance using the usual 112 number in most European countries 911 in United States and Canada You can also set 112 as your last SOS number to ensure you are able to reachhelpincasecallstoothernumbersfromyourSOSaren tanswered WARNING The SOS fea...

Page 16: ... 41 41 51 00 800 Customer Support www luciaphone com support service luciaphone com Antarus SA Switzerland www luciaphone com ...

Reviews: