background image

ADVANCE AND AUTOMATIC CUTTING OF THE NYLON LINE

1 - With the equipment running:

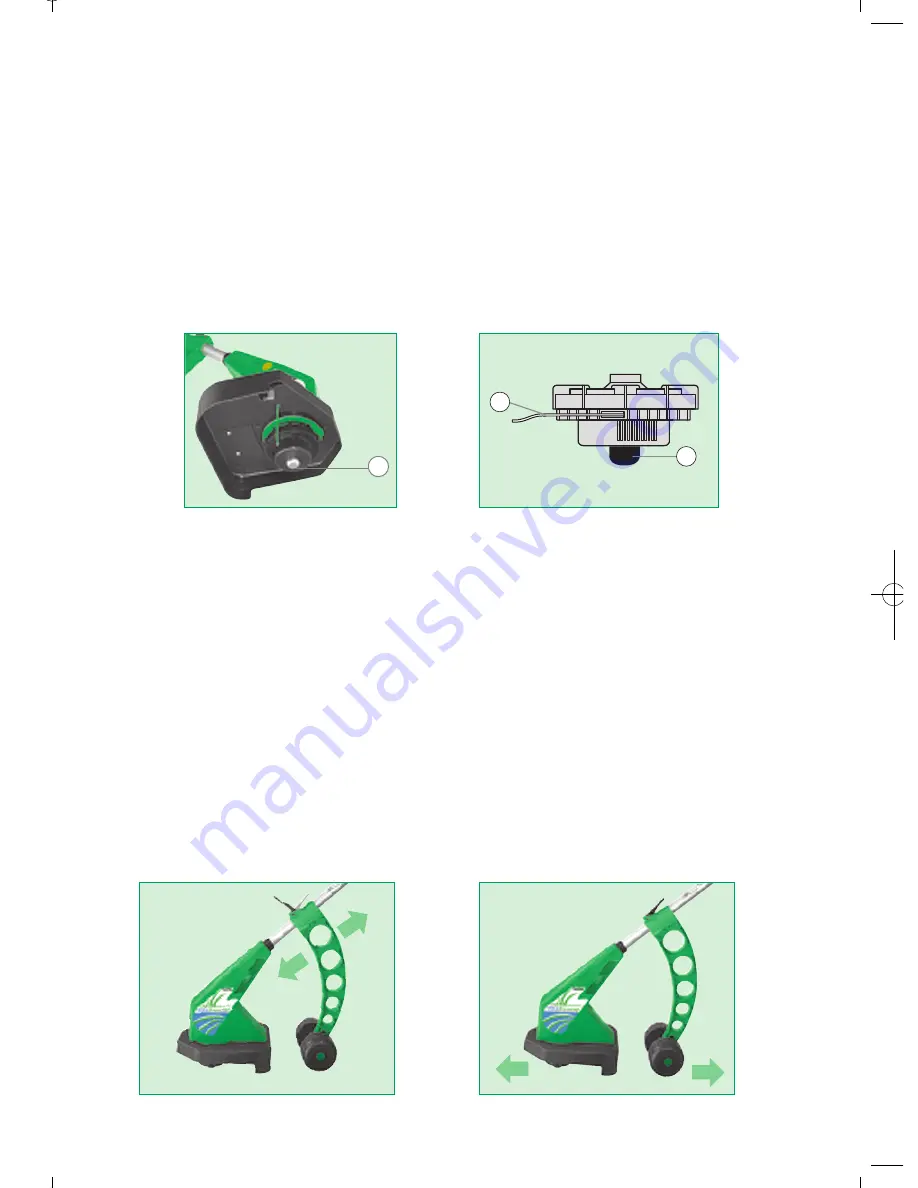
Slightly press the spool against the ground. The nylon line will automatically be released. The cutting blade
fixed to the protection device will limit the amount of wire released.

Press the spool against the ground as many times as necessary.

In order not to damage the equipment or the protection device, only press the metal part of the spool (1)
against the ground.

2 - You may want to carry out this operation manually:

Unplug the equipment.

Press the metal part of the spool (1) with one hand and with the other pull the nylon line (2) in the necessary
length. If the wire exceeds the ideal length, it will be cut by the blade fixed to the protection device.

FIXING THE EXTENSION CORD TO THE EQUIPMENT

There is a locking system in the lower part of the handle to facilitate usage and to prevent the extension cord from
being disconnected from the wall outlet. To use this system:

Put the extension cord in hole.

Pass the cord over the lock.

Connect the equipment plug to the extension cord.

HOW TO CUT THE GRASS

Before begning to cut the grass, set the adjustable support (figure below) according to the grass length.

Hold the equipment with one hand by the adjustable handle and press the trigger key with the other.

If the grass is very long, the grass should be cut in stages, maintaining  a suitable height in relation to the
ground to avoid overloading it.

For better performance of your mower, mow the lawn alternating frontward and backward movements, slowly
advancing on the area to be cut (see figure).

Never allow the spool to touch the ground, it causes overload and may burn the motor of your mower.

1

2

1

5

REGULACIÓN DE ALTURA Y ÁNGULO DEL PUÑO AJUSTABLE

Para mayor comodidad y confort durante la manipulación del equipo, el operador puede regular la altura y el
ángulo del puño ajustable, conforme descripción y diseño a seguir.

Ajuste de la altura

1 - Suelte la tuerca plástica (1) que prende el soporte del puño ajustable al mango (2).
2 - Deslice el puño ajustable (3) hacia arriba y hacia abajo, ajustando el alto deseado.
3 - Apriete la tuerca plástica (1).

Ajuste del ángulo

1 - Suelte el manípulo (4).
2 - Realice el ajuste del puño conforme deseado.
3 - Apriete el manípulo (4).

REPOSICIÓN DEL HILO DE NILÓN

La duración del hilo de nilón depende de la habilidad del operador para evitar el contacto con piedras, muros,
paredes y aceras. El contacto constante en estos tipos de obstáculos causa el desgaste prematuro del hilo de nilón.

Adquiera en los puestos de asistencia técnica 

RAZAR

SHARP

o en las tiendas especializadas, el recambio

conteniendo bobina con el hilo de nilón para reposición.

CÓMO RETIRAR O COLOCAR LA BOBINA

Asegúrese de que el equipo esté desconectado del tomacorriente.

Gire el equipo hacia arriba.

Segure la base de la bobina (6) con una de las manos y, con la outra, retire la tapa de la bobina (1), girándola en
el sentido contrario a las agujas del reloj, conforme flecha indicativa en la tapa de la bobina.

Después de retirar la bobina (3), limpie bien la base del equipo, tomando siempre el cuidado de no dejar
residuos de césped cayeren dentro del compartimiento del motor.

Para reponer la bobina, pase la punta del hilo de nilón (4) por el agujero de salida (2), encaje la bobina en la
tapa (1), ajuste la posición de la tapa de la bobina en la  guía de la base (5), presione hacia abajo y gire en el
sentido de las agujas del reloj hasta oír el “click” de encaje.

CÓMO RECARGAR LA BOBINA

Utilice solamente hilo de nilón con el diámetro de 1.8 mm.

Hilos de nilón fuera del diámetro especificado pueden causar daños al
motor y al sistema de avance automático.

Retire la bobina y remueva el residuo de hilo de nilón.

Tome una de las extremidades del nuevo hilo y encájela en el agujero (1)
conforme figura.

Enrolle el hilo en el sentido indicado por la flecha de la bobina lo más
uniforme posible, obedeciendo el metraje máximo de 8 metros.

1

3

7

6

2

4

5

Atención!

Siempre que efectúe la sustitución de la     
bobina (recambio), guarde el resorte (7)  
para utilizarlo nuevamente.

Cable (2)

Tuerca

Plá

s

tica

(1)

Puño Aju

s

table (3)

Ma

n

ípulo (4)

1

12

Manual Ultra Trimmer  12/17/09 5:33 PM  Page 13

Summary of Contents for Ultra trimmer

Page 1: ...INSTRUCTION MANUAL MANUAL DE INSTRUCIÓN Electric Law Mover Edger Cortacésped Eléctrico 111 3 0 7 6 ...

Page 2: ... Keep it away from heat oil and sharp edge Frequently inspect the extension cord do not use insulation tape to mend it Do not force equipment The equipment will work better and safer when used under the conditions specified Be alert Pay attention to what is going on around you Do not use the equipment when you are tired distracted or under the influence of alcohol or drugs Never transport the equi...

Page 3: ...he equipment Before starting to cut the grass check the area where the equipment will be used for debris and remove all stones pieces of wood wires bones and other weird objects Do not use the equipment barefooted or with sandals When cutting the grass always wear proper footwear and pants Avoid using the equipment when the grass is humid and never use it when it is raining Walk do not run Always ...

Page 4: ...It is conditioned together with the equipment in the same package To assemble it turn the equipment upwards Fig 1 Place the protection device as per drawing and fit it in lock 3 Fig 2 Press it to the body 4 put screws 2 in position and tighten them Fig 1 If you use the equipment without the protection device you will not be entitled to the warranty Warning All and every maintenance or cleaning sha...

Page 5: ...ds Hold the spool base 6 with one hand and with the other remove the spool cover 1 turning it counter clockwise as shown in the spool cover After removing the spool 3 thoroughly clean the equipment base taking care not to allow grass to fall in the motor compartment To replace the spool pass the tip of the nylon line 4 through hole 2 fit the spool on cover 1 align the spool cover on the base guide...

Page 6: ...HE EXTENSION CORD TO THE EQUIPMENT There is a locking system in the lower part of the handle to facilitate usage and to prevent the extension cord from being disconnected from the wall outlet To use this system Put the extension cord in hole Pass the cord over the lock Connect the equipment plug to the extension cord HOW TO CUT THE GRASS Before begning to cut the grass set the adjustable support f...

Page 7: ...irt as shown in the next figures The support may be removed when necessary as shown below Table for the Correct Use of the Extension Cord Voltage 127Volts Length in meters 10 20 30 40 50 60 70 80 90 Gauge Ø in A W G 18 16 14 14 14 12 12 12 12 Technical Specifications Nylon Line Length Frequency Voltage Motor Type Model Ultra Trimmer Universal 127V Monophase 50 60 Hz 8 m Nylon Line Thickness Ø Cutt...

Page 8: ...defects Electric shorts Manufacturer Assembly error Short between phases Failure of material Failed rotor The Warranty does not cover The expenses associated with packaging and transporting the product to the RAZARSHARP Authorized Technical Assistance The replacement of part damaged in transportation Lost parts Normal wear and tear of parts This Warranty will be invalid if Broken shaft Other broke...

Page 9: ...NOTES 8 ...

Page 10: ... uno debe tener durante el manoseo y al hacer el mantenimiento del equipo El motor utilizado en este equipo Es del tipo universal debiéndose verificar el desgaste de los cepillos carbón cada 300 horas y si es necesario efectuar la sustitución busque la asistencia técnica RAZARSHARP más próxima Mantenga los niños alejados Todas las personas especialmente los niños deben encontrarse a una distancia ...

Page 11: ...equipo esté desconectado y retire la extensión eléctrica del tomacorriente Atención El doble aislamiento no sustituye las precauciones que se deben tomar cuando opere el equipo El doble aislamiento es una seguridad adicional contra accidentes que pueden ser causados por una falla del sistema de aislamiento del equipo Instrucciones Adicionales de Seguridad y Operación Lea las instrucciones cuidados...

Page 12: ...po en el mismo embalaje Para montarlo gire el equipo hacia arriba Fig 1 Ponga la falda de protección conforme el dibujo encájela en la traba 3 Fig 2 presiónela junto al cuerpo 4 coloque los tornillos 2 y dé el aprieto Fig 1 La utilización del equipo sin la falda de protección es considerada como pérdida de garantía Atención Toda manutención o limpieza deberá ser hecha con el equipo desconectado y ...

Page 13: ... la base de la bobina 6 con una de las manos y con la outra retire la tapa de la bobina 1 girándola en el sentido contrario a las agujas del reloj conforme flecha indicativa en la tapa de la bobina Después de retirar la bobina 3 limpie bien la base del equipo tomando siempre el cuidado de no dejar residuos de césped cayeren dentro del compartimiento del motor Para reponer la bobina pase la punta d...

Page 14: ...litar el uso del equipo y evitar que un movimiento brusco desconecte el enchufe del tomacorriente hay un sistema de traba en la parte inferior del puño Introduzca la extensión eléctrica en el orificio Pase la extensión sobre la traba Conecte el enchufe del equipo en la extensión eléctrica CÓMO CORTAR EL CÉSPED Antes del inicio del corte del césped ajuste el soporte regulable figura de abajo de acu...

Page 15: ...nforme muestran las ilustraciones que siguen En caso que haya necesidad el soporte puede ser retirado conforme demostrado abajo Tabla para Uso Correcto de la Extensión Eléctrica Voltaje 127Volts Largo en metros 10 20 30 40 50 60 70 80 90 Diámetro Ø en A W G 18 16 14 14 14 12 12 12 12 Especificaciones Técnicas Largo del Hillo de Nilón Frecuencia Voltaje Motor Tipo Modelo Ultra Trimmer Universal 127...

Page 16: ...de material Rotor fallado La Garantía no cubre Los gastos ocasionados por embalaje y transporte del producto hasta la Asistencia Técnica Autorizada RAZARSHARP La sustitución de piezas damnificadas en transporte Pérdida de piezas Piezas que presentaren desgaste normal por el uso Esta Garantía perderá totalmente su validez en cualquiera de las hipótesis que sieguen Eje roto Piezas rotas o abolladas ...

Page 17: ...NOTAS 16 ...

Page 18: ...u by RAZARSHARP Comprobe los nuevos eco productos inteligentes y prácticos presentados por RAZARSHARP ULTRATRIMMER ULTRA CORTACÉSPED WWW RAZARSHARP COM MINIMOWER MINICORTACÉSPED ORGANICSHREDDER TRITURADOR DE RESÍDUOSORGÁNICOS CITYCLIPPER CORTACÉSPEDMANUAL ...

Page 19: ...111 3 0 7 6 ...

Reviews:

Related manuals for Ultra trimmer