V8 Overview 8
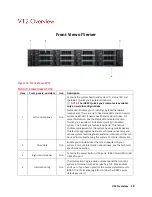
Front View of Server
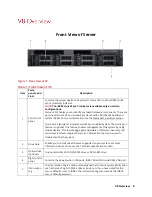
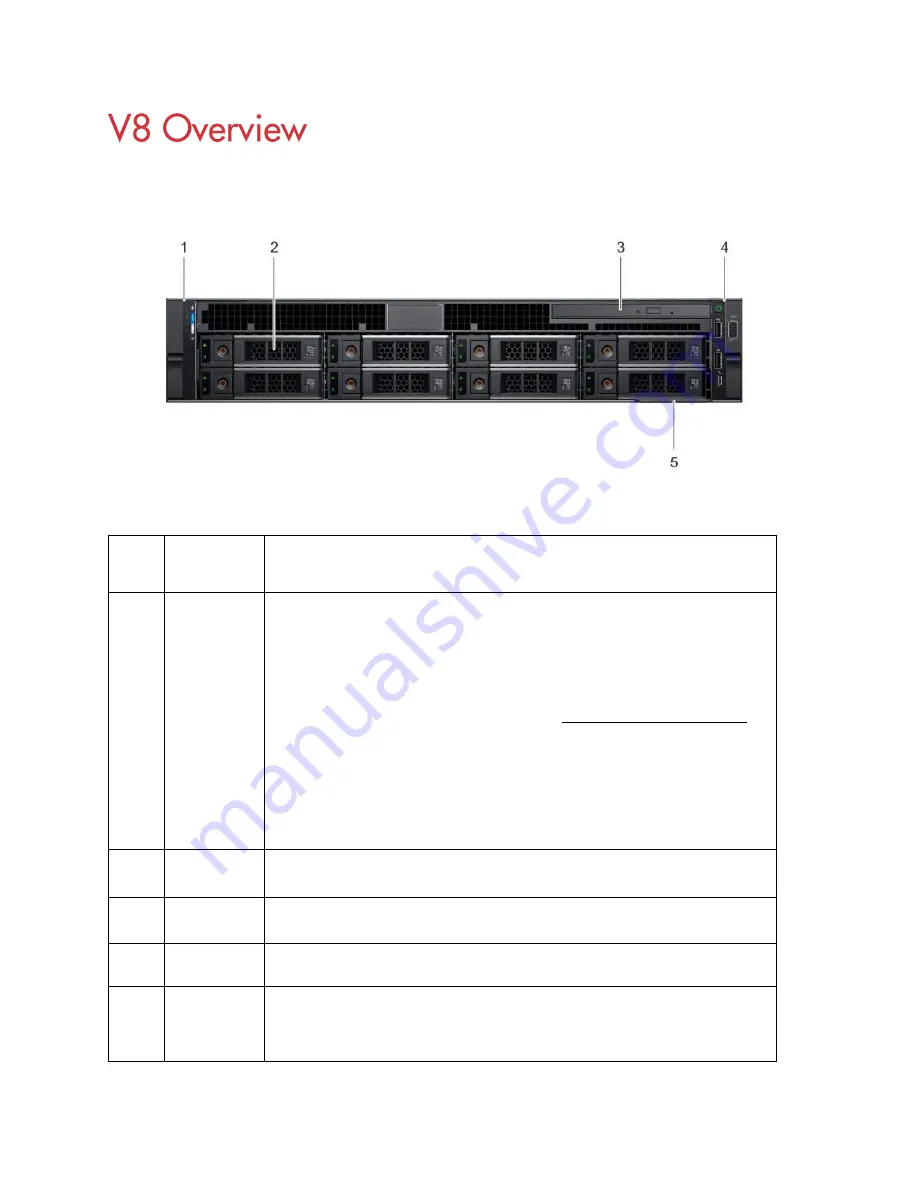
Figure 1. Front View of V8
Table 1. Front View of V8
Item
Ports,
panels, and
slots
Description
1
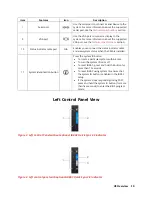
Left control
panel
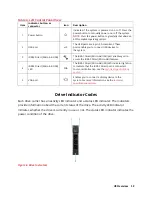
Contains the system health and system ID, status LED, and the iDRAC Quick
Sync 2 (wireless) indicator.
NOTE:
The iDRAC Quick Sync 2 indicator is available only on certain
configurations.
Status LED: Enables you to identify any failed hardware components. There are
up to five status LEDs and an overall system health LED (Chassis health and
system ID) bar. For more information, see the Status LED indicators section.
Quick Sync 2 (wireless): Indicates a Quick Sync enabled system. The Quick Sync
feature is optional. This feature enables management of the system by using
mobile devices. This feature aggregates hardware or firmware inventory and
various system level diagnostic and error information that can be used in
troubleshooting the system.
2
Drive slots
Enable you to install drives that are supported on your system. For more
information about drives, see the Technical specifications section.
3
Optical drive
(optional)
One optional slim SATA DVD-ROM drive or DVD+/-RW drive.
4
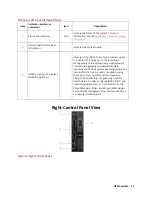
Right control
panel
Contains the power button, USB ports, iDRAC Direct (Micro-AB USB), VGA port.
5
Information
tag
The Information Tag is a slide-out label panel that contains system information
such as Service Tag, NIC, MAC address, and so on. If you have opted for the
secure default access to iDRAC, the Information tag also contains the iDRAC
secure default password.
Summary of Contents for A8
Page 1: ...rcgs20200916 2020 2020 2020 2020 2020 2020 2020 2020 2020 ...
Page 27: ...V12 Overview 26 Figure 21 Service Information with System Touch Points ...
Page 75: ...RAID Storage 74 Select Virtual Disk Management Figure 63 PERC Adapter Server Profile View ...
Page 81: ...RAID Storage 80 Select Create Virtual Disk Figure 69 Create Virtual Disk ...
Page 82: ...RAID Storage 81 Select RAID level Figure 70 Select RAID Type ...
Page 83: ...RAID Storage 82 Select Physical Disks Figure 71 Select Physical Disks ...
Page 85: ...RAID Storage 84 Scroll up and Click Apply Changes Figure 73 Apply Changes ...
Page 86: ...RAID Storage 85 Select OK Figure 74 Confirm Completion ...
Page 89: ...RAID Storage 88 Confirm and Click Yes Figure 77 Confirm Operation ...
Page 96: ...RAID Storage 95 Verify all settings and if correct click Finish Figure 84 Complete the Wizard ...

