background image

5

Need Help?

 Visit our website for replacement parts, product support, a list of authorized service centers in the US and customer service contact information 

at 

www.razor.com

. Please have the product I.D. code (located on the white label of your product) available for better assistance. Additional Customer 

Service contact information is listed at the back of this manual.

ASSEMBLY AND SET-UP

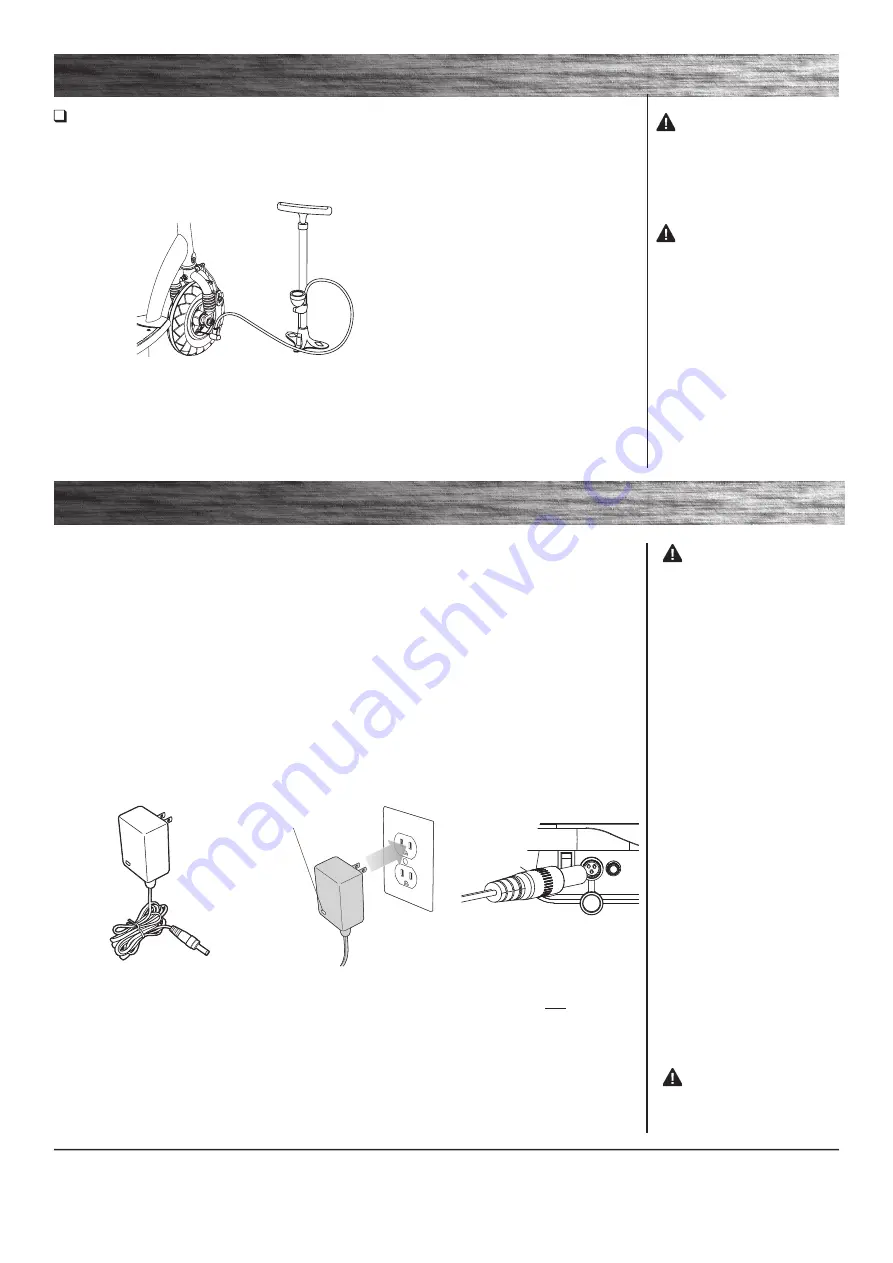
 Inflating the Tire

The front tire is inflated when shipped, but it invariably may lose some pressure between the point of manufacturing 

and your purchase. 

Always inflate tire to the correct PSI before first time use.

Lower air pressure can result in a shorter ride time.

Periodically check front tire. Reinflate when needed.

1

 Using a bicycle-style tire pump 

equipped for a Schrader-type valve, 

inflate the front tire to the correct PSI 

indicated on the sidewall of the tire.

WARNING:

 Do not use the 

electric scooter for the first time 

until you have inflated the front tire 

to the correct PSI. Failure to do so 

may damage your electric scooter 

and void your warranty.

WARNING:

 Do not 

overinflate, as this could damage 

the tire or wheel. 

Note:

 The pressure air supplies 

found at gasoline stations are 

designed to inflate high-volume 

automobile tires. If you decide to 

use such an air supply to inflate your 

electric scooter tire, first make sure 

the pressure gauge is working, then 

use very short bursts to inflate to 

the correct PSI. If you inadvertently 

overinflate the tire, release the 

excess pressure immediately.

CHARGING THE  BATTERY

LED light

Note:

 Make sure power 

switch is in the 

OFF

 position. 

Plug the charger into the 

charger port. The light on the 

charger should turn red during 

charging. The light will turn 

green again when charging  

is complete. 

Charger

WARNING:

 Use ONLY  

with the recommended charger. 

Batteries are only to be charged 

under adult supervision. The charger 

is not a toy. Always disconnect the 

charger before wiping down and/or 

cleaning the electric scooter with a 

damp cloth.
The charger supplied with the 

electric scooter should be regularly 

examined for damage to the cord, 

plug, enclosure and other parts. 

In the event of such damage, 

the electric scooter must not be 

charged until it has been repaired 

or replaced.
Chargers have built-in overcharge 

protection to prevent battery from 

being overcharged. 

Note:

 If the charger gets warm 

during regular use, this is a normal 

response and is no cause for 

concern. If your charger does not 

get warm during use, it does not 

mean that it is not working properly. 
Wall outlet - Green (stand by) 

Wall outlet and unit - Red (charging) 

Wall outlet and unit - Green (charged)

Note:

 Continue charging unit even 

if light turns green prior to 12 hours.

WARNING:

 Battery charge 

can deplete over time.  Periodically 

recharge battery when not in use.

Plug the charger plug into wall 

outlet. The light on the charger 

should be green.


Note:

 If green light (LED) does not 

turn on, try a different outlet.

Your electric scooter may not have a fully charged battery; therefore you must charge the battery prior to use.  
• Initial charge time: 12 hours.
• Recharge time: up to 12 hours, even if the light  

turns green. Recommended maximum charging time  

is 24 hours.

• Always charge the battery immediately after riding.
• Fully charge battery before storing for extended 

periods of time.

• Unplug charger from the wall outlet when not in use.
• Failure to recharge battery periodically may result in a 

battery that will not accept a charge. 

• Make sure the power is turned 

OFF 

when product 

is not in use. If the ON/OFF switch is left on for an 

extended period of time, the battery may reach a stage 

at which it will no longer hold a charge.

• To ensure long battery life, never store the product in 

freezing or below freezing temperatures! Freezing will 

permanently damage the battery.

• Run time: Up to 60 minutes of continuous ride time. 

Run time may vary depending on riding conditions, 

rider weight, climate, and/or proper maintenance.

• Constant starting and stopping may shorten ride time.
• Battery life can vary depending on proper maintenance 

and usage of the product.

Charger

(Note: Charger design may vary 

from one shown)

Summary of Contents for 13111261

Page 1: ...azor 13111261 E100 Electric Scooter Pink 32 5 x 16 x 36 User Manual of Product 2 Razor Power Core E100 Electric Scooter for Kids Ages 8 100w Hub Motor 8 Pneumatic Tire Up to 11 mph and 60 min Ride Tim...

Page 2: ...o use this product For assistance contact Razor DO NOT RETURNTO STORE NOTE Manual illustrations are for demonstration purposes only Illustrations may not reflect exact appearance of actual product Spe...

Page 3: ...at all times and only use where allowed and with caution Do not activate the speed control on the hand grip unless you are on the scooter and in a safe outdoor environment suitable for riding The ele...

Page 4: ...ly by an adult with experience in bicycle mechanics Allow up to 10 minutes for assembly not including initial charge time Allow up to 12 hours for charge see page 4 for charging information WARNING DO...

Page 5: ...mal circumstances Note The cable and wire assembly from the handlebars must not wrap around the steering tube or handlebars Sharp bends or twisting of the brake cable can cause the brake to malfunctio...

Page 6: ...use If the power switch is left on for an extended period of time the battery may reach a stage at which it will no longer hold a charge To ensure long battery life never store the product in freezin...

Page 7: ...ck start the unit using one foot to push scooter forward while applying the throttle A E100 Glow only LED lights are activated when the throttle is applied How to Stop To stop unit release the throttl...

Page 8: ...Washer Fork 8 7 Spring Washer 8 1 16 mm Locknut Middle 8 6 Front Axle Bolt Note Front wheel hardware sequence 1 To adjust brake cable play thread the brake lever adjuster in or out 1 4 to 1 2 turn un...

Page 9: ...e product must not be charged until it has been repaired or replaced Use ONLY with the recommended charger Wheels Wheels and drive system are subject to normal wear and tear It is the responsibility o...

Page 10: ...reset button Correct riding conditions to prevent overload If motor does not engage but makes a clicking sound Replace Battery If motor does not engage no clicking sound Replace Control Module Short r...

Page 11: ...for years with genuine Razor parts Visit our website for more information on spare part availability Specifications subject to change without notice 1 Handlebar Grips Right Left 2 Single Speed Twist...

Page 12: ...ANCE YOUR INSURANCE POLICIES MAY NOT PROVIDE COVERAGE FOR ACCIDENTS INVOLVINGTHE USE OFTHIS SCOOTER ELECTRIC RIDE ON PRODUCT TO DETERMINE IF COVERAGE IS PROVIDED YOU SHOULD CONTACTYOUR INSURANCE COMPA...

Page 13: ...5 of the FCC Rules These limits are designed to provide reasonable protection against harmful interference in a residential installation This equipment generates uses and can radiate radio frequency e...

Page 14: ...t Specifications subject to change without notice Please have your product along with the 19 character product I D code with you before contacting Razor for warranty assistance and or replacement part...

Page 15: ......

Page 16: ...c at all times Only use where allowed and with caution Do not activate the speed control on the hand grip unless you are on the scooter and in a safe outdoor environment suitable for riding The electr...

Page 17: ...assembly by an adult Allow up to 10 minutes for assembly not including initial charge time Allow up to 12 hours for charge see page 5 for charging information WARNING DO NOT USE NON RAZOR PRODUCTS WI...

Page 18: ...ol and fall When correctly tightened the handlebars will not rotate out of alignment with the front wheel under normal circumstances Note The cable and wire assembly from the handlebar must not wrap a...

Page 19: ...e seat post 6 Use 4 mm Allen wrenches to secure seat onto the seat post using bolts removed in Step 4 8 Tighten bolts after seat adjustment using 4 mm Allen wrenches Seat Assembly Power Core E100S Onl...

Page 20: ...ctric scooter with a damp cloth The charger supplied with the electric scooter should be regularly examined for damage to the cord plug enclosure and other parts In the event of such damage the electr...

Page 21: ...nd replace as needed Regularly check the tire pressure and inflate as needed q Frame Fork and Handlebars Check for cracks or broken connections Although broken frames are rare it is possible for an ag...

Page 22: ...3 Inspect the brake pads A for proper alignment against the wheel or excess wear To realign brake pads loosen the fixing nut B and adjust the pad to contact the rim Re tighten and readjust as needed V...

Page 23: ...onnector from the control module 8 REPAIR AND MAINTENANCE Note Rear wheel motor hardware sequence Left Side 14 1 Phillips Screws x3 14 2 Motor Housing Right Side 14 3 Spacer 14 4 Nut Frame 14 5 Flat W...

Page 24: ...Visit our website for replacement parts product support a list of authorized service centers in the US and customer service contact information at www razor com Please have the product I D code locate...

Page 25: ...related accessories contain lead and lead compounds Wash your hands after handling q Battery Care and Disposal Do not store in freezing or below freezing temperatures To properly maintain your battery...

Page 26: ...eplace battery Short run time runs slow Rider s weight Riding conditions Battery not fully charged Old damaged battery Do not exceed 120 lb 54 kg maximum weight limit Use only on flat dry surfaces Avo...

Page 27: ...TER PARTS Keep your electric scooter running for years with genuine Razor parts Visit our website or e mail us for more information on spare part availability Specifications subject to change without...

Page 28: ...ANCE YOUR INSURANCE POLICIES MAY NOT PROVIDE COVERAGE FOR ACCIDENTS INVOLVING THE USE OF THIS SCOOTER ELECTRIC RIDE ON PRODUCT TO DETERMINE IF COVERAGE IS PROVIDED YOU SHOULD CONTACT YOUR INSURANCE CO...

Page 29: ...be void if the product is ever used in a manner other than for recreation or transportation modified in any way rented The manufacturer is not liable for incidental or consequential loss or damage du...

Reviews: