background image

17-8

17-1

17-3

17-2

17-1

17-2

17-3 17-4

17-6

17-5

17-7

17-9

7

REPAIR AND MAINTENANCE

If the brake is too tight or too loose, use a 10 mm 

wrench to loosen the nut for additional adjustment on 

the brake cable. Securely tighten the nut when finished.

1


To adjust the brake cable tension, thread the brake 

lever adjuster in or out 1/4 to 1/2 turn until the desired 

brake adjustment is attained. Most adjustments are 

complete at this step. If brake still needs further 

adjustment, proceed to step 2.

 Chain and Rear Tire Replacement  

Tools required:

 Phillips screwdriver, 10 mm wrench, two (2) 8 mm wrenches and two (2) 16 mm wrenches.

Note:

 Rear wheel hardware 

sequence.

Turn power switch “OFF” before beginning repair or maintenance:

 Adjusting the Brakes

Tool required:

 10 mm wrench

• Read the instructions
• Remove charger plug
• Turn the power switch off

• Secure the unit under repair
• Exercise caution around  

exposed parts

• Contact Razor customer service 

if unsure about any repair or 

maintenance

Disassembly

1


With a Phillips screwdriver, 

loosen the three (3) screws on 

the chain guard and remove.

2


With a 10 mm wrench, loosen 

the brake cable anchor bolt and 

disconnect the cable.

3


With two (2) 8 mm wrenches, 

remove the cable guide bracket 

from the frame and brake plate. 

Keep the bolt, washer, spacer, 

and nuts together.

With two (2) 16 mm wrenches, 

loosen the axle locknuts. Push down 

and remove wheel from the frame. 

Remove chain from rear sprocket.

WARNING:


The brake is capable of skidding 

the rear tire and throwing an 

unsuspecting rider. Practice in an 

open area free from obstacles 

until you are familiar with the 

brake function. Avoid skidding to a 

stop as this can cause you to lose 

control and/or damage the rear tire.

Right Side (Throttle)

17-7 Spacer 
17-8 Washer (plate cut)

Frame

17-3 Washer (thick)
17-2 Spring Washer
17-1 Locknut

Left Side (Brake)

17-1 Locknut
17-2 Spring Washer
17-3 Washer (thick)

Frame

17-4 Washer (thin)
17-5 Brake Plate
17-6 Spacer

Middle

17-9 Rear Axle Bolt 

Summary of Contents for E325

Page 1: ...illustrations are for demonstration purposes only Illustrations may not reflect exact appearance of actual product Specifications subject to change without notice Please have your unit and 19 charact...

Page 2: ......

Page 3: ...may be used Keep safely away from cars and motor vehicle traffic at all times Only use where allowed and with caution Do not activate the speed control on the hand grip unless you are on the scooter...

Page 4: ...mmends assembly by an adult Allow up to 10 minutes for assembly not including initial charge time Allow up to 12 hours for charge see page 5 for charging information WARNING DO NOT USE NON RAZOR PRODU...

Page 5: ...with the valve stem Thread the valve extender completely onto the valve stem and attach the pump Inflate to the PSI indicated on the tire sidewall 3 Remove valve extender immediately after inflating a...

Page 6: ...Attaching the Seat E300S Series Only Tools required Two 2 4 mm Allen wrenches and Phillips screwdriver 2 Remove the four screws on the middle of the deck with the 4 mm Allen wrench and the Phillips s...

Page 7: ...when unit is not in use If the power switch is left on for an extended period of time the battery may reach a stage at which it will no longer hold a charge To ensure long battery life never store th...

Page 8: ...r tire and throwing an unsuspecting rider Practice in an open area free from obstacles until you are familiar with the brake function Avoid skidding to a stop as this can cause you to lose control and...

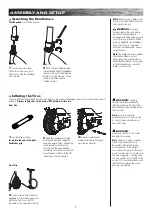
Page 9: ...ion around exposed parts Contact Razor customer service if unsure about any repair or maintenance Disassembly 1 With a Phillips screwdriver loosen the three 3 screws on the chain guard and remove 2 Wi...

Page 10: ...ghten the cable guide bracket bolt Tighten the locknuts on the rear axle Test the brake to verify proper function before riding Readjust as needed 6 Verify chain is properly installed on each sprocket...

Page 11: ...of automotive batteries If you live in Florida or Minnesota it is prohibited by law to throw away lead acid batteries in the municipal waste stream Charger The charger supplied with the electric scoot...

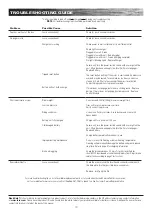
Page 12: ...ss reset button Correct riding conditions to prevent overload If motor does not engage but makes a clicking sound Replace battery If motor does not engage no clicking sound Replace Control Module Shor...

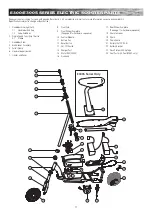
Page 13: ...dlebar End Cap 1 2 Valve Extender 2 Single Speed Twist Grip Throttle 2 1 Sleeve 3 Handlebar Stem 4 Brake Lever Assembly 5 Collar Clamp 6 Headset upper lower 7 Limiter and Cover 8 Front Fork 9 Front Wh...

Page 14: ......

Page 15: ...ANCE YOUR INSURANCE POLICIES MAY NOT PROVIDE COVERAGE FOR ACCIDENTS INVOLVINGTHE USE OFTHIS SCOOTER ELECTRIC RIDE ON PRODUCT TO DETERMINE IF COVERAGE IS PROVIDED YOU SHOULD CONTACTYOUR INSURANCE COMPA...

Page 16: ...l be void if the product is ever used in a manner other than for recreation or transportation modified in any way rented The manufacturer is not liable for incidental or consequential loss or damage d...

Reviews: