background image

10

 TROUBLESHOOTING GUIDE

Problem

Possible Cause

Solution

Does Not Work Out Of The Box

Unit must be traveling up to 3 mph before  

motor will engage

Loose connection(s)

Kickstart to 3 mph while applying the throttle to 

engage motor

Check for loose connections/wires underneath 

the deck plate

No Longer Works

Loose connection(s)

Charger not working

Tripped reset button

Battery will not hold a charge

Check for loose connections/wires underneath 

the deck plate 

Check power to wall outlet and/or try a 

different outlet

Check lights on charger: 

Plugged into wall = Green

Plugged into wall & unit = Red = Charging 

Charging Complete = Green

No lights/Blinking lights - Replace Charger

With no weight on the unit, carefully lift up the 

back end; manually (and carefully, of course) 

spin rear wheel and apply throttle to engage 

the motor. If motor engages - Replace Battery

The reset button will trip if the motor is 

overloaded. An excessive overload may be 

caused, for example, by too heavy a rider,  

too steep a hill, etc. Wait a few seconds then 

press reset button. Correct riding conditions to 

prevent overload

If motor does not engage, but makes a clicking 

sound - Replace Battery. If motor does not 

engage, no clicking sound - Replace Control 

Module

Short Ride Time/Runs Slow

Rider weight

Riding conditions

Battery not fully charged

Old/damaged battery

Tire is not properly inflated

Improper battery maintenance

Brake dragging

Do not exceed 120 lbs maximum weight limit

Use only on flat, dry surfaces. Avoid inclines 

and areas with heavy debris 

Charge unit for a full 12 hrs

With no weight on the unit, carefully lift up the 

back end; manually (and carefully, of course) 

spin rear wheel and apply throttle to engage 

the motor. If motor engages - Replace Battery 

Charge battery periodically when not in use

Tire will lose some pressure over time. Verify 

correct tire pressure

Do not store unit in freezing or below freezing 

temperatures. Freezing will permanently 

damage the battery and greatly reduce ride 

time. Refer to Page 5 Charging the Battery

Check the brake cable has 2-3 mm of slack at 

lever. Cables should NOT be wrapped around 

the handlebar stem. Adjust brake cable slack 

according to page 6 instructions

Runs Intermittently

Loose connection(s)

Check the wires around the throttle and 

connectors underneath the deck plate 

Replace - Twist Grip Throttle

*Unit(s) should be turned off and fully charged prior to doing any Troubleshooting

NOTE:

 All troubleshooting steps should be performed by an adult only

Summary of Contents for eSpark

Page 1: ...ing the throttle to engage motor NOTE Manual illustrations are for demonstration purposes only Illustrations may not reflect exact appearance of actual product Specifications subject to change without...

Page 2: ...and only use where allowed and with caution Do not activate the speed control on the hand grip unless you are on the scooter and in a safe outdoor environment suitable for riding The scooter must acc...

Page 3: ...oved safety helmet with chin strap securely buckled elbow pads and kneepads A helmet may be legally required by local law or regulation in your area A long sleeved shirt long pants and gloves are reco...

Page 4: ...IC SCOOTER The scooter has been built to certain Razor design specifications The original equipment supplied at the time of sale was selected on the basis of its compatibility with the frame fork and...

Page 5: ...he stem into the fork WARNING Failure to properly tighten the collar clamp may allow the handlebars to dislodge while riding and may cause you to lose control and fall When correctly tightened the han...

Page 6: ...freezing or below freezing temperatures Freezing will permanently damage the battery Run time Up to 40 minutes of continuous ride time Run time may vary depending on riding conditions climate and or...

Page 7: ...it is possible for an aggressive rider to run into a curb or a wall and wreck bend or break a frame Get into the habit of inspecting your scooter on a regular basis Tires Periodically inspect the tir...

Page 8: ...00 Rear Wheel Sequence 18 1 18 7 18 2 18 3 18 4 18 4 18 3 18 2 18 7 18 1 18 8 18 5 18 6 1 Using a 10mm wrench loosen the brake cable bolt q Front Wheel Replacement Tools required 10mm wrench and two 2...

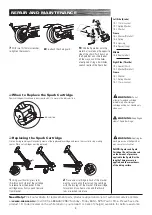
Page 9: ...attempt to replace cartridge immediately after riding as cartridge will be hot Handle only when cool WARNING Keep fingers clear of Spark Bar hinge Friction during sparking will eventually wear out the...

Page 10: ...harger supplied with the electric scooter should be regularly examined for damage to the cord plug enclosure and other parts In the event of such damage the product must not be charged until it has be...

Page 11: ...Replace Battery If motor does not engage no clicking sound Replace Control Module Short Ride Time Runs Slow Rider weight Riding conditions Battery not fully charged Old damaged battery Tire is not pr...

Page 12: ...le for better assistance 01 02 1 02 03 04 01 05 06 07 08 09 10 11 12 13 14 15 16 17 18 19 20 21 22 23 24 25 01 Handlebar Grip right left 02 Single Speed Twist Grip Throttle 02 1 Sleeve 03 Handlebar St...

Page 13: ...DECLARATION YOUR INSURANCE POLICIES MAY NOT PROVIDE COVERAGE FOR ACCIDENTS INVOLVING THE USE OF THIS SCOOTER ELECTRIC RIDE ON PRODUCT TO DETERMINE IF COVERAGE IS PROVIDED YOU SHOULD CONTACT YOUR INSUR...

Page 14: ...Design are among the registered trademarks of Razor USA LLC in the United States and or select foreign countries The manufacturer is not liable for incidental or consequential loss or damage due direc...

Reviews: