background image

B

A

a

B

C

C

4

Need Help?

 Visit our web site for replacement parts, product support and a list of authorized service centers 

at 

www.razor.com

 or call toll free 866-467-2967


Monday - Friday 8AM - 5PM Pacific Time. Please have the 

product I.D. code available for better assistance.

Set-Up and USage

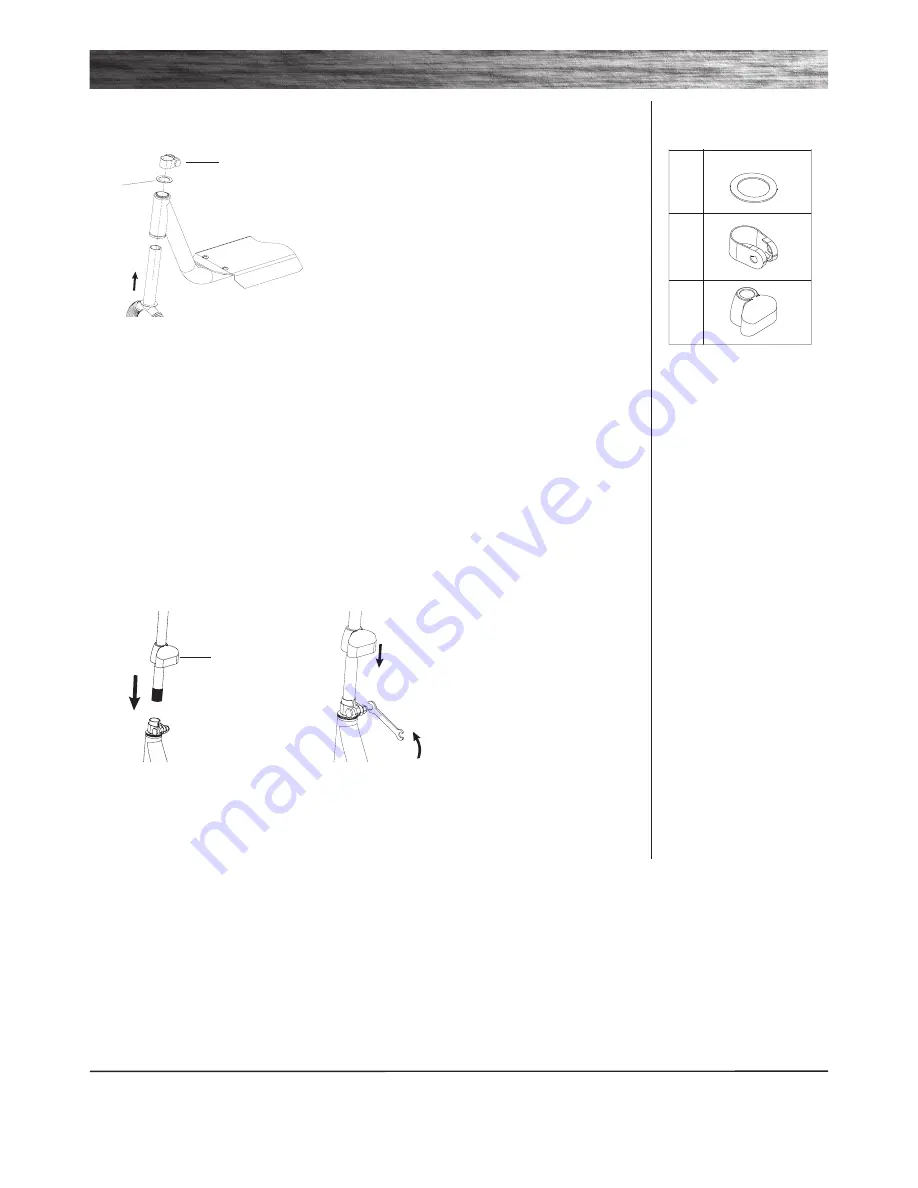
Attaching the T-bar 

Tools Needed: 13 mm wrench

1


Slide collar clamp cover (C) up 

to the middle of the T-bar. Insert 

the T-bar all the way down into the 

front fork.

Remove the black protective cover from the 

top of the fork. Using a 13 mm wrench, loosen 

collar clamp bolt and slide collar clamp (B) up 

the fork and remove. Remove washer (A) from 

fork. Insert the front fork into the steering tube. 

Slide washer (A) back onto the front fork. Slide 

collar clamp (B) back down onto the fork until it 

is sitting directly on top of washer (A).

2


Align the handlebars with the 

front wheel and using a 13 mm 

wrench, tighten the collar clamp 

bolt until the handlebars are 

locked securely into place. Slide 

the collar clamp cover down over 

the collar clamp.

Assembling the Front Fork 

Tools Needed: 13 mm wrench

Summary of Contents for LiL KiCK

Page 1: ...e note manual illustrations are for demonstration purposes only illustrations may not re ect exact appearance of actual product Speci cations subject to change without notice please have your 22 chara...

Page 2: ...ooter Close adult supervision recommended Rider weight does not necessarily mean a child s size is appropriate to fit or maintain control of the scooter A parent s decision to allow his or her child t...

Page 3: ...e your scooter was partially assembled and packed at the factory there should not be any problems even if the box has a few scars or dents WARNING DO NOT USE NON RAZOR PARTS WITH YOUR SCOOTER Razor sc...

Page 4: ...g washer and washers x3 from one side of the axle bolt Insert the axle bolt through the rear wheel Insert the large washer 3 5 onto the axle bolt between the frame and rear wheel and slide the axle bo...

Page 5: ...he front fork 1 Remove the black protective cover from the top of the fork Using a 13 mm wrench loosen collar clamp bolt and slide collar clamp B up the fork and remove Remove washer A from fork Inser...

Page 6: ...Lil KICK PARTS 1 Handlebar Grips 2 Handlebar Pad 3 Handlebar 3 1 Bolt x2 3 2 Spring Washer x2 3 3 Nut x2 4 T bar 5 Collar Clamp Cover 6 Collar Clamp 6 1 Bolt 6 2 Spring Washer 6 3 Lock Nut 7 Washer 8...

Page 7: ......

Page 8: ...or your records save your original sales receipt with this manual and write the barcode number below __________________________________________ Item Number Blue 13014940 Pink 13014961 US_131104 Safety...

Reviews: