6
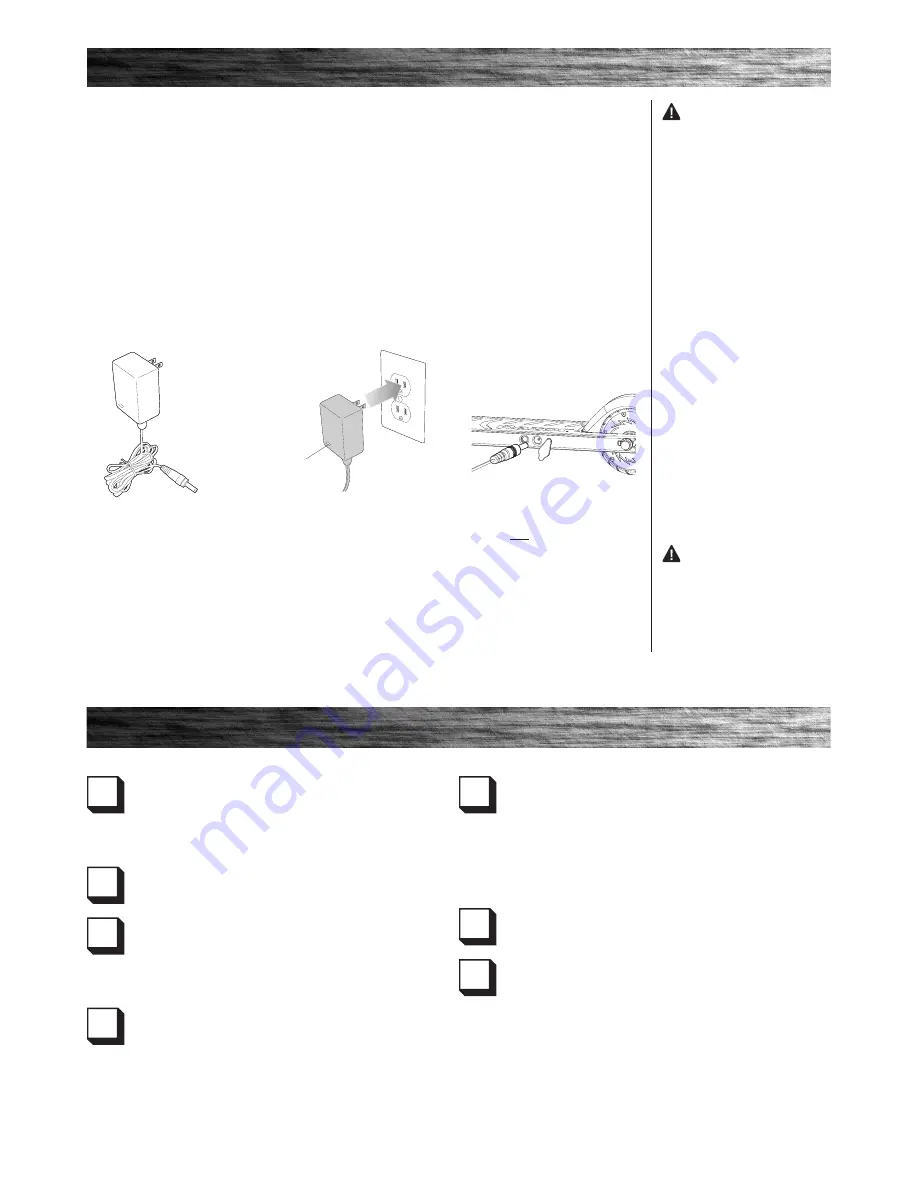
CHARGING THE BATTERY
WARNING:
Use ONLY
with the recommended charger.
Batteries are only to be charged
under adult supervision. The charger
is not a toy. Always disconnect the
charger before wiping down and/or
cleaning the Power A
2
with a damp
cloth.
The charger supplied with the
Power A
2
should be regularly
examined for damage to the cord,
plug, enclosure and other parts.
In the event of such damage, the
Power A
2
must not be charged until
it has been repaired or replaced.
Chargers have built-in overcharge
protection to prevent battery from
being overcharged.
Wall outlet - Green (stand by)
Wall outlet and product -
Red (charging)
Wall outlet and product -
Green (charged)
Note:
Continue charging product
even if light turns green prior to
3 hours.
WARNING:
Battery charge
can deplete over time. Periodically
recharge battery when not in use.
Your Power A
2
may not have a fully charged battery; therefore you must charge the battery prior to use. Be sure to
charge the battery in a clean, dry location away from direct sunlight, flames or sparks.
• Initial charge time: 4 hours.
• Recharge time: up to 3 hours, even if the light
turns green. Recommended maximum charging time
is 24 hours.
• Always charge the battery immediately after riding.
• Fully charge battery before storing for extended periods
of time.
• Unplug charger from the wall outlet when not in use.
• Failure to recharge battery periodically may result in a
battery that will not accept a charge.
• Make sure the power button is turned
OFF
when
product is not in use. If the power button is left on for
an extended period of time, the battery may reach a
stage at which it will no longer hold a charge.
• Run time: Up to 40 minutes of continuous ride time.
Run time may vary depending on riding conditions, rider
weight, climate, and/or proper maintenance.
• Constant starting and stopping may shorten ride time.
• Battery life can vary depending on proper maintenance
and usage of the product.
• Do not charge at or below 32°F (0°C).
2
Note:
Make sure power button
is in the
OFF
position. Plug the
charger into the charger port. The
light on the charger should turn
red during charging. The light will
turn green again when charging is
complete.
1
Plug the charger plug into wall
outlet. The light on the charger
should be green.
Note:
If green light (LED) does not
turn on, try a different outlet.
Charger
(Note: Charger design may vary from
one shown)
LED Light
PRE-RIDE CHECKLIST
Brake
Check the brake for proper function. When you step on the
rear-fender brake, the brake should provide positive braking
action. When you apply the brake with the throttle on/engaged,
the brake cut-off switch should cut power to the motor.
Wheels
Periodically inspect the wheels for excessive wear.
Frame, Fork and Handlebars
Check for cracks or broken connections. Although broken frames
are rare, it is possible for an aggressive rider to run into a curb
or object and wreck, bend or break a frame. Get in the habit of
inspecting your scooter on a regular basis.
Hardware/Loose Parts
Before every ride, check all parts, such as nuts, bolts, fasteners,
etc., to ensure they are secure and assembled correctly. There
should not be any unusual rattles or sounds from loose parts
or broken components. If the product is damaged, do not ride.
Reference “Safety Warnings” on pages 1 and 2 of
this manual.
Safety Gear
Always wear proper protective equipment, such as an approved
safety helmet (with chin strap securely buckled), elbow pads,
and kneepads. A helmet may be legally required by local law or
regulation in your area. A long-sleeved shirt and long pants are
recommended. Always wear shoes and keep shoelaces tied and out
of the way of the wheels and motor. NEVER RIDE BAREFOOTED OR
IN SANDALS.
Laws and Regulations
Always check and obey any local laws or regulations.
Insurance
Do not assume that your existing insurance policies necessarily
provide coverage for product use. Check with your insurance
company for information regarding insurance.
Summary of Contents for POWER A 2
Page 2: ......


