11
1-877-519-9090
INSTALLATION INSTRUCTIONS
Step 18:
Route the driver side door trigger wire (brown) towards
the driver side b-pillar. Route the passenger side door trigger
wire (white) under the center console and over to the passenger
side b-pillar. Route the black disable switch wires to the center
console.
Step 19:
The door trigger sensor harness will need a ground
connection to the vehicle. Locate the seat belt assembly at the
driver side b-pillar and install the ground wire under the top bolt
of the seat belt assembly.
Step 20:
Connect the snap in bullet connector to the brown wire
on the passenger side.
Step 21:
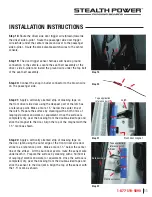
Apply a vertically oriented strip of masking tape on
the front driver side door using the deepest part of the latch as
a reference point. Make a mark 1.5” below the center line of
the latch. Prepare the surface by cleaning with a 50/50 mix of
isopropyl alcohol and water or equivalent. Once the surface is
completely dry, peel the backing from the double-sided tape and
stick the magnet to the door. Align the top of the magnet with the
1.5” mark as shown.
Step 22:
Apply a vertically oriented strip of masking tape on
the door jamb using the outer edge of the front driver side door
striker as a reference point. Make a mark 1.5” below the center
line of the striker. Lift the bulb door seal to route the sensor wire
underneath it. Prepare the surface by cleaning with a 50/50 mix
of isopropyl alcohol and water or equivalent. Once the surface is
completely dry, peel the backing from the double-sided tape and
stick the sensor to the door jamb. Align the top of the sensor with
the 1.5” mark as shown.
Step 19
Step 20
Step 21
Front door magnet
Latch
Striker
Tape application
reference point
Tape application
reference point
Bulb door seal
Front door sensor
0”
0”
1.5”
1.5”
Step 22


